Detailed Natural Color Wig Install From Start To Finish | Straight Frontal Wig | Brennas Hair
- Posted on 08 March, 2023
- Lace Closure
- By Anonymous
[OPEN FOR DETAILS] Hey loves! Thanks for tuning in! =) I received this Straight 13x4 lace front wig from BRENNAS HAIR and honestly it was a hit!! I hope you enjoy the video and let me know what you think in the comments! XO.
- L I N K S -
Use my code to get 10% off, Code: Mayra
●▬▬▬▬▬ ❤ #Brennas Hair ❤ ▬▬▬▬▬●
☛Link to the wig: https://bit.ly/3WODGdT
Hair Info: 22 inch natural color straight lace front wig
★ 22 inches
★ 180% density
★ Swiss HD lace
★ 30 Days Free Return
●▬▬▬▬▬ ❤ Contact Brennas Hair ❤ ▬▬▬▬▬●
Instagram @brennas hair: https://www.instagram.com/brennashair/...
YouTube @brennas hair: https://bit.ly/3oNBq7k
Facebook @brennas hair: https://www.facebook.com/brennashairfa...
Tiktok @brennas hair: https://www.tiktok.com/@brennas_hair_b...
Inquire Now: WhatsApp number: +8615238076772
#brennashairreview #brennashairwig #brennashair #13X4lacewig #wiginstall #humanhair #cheaphumanhairwig
♡ ♡ ♡ ♡ ♡ ♡ ♡ ♡ ♡ ♡ ♡ ♡ ♡ ♡ ♡
LET'S STAY CONNECTED LOVES ♡ XO
I N S T A G R A M | https://www.instagram.com/beautywmayra...
T I K T O K | @itsmayraela
♡ ♡ ♡ ♡ ♡ ♡ ♡ ♡ ♡ ♡ ♡ ♡ ♡ ♡ ♡
.
.
.
THIS VIDEO IS SPONSORED. HOWEVER, ALL THOUGHTS AND OPINIONS ARE FULLY MINE.
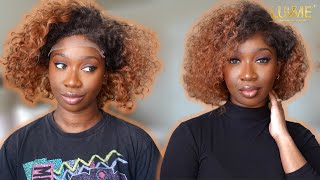
Foreign Brenna's hair - this is the Box. The week came in. It also brought all of these little goodies, and this is the hair I'm gon na be trying. Today it is a 22 inches natural colors, straight lace, front wig. I already bleached the knots and plucked the wig a little bit, so I can just move on to installation I'm going to start by putting some foundation on the lace to make sure it matches my skin it's. This is not a mandatory stuff, but I always recommend people to put some foundation, so it matches with the skin. And then I went ahead and I put my wig caps. I'M gon na use a black cap just to secure my hair, because I did not do a breakdown for these installations. I was being lazy and then I'm gon na put just a regular tan recap on top and I'm gon na also put the same Foundation. I use for my wig for the it for the lace on the on the wig cap. You know I'm also not going to be doing um no ball. Cap method I like to do ball. Calf methods. However, I only do it when I know that I'm gon na have the wig on for for a little bit longer than just a day or two so for today, I'm just gon na do um Regular cap installation. When I'm done putting Foundation, I'm gon na go ahead and take a little alcohol pad and I'm gon na clean, my forehead in the area where I'm gon na be gluing the wig to make sure it doesn't have any. You know build up from the foundation foreign. So this is a close-up of the wig, as you guys can see. As you guys can see she it's pretty. I did not do too much plucking, I feel like this is just enough plucking and it looks perfect. I also bleached the knots and it took me two tries I don't know why, but the first time I tried to bleach the knots it did not pick the color but anyways you did it the second time. So the next step it's gon na - be to cut the extra lace on the sides, so it can be around it can fit around my ears correctly and then I'm gon na do small sections. I usually work in three sections, but I also wanted to show you guys that you can do multiple sections if you're a beginner and you wan na you know, make sure you're being precise and neat with your work. Working in sections is always the best idea. If you're a beginner just to make sure you don't get that many mistakes, I'm using eBay spray to um to glue my weight just because you know you guys already know the drill, that's what works! For me, foreign. I like to start installing my wig from The Middle section to make sure I get it. I get the weak centered and it's all where it's supposed to be, and basically what I'm gon na do is just repeat the same step in every single side. Just like a three I'm gon na do like three coats of the spray I'm gon na make sure I dry the layers of spray from time to time to make sure it's tacky and then, when it's ready, I'm gon na go ahead and I'm gon na put The lace in place and press down with the red tail comb and my blow dryer foreign, difficult baby. I remember talking to me baby, as you guys can see here. I am basically done gluing, my wig. You want to make sure the glue is completely dry before you even cut the lace or you put an elastic band. This is a close-up of how the wig looks like all glued down literally melted down so nicely. I love eBay lace and this wig is just so easy to install. So the next thing I'm gon na do is cut my lace um. I do this like, as, as I explained in a few other videos, I cut my lace before putting my elastic band because after because that's how I get less lifting - and I also did not do any baby hairs with this wig because you know sometimes when it Comes to there's something about straight hair and no baby hair that just you know, drives me crazy. I love it. So, as you guys can see, I did get a little bit of lifting mostly close to my ears and that's completely normal. What I'm gon na do is take some spray and put it on the end of my rat tail comb and then slowly apply it on the areas where it's needed and I'm gon na make sure it's all dry before I can move on to anything else. Okay, this was surprisingly a very easy installation. I don't know why. Maybe it's because I just did the bare minimum, but, like honestly when the hair is nice, like you know, the hair is so soft like this. Is the hair without me even like flat ironing it or anything like that? I literally like I bleach the knots pluck the wig, and then I washed and dry it and let it air dry, and this is what it looks like it literally looks like I already did some work on it. The hair stayed straight the whole time and it was just so easy foreign I'm going to start by pressing down the way, because we don't want no bulky wig like it's 2023. We don't do that like we don't do that point blank period, so I'm gon na use my hot comb and I'm gon na press down the the week at the top, so it can be as flat and natural looking as possible. Um honestly, I was being lazy. Usually I work in sections, but I was being so lazy and I was like you know what this is straight: hair and the hair, it's literally already so silky. It'S not gon na. Take me that much time to do it in one pass and as you guys can see it worked out, I did not have to work in sections. I did put the wax stick in sections though, but I just pressed it down all at once, because I was just being lazy but anyways. I'M just gon na go ahead and repeat the same thing on the other side and then I'm gon na go ahead and put my elastic band foreign. I remember to you on my mind. I want this to style the hair, I'm just gon na go ahead and press it down a little bit more with my flat iron, I'm using bio silk as a heat protectant today, but anyways guys, um. We are reaching the end of this video. As you guys can see. This hair was easy to install. It was easy to style. It looks amazing. The lace melted so nicely um, I forgot to mention, but it's a sweet, sweet HD lace, so yeah get into it. Um this is how the hair looks. At the end it looks so beautiful, I'm so happy. I got to try this wig um. I was a little bit skeptical at the beginning, like I said it took a little bit long to bleach the knots, but it might have been my products because there's the the results were beautiful, as you guys can see. This is what the hair looks like after flat ironing it. This is how melted the lace looks like and yeah guys. This is absolutely everything. I'M gon na have all the information in the description box, and I will see you guys on my next video. Don'T forget to subscribe like and comment if you like this video and check out my other social media, I will have it somewhere here on the screen. Love. You love you so much much bye, foreign


Comments
DivaNy hair: