Step By Step Updated Bleaching Lace Frontal Knots Technique| Beginner Friendly
- Posted on 22 July, 2022
- Lace Closure
- By Anonymous
DIY: How To Bleach Knots Perfectly Natural
Look Beginner Friendly | Step By Step
Instagram.com/blessedbethemane
18” hd frontal https://www.blessedbethemane.com/produ...
Myspace by kimengumi https://soundcloud.com/kimengumi
Creative Commons - Attribution 3.0 Unported- CC BY 3.0
Free Download / Stream: https://bit.ly/myspace-kimengumi
Music promoted by Audio Library https://youtu.be/6eAZ-
HAEdOs
Track Info:
Title: Myspace by kimengumi
Genre and Mood: Hip Hop & Rap + Bright
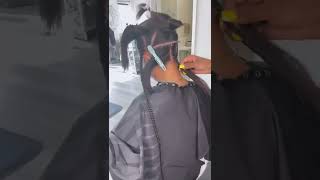
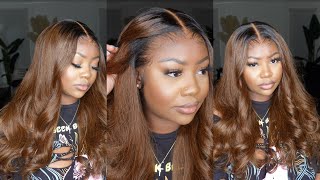
Hi and welcome to my channel that's so blessing today, i'm not even showing you how to bleach knots, i'm showing you how to give the girl scalp i'm going to be breaking everything down, step by step and guess what it's beginner friendly. Where else you want to get that at stay tuned, the bleach i'm using today bw2 - and this is how much bleach i'm putting i'm sorry. I lost the little measuring cup that comes in the thing. I typically don't use it. I wanted to use it for the other day, but i don't have it so that's how much i have in my bowl and now i'm going to follow up with developer, i'm using salon care in 40 developer just a little bit at a time. I'M pretty much. Just going to stir and look for a thick consistency like toothpaste, stirring this is what my consistency looks like it's really not moving at all, so i'm going to add a little bit more developer because i need to be able to like spread it easy. This is the consistency i'm looking for it's not falling off too easily and then off. When i shake it, if you can shake it real crazy and nothing comes off, it's too thick. So now what i'm going to do is flip it over and comb all the baby hairs backward. You can use a little bit of hairspray to help you, but you pretty much just want to make sure those baby hairs are out of the way. So we are only bleaching. The knots what i like to do is gather most of the product products on the tip of my brush. It'S the part of the brush, i'm going to use the most, so i got most of it on tip of the brush and i'm going to lift the frontal up and i'm going to start in the back, because that's where, like the bigger knots, usually are - and I'M going to work my way to the front, starting from the back, also allows me to kind of get a feel for the consistency to see if i need to adjust it or adjust. Like my pressure before going in the front where the baby hairs are the part, that's going to be like most visible, i'm not pushing hard at all, i'm applying the bleach on as many knots as possible. It'S okay! If you don't get all of the knots, your focus should be basically like your pressure. I did get some on the hair, that's okay! You can worry about that later. I'M just slowly working my way towards the hairline and what i like to do is go a little in front of the baby hairs just to make sure that you have them all covered so like i'm almost out of product. So what i'm gon na do is wipe the excess on the edge of the bowl and then put it back on the tip of my brush, because when your product gets low and you start using the um, the bottom bristles, i find that it's usually too much Pressure and you get like see-through, and we don't want that - my pressure is pretty light if you feel like you're having a hard time spreading it, you may want to add some more developer outside of that. Just pretty much take your time ready. So this is how we're looking now, i'm going to flip over and just double check my saturation make sure that only the knots are covered, which is the case like you can look see you can kind of look in between and see that like just the knots Are covered, we didn't get any of the hair, which is as far as the hair, the bleach that got on the hair, i'm just going to write that away so just using a damp paper towel wiping that away! I'M going to leave this just like this! I'M going to check it at 20 minutes and then from there i'll see how much more time is needed, because i'm not really going bad time. I'M looking i'm going by how the knots look. Okay, guys! Let'S talk about some tricks in terms of knowing when your knots are ready, it's inevitable that you're going to get like a few strands in the bleach when you're bleaching the knots. So i don't know if y'all are going to be able to tell, but this strand is like a it's like a golden blonde like a it's. Basically light brown, okay! So now i'm going to flip it over and i'm going to take a look at the knots. So, like the knots are like an orange brown, but when i part deeper, i feel like i want to see um lighter knots, so i'm just going to leave it for a little bit longer. At this point it has been about eight minutes which i'll be back. All right, so this is how we're looking it's officially been. 20 minutes. It'S like they're, a orange, if i'm being on this orange i'll, go ahead and wash it out. This is how we're looking this exactly why it is important to tone, because it's giving orange, i mean some people like this. If you like this, you know no shade. I'M gon na go ahead and wash it i'm gon na use garnier fructis. So now i'm going to tone um i'm going to go in with joyco uh purple balance joyco purple shampoo. I don't know here we go screenshot, so i'm just going to put some in my hole just enough for the lace to be submerged and then i'm just going to give it a twirl. Now make sure that water is nice and purple and then i'm going to let my um frontal soap, i can use a little more there. We go i'll, let you know how much comments is in there, because i know you're probably going to want to know kind of see the difference in the color and it's ready to wash out it's been about 20. These are our finished results. Look at what is giving on my arm, so just wait until you put it on your head. If there's anything i didn't cover, if you have any questions, feel free to leave me a comment. I'Ll get back with. You die

Comments
Nessa Mae: I LOVE thankyou ❤