Trendy Updo Pin Up Hairstyle On Perfect Fall 99J/Burgundy Lace Frontal Wig | Ft. Hermosa Hair
- Posted on 24 October, 2022
- Lace Frontal
- By Anonymous
⬇️ LINKS ⬇️
●▬▬▬▬▬▬▬▬♛#Hermosahair♛▬▬▬▬▬▬▬▬●
Direct Link ➤ https://bit.ly/3LmVIPw
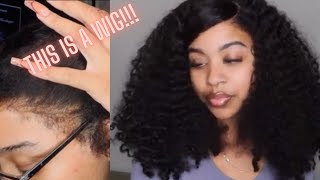
Hair Detail: 99J Body Wave 13x4 Burgundy Human Hair 22inch 220%
#Hermosahair Official Website: https://bit.ly/3LoCrNC
※ Buy Now, Pay Later with PayPal/ Klarna, 4 Interest-Free payments
More Best Selling Wigs:
Lace Front Wigs for Sale☛:https://bit.ly/3LspQJw
Invisible HD Lace Wigs☛: https://bit.ly/3dsmr0I
Hot Colored Wigs☛: https://bit.ly/3qNbPwl
❥Follow our social media:
IG @hermosahairmall : https://www.instagram.com/hermosahair...
FB @hermosahairmall : https://www.facebook.com/hermosahairma...
Email: [email protected]
Whatsapp: +86 13253731788
#AlyssaJalise
♡♡♡♡♡♡♡♡♡♡♡♡♡♡♡♡♡♡♡♡♡♡♡♡♡♡♡♡♡
♡ SHOP MY LASHES, LIP GLOSS, AND MORE: https://www.whosshebeauty.com
Social Media:
♡ email: [email protected] (FOR BUSINESS INQUIRIES ONLY!!!!)
♡ business ig: https://instagram.com/whosshebeauty
♡ ig: https://instagram.com/alyssa.jalise
♡ tik tok: https://www.tiktok.com/t/ZTR1m85oa/
Foreign lace, frontal unit and 99j burgundy, 22 inches and 220 density y'all she full y'all know I don't do things. But yes, I was super excited for this unit. This is the perfect fall. Color y'all know fall. Is here so get your fall. Units got ta, start bringing out the burgundies and the Gingers and all that good stuff chocolate, brown, okay, get your fall wigs, but yeah y'all. I got a good one. Today I tried the little pinup style, that's been trending lately I know y'all have seen it. I think I did pretty good on it for my first time so yeah, I'm gon na stop talking I'm gon na jump right into the video, because I want y'all to see how I pulled this together. Y'All cause I was struggling so yeah as always we're gon na start with the unboxing. Then y'all are gon na, see the install and styling portion, and then I will give y'all my review. So if you want to see all of that, then keep on watching all right y'all. I bet one of the voice over I'll, be showing y'all how I did this pinup style. So the first thing I did was flip the wig upside down to hot comb. All the hair downwards, or if the wig was upright, then hop combing. Everything up since this is a pinup style, so basically just training the hair in that direction, so it will lay flat and it'll be easier to style once we put it up in the ponytail foreign now, I'm taking the rat tail end of my rat tail comb And I'm just parting out a few sections for the back of the hair to help everything blend better. This is a 13 by 4 wig, so there are tracks, so we want to do our best to blend. All of that do not part in just one row of tracks. You know kind of skip a few, so it'll be easier to hide them so yeah. This is not a full lace. Wig we got ta hide these tracks. Also, I don't glue down or sew down the back of my wig, so this also helps you know, hide anything back there that may be going out now, I'm just taking my wax stick and my hot comb and hot combing. Again everything upwards in that direction. To train that hair to lay in that direction, I don't know why I didn't do that. The first time I had comb but whatever and then I'm also taking some got to be sprayed to Slit everything up into this ponytail we got ta lay it down, got ta, lay it down and, as you see, I'm just taking my rat tail comb to comb, That product through and comb everything upwards until I get it, how I want it also keep in mind that the only part that's in the ponytail right now is the tracks. I'Ve already separated frontal, so we're only putting the tracks in the ponytail right now. Now I'm taking rubber band and putting the hair in a ponytail y'all should know how to do a ponytail. I hope so anyway, if you're here I don't know how to do a ponytail. You got other problems, so this is where we're at now just put it up in a bun to keep it out of the way, and now I'm taking this temporary hairspray and the color burgundy. I got this at my beauty, supply store and I'm just spraying up in between. You see these little areas where the tracks are. That'S how you hide that I got this tip from slay by Jordan. Y'All know if you always come through with the tea and the tricks so yeah. That'S how you hide all that up in there and yeah here's the frontal again, I told y'all, I separated the frontal from everything. So it'll be easier for me to install and I'm just blow drying the hairspray in the back. So you know it ain't getting all over the place. So that was the hardest part to me. The hard Parts out the way now we're getting ready to install I'm just gon na go about my install as normal y'all should know this process by now. But if you don't, I did mention in my last video that if y'all wanted me to do a detailed, install, video and updated detail, install video - I will do that and I did get a comment, so I will be doing that next week. So y'all stay tuned for that right now, I'm just gon na do my little sped up version that I always do next week. Y'All will get the detail, install. I promise and also I left the frontal out again. I just wanted to reiterate that that I left the frontal part out, like the hair out, to make it easier for me to install, because if I slipped it all up in the ponytail - and you know when I be pressing the lace down into my glue, I Don'T want to mess up the ponytail doing that part, so I left all that hair out, but we're gon na stick it up in the ponytail with everything else. First time, foreign foreign, so the install is done now we're going to finish up styling. So I just part down the middle and I'm taking my wax stick and hot combing. Those two sections that will be in the front y'all know the pieces that are here in the front that you saw in the intro. That'S the sections we're parting out right now. So yeah, I'm just taking my wax: stick: hot combing everything parting out those sections and making sure that's flat. I should have made these sections bigger and now that I think about it. I didn't realize it to wait after the fact - and I don't know why, because I was looking at inspo picks of this style for over a week, but these sections should have been bigger. There'S nothing wrong with how it looks, but I personally want a little bit bigger and I didn't even realize until after I was doing the video but yeah, I'm just taking these sections and clipping them out the way. So I can do some quick sideburns. I don't really do edges anymore; they just get on my nerves, I'm already not good at them. If it's one thing, that's going to stress me out about the install is trying to do some baby hairs or some edges. So I really don't do them anymore. It'S really not necessary for me. I just do some quick sideburns to be done with it. I do like to do a little bit more baby hairs when I do curly hair for some reason. Even then, I'm always do it, but yeah I'm just doing some quick sideburns, that's besides the point and then we're gon na get started on putting the rest of this hair up in the ponytail s. Okay. So it's basically the same process as before. When we did the ponytail with the tracks, I'm just taking my wax stick to help everything lay down and hot combing everything towards the ponytail in the direction it will be, laying so yeah, that's really all I'm doing, and I'm gon na put a rubber band around It and put it in the ponytail with the rest of the hair. That'S it all right now for the curls, I'm just taking my wand, curler and curling little sections taking a bobby, pin and pinning it in place. Basically like pin curls, you know how to do. Pin curls, that's basically what you're doing in some sections I leave out a little more hair, hang out the bobby pin. So it's like you, know little curls falling here and there just making it look a little bit more messy. I guess, but that's all you're doing you're just taking sections little small section, other ponytail curling it pinning it down. That'S all you're doing this is the easiest part of this hairstyle to me, y'all like that ponytail. That'S what killed me stressed me out trying to get that back straight and get everything all neat and nice and hide them tracks and all that in the back. That'S what killed me! That'S! What took me the longest! The front didn't even bother me when I tried to put the frontal part up in the ponytail that didn't take me long at all, but that bat killed me. This part right here, you home free when you get to this part. It'S the easiest part, especially because the way I did my pinup style is more of a messy look. I know a lot of people are doing them like that, but yeah. That also makes this part super easy because it's not like it has to be perfect or anything because of a messy look. You know what I'm saying you know: semi messy semi. You know you get what I'm saying, but yeah we're just going to be curling everything. That'S left that you see straight we're curling it foreign, what we have all right so now, I'm taking my razor comb for those back pieces that we parted out at the beginning of the video and just trimming those down just to give it. You know that, like you know those shorter hairs that be in the back that didn't make it into the ponytail. That'S the look it's supposed to give and we are done girl. Now, let's get into this review all right y'all if y'all just saw the unboxing, install and styling portion of this video and I'm gon na give y'all my review on this girl. So, let's start with it, she's big here from you or not y'all know I got ta, give y'all that she is big hair friendly. I had no problems getting her on no fighting, nothing like that. So that's a plus, always for me the lace was really easy to melt easy to work with, as y'all can see or don't see, yeah yeah he's not there, it's not there. This is my hair but yeah the lace easy to work with, and it's giving me 13 inches ear to ear. It does touch both of my ears and my four inches back tangling and shedding it doesn't tangle, but it does shed a little bit. Y'All know color units tend to shed a little more so it does. That was one issue that I had with it. Also when I was plucking the unit, I think I showed y'all after the unboxing or during the unboxing, the hairline before and after I plucked it. Y'All I was having a hard time y'all. This is one of them wigs with those stubborn knots that act like they don't want to come out. I was literally like ripping at these knots trying to get them out, but I finally pulled it together, but that's another thing that I had a problem with was the knives being stubborn. They didn't see, like I said in the intro, is 220 density and she's full. Very full - and I love to see it. Usually companies don't like to send me like the thicker densities, for whatever reason, but they were kind enough to send me a 220 density, and I was very grateful and appreciative of that, because y'all know I don't do thin. You know I don't do that so no issues there she's very much full just perfect for this hairstyle, because you got to have enough hair to do updos and hairstyles like this. You got to have enough hair so perfect for this hairstyle the length. I can't really do a link check, obviously, because all the hair is up, but I feel like it was given 22 inches when it was down. So we'll just say it past the link check test. I don't think I really had any issues with it bleeding like. I know I had a burgundy wig before that, like bled all over my hands when it was wet or when I spread it. What got to be sprayed. I didn't have that issue here. I didn't see any dye on my hands, so that's good and I really think that's everything y'all, that's really all I have to say so. Overall, I'm gon na give this unit an 8 out of 10.. Like I said, the only issues I had was the shedding, which is normal for color units, but it is something to consider and the knots being stubborn when I was plucking, but that's really it sharp other than that. I love this unit like I really recommend it for the fall, especially like the full 220 density definitely recommended for the fall, if you're into color and looking to try some this fall here, you go and it's not a bright burgundy either. I know some people get a little scared of color because you know the bright, colors and stuff like that, but this is more of a darker burgundy, so this may be more your speed, so yeah definitely recommend it. If you want to purchase unit for yourself, the link will be down in the description box below as always and be sure to check for a coupon code, because there usually is one so check just in case and that's all I got for you guys so yeah. Let me know what y'all think of the style. Let me know how y'all think I did on it. Well, that is it for this video. You guys hope you all enjoyed don't forget to like comment and subscribe to your girl Channel. Please and thank you and make sure your post notifications are awesome. You don't ever Miss what I post, because you don't want to do that. You don't want to do that so make sure your post notifications are on I'll, see y'all in my next video bye, good
Comments
Alyssa Jalise: How did I do on this pin up style? Also go watch my tik tok on it link in description
aviiionn: the color is pretty on your skin ❤️..
Jo Termunde: Very cool..love the color..have a good one..
Ms. Shabria Gxo: