Installing Tape In Hair Extensions On My Type 4 Natural Hair Ft. Elfin Hair | Ariannalyf
- Posted on 02 October, 2022
- Clip-in Hair Extensions
- By Anonymous
*WATCH IN 4K.*
INSTALLING TAPE IN HAIR EXTENSIONS ON MY TYPE 4 NATURAL HAIR ft. Elfin Hair | ariannalyf
Subscribe to my channel to watch more: https://www.youtube.com/c/Ariannalyf
#ariannalyf #tapeinhairextensions #tapeinextensions #type4hair #diy
----------
TIME STAMPS:
Unboxing | 0:25 - 1:06
Section the leave out | 1:06 - 2:24
Silk pressing the bundles | 2:24 - 5:39
Installing the tape ins |5:39 - 13:17
------------
**HAIR APPOINTMENTS**
Florida Panhandle
https://hairbyariannalyf.as.me/
-----------
SOCIAL MEDIA ✨:
Instagram - https://www.instagram.com/arianna_lyf/...
Facebook - Arianna LYF
TikTok - ariannalyfofficial
Wigs, Bundles, & Educational Tutorials - https://ariannalyf.com/
-----------
VISIT MY AMAZON STORE:
https://www.amazon.com/shop/arianna_ly...
-----------
CAMERA EQUIPMENT: *i receive a small commission*
- Sony Alpha a6500 - https://amzn.to/3Sv78TJ
- Lens - https://amzn.to/3UFKGZS
- 4k memory card (128GB) - https://amzn.to/3dHxrHz
- Sony Camera Remote Control - https://amzn.to/3rd5B93
- Display Monitor (for filming) - https://amzn.to/3dKDjzN
- HDMI to Micro HDMI cable - https://amzn.to/3dNRrYZ
------------------------------------------
MUSIC:
intro song - https://www.youtube.com/watch?v=NQ1zLY...
lofi songs -
♪ Sunflower (Prod. by Lukrembo)
Link : https://youtu.be/aoL_cSU1Xtw
--------------------------------------------------------------
#aestheticmusic #royaltyfreemusic #lukrembo
--------------------------------------------------------------
♪ Rose (Prod. by Lukrembo)
Link : https://youtu.be/XIhyti2Qa74
--------------------------------------------------------------
--------------------------------------------------------------
♪ Onion (Prod. by Lukrembo)
Link : https://youtu.be/KGQNrzqrGqw
--------------------------------------------------------------
☆☆☆☆☆☆☆☆☆☆☆☆☆#Elfinhair☆☆☆☆☆☆☆☆☆☆☆☆☆☆
Hurry Up!! Gift coupon code is ONLY valid for one month. Don't Miss!!
❤Get Same Free Wig Kit Gifts(valued $39), use coupon code: "GFAR"
✨Hair info:80pcs 22Inch Tape-In Human Hair Extensions Kinky Curly
✨Direct link for video tape in kinky curly hair extension : https://bit.ly/Arianna_lyf
❤Other Highly Recommend Hot Sale Items:
✨Affordable No Glue No Lace Headband Wigs: https://bit.ly/3LO8wxS
✨Hot Popular Precolor Lace Front Wigs: https://bit.ly/3KMMl9K
✨Cheap 100% Raw Human Hair Bundles: https://bit.ly/3vGOAHv
✨High-quality & Invisible HD Lace Wigs:https://bit.ly/3ai1JOZ
✨Follow Elfin hair for giveaway:
Facebook---https://www.facebook.com/elfinhair
Instagram---https://instagram.com/elfinhair/
Tiktok---https://www.tiktok.com/@elfin.hair
Youtube---https://www.youtube.com/c/ElfinHair
✨Contact for wholesale:
Wholesale business WhatsApp: +86-17264053306
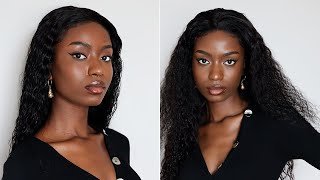
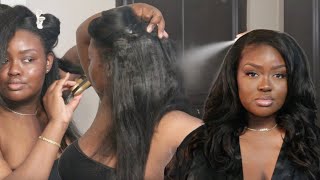
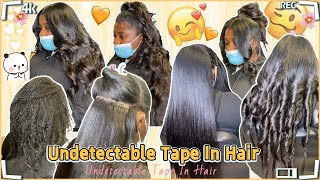
Thank you, hello, hey guys, my name is Ariana and welcome to my YouTube channel. If you are a new subscriber welcome and if you are a returning subscriber welcome back so we're gon na jump right into this video, today's video is sponsored by Elfin hair company. Thank you so much for sponsoring me and partnering with me. This is a wonderful opportunity. Y'All they sent me so much stuff, as y'all can see in this unboxing part y'all see all the little things that they sent on the screen. It'S too many things for me to name this fast, so just watch them on the screen. Y'All they sent a lot, but the main things I use for today's video is the extensions the tapings and the comb, as you guys can see in honor of fall and it being a little bit cold outside. I wanted to Silk press my hair and I also needed a trip so for today's video we're starting on silk pressed hair, I wanted to Silk press my hair because I thought it was going to be way easier when it comes to parting and installing the tapings. Seeing as how I'm doing this on myself - and it was my very first time doing - tapings I didn't have time to be fighting with my hair. I parted out the Outer Perimeter of my hair and, as you guys see, I'm putting the comb behind the section of hair to see. If I can see the comb through my hair. If you can see the comb through your hair, you need to section off more hair that way the tape ends will be undetectable. I learned that trick from Slade by Jordan. I don't know if y'all watch him on YouTube, but he is amazing when it comes to hair wigs, just everything y'all need to watch this channel if y'all love it same thing in the back as far as parting, you want to part it out to where the Tape ends will be undetectable. It was kind of difficult for me to do this because I cannot see behind me. It was very hard to know if I was parting out enough hair, but we made it work when it comes to wearing extensions with my natural hair. I have noticed that kinky, curly or kinky straight are my go-to textures. As far as it looking the most natural today, I wanted to use design Essentials, silk press series. I love their system, it works so good on my natural hair, as well as on a lot of my clients, natural hair, and it also works on my bundles. I'Ve noticed my straightening processes or silk presses on Kinky Curly bundles last a lot longer when I use design Essentials, it works great. So if you guys want to rock your own silk press, definitely click the link down below to my Amazon store and I have all of the design Essentials: silk press products in the store, so there you go also definitely pause the video and read the tips that I have on the screen because I can't say everything in the video as far as my thoughts and feelings on this entire blowout process, it was kind of difficult to do this, not gon na lie, as y'all can tell I'm, holding the hair in one hand and Blow drying it with the other y'all, it was definitely tough. So if you guys are doing tapings, I don't know if y'all seen on Instagram but there's this product, that's around I'ma, see if I can link it down below in the Amazon store, but there's this product that you can put the tapings on and it's almost like A hanger and it can hold your tape in for you, so your blowouts will be a lot easier to do. Also tip right here. Y'All saw that white can of spray that I was using Sebastian shaper spray. It is anti-humidity, they have different strengths, so they have a white one and a black one I like either or for silk presses, but it pretty much repels water. So your hair doesn't frizz out as fast. That'S one tip that I wish I would have learned so much sooner when it comes to rocking my hair straight because I live in Florida. So humidity is real out here and I will always sweat my hair out as soon as I leave out of the salon or honestly, I will still be in the chair, and sometimes my silk presses are already frizzy, but the spray is what will help your hair? Not do that so y'all definitely need to get the spray. Also, this clip that is on the screen is in real time. Yes, I am pressing the hair that slow with the comb, so I can do the chase method, but it it's a lot of hair. Not gon na lie to you. So if you were doing somebody's real hair, you would want to take smaller sections and still take your time doing the past, but I only do one pass so once we go over it, that's it ain't no repeats baby. So, yes, take your time get the comb. Do the chase method also, the flat iron is set to 450, very scary, but hey one pass and it gets your hair straight for the first time, so we don't have to keep going over it. Also, I'm not using a lot of tension on the flat iron as I'm going through the hair, I'm not squeezing the flat iron like a death grip. No, you don't have to squeeze it that tight. Honestly, that is what causes heat damage is too much pressure and tension on the hair, while it's under Heat, so yeah just make the normal pass like you should at the end of the flat ironing, I went back over it with the serum that is in the Design Essentials series and that's what the bundles look like. You can also spray it again with the anti-humidity spray just to prevent fruits on to the hard part. As you guys can see, there is a diagram on the screen. I got it from Pinterest. This is the closest that I could find to the method that I use to install my tapings to simplify things. You want to place the tapings in a diagonal angle, 45. Degree angle. That way, whenever the hair is down, it will lay flat, but also, if you want to pull your hair up into a ponytail, it will also lay flat in the crown area of the head. You can place. Some of the tape ends horizontally, like in the head diagram on the left side of the screen. You can place them horizontally and it does work um. It really just depends on where you're at on your head. Some tapings need to be placed diagonally and other tapings. Can be placed horizontally so now we are on to installing the tapings on my hair and, as you guys can see, I'm already on the front. I could not film the back. I tried I'm so sorry. I tried to film the back. It was very, very difficult what you guys see me doing right here is showing you how to apply the adhesive to the tapings. Basically, the tape vents come with a white strip on it. You peel the strip off you get the blue strip, peel. That off of the paper put the blue strip on the tape ends, and then you peel off the little blue tabs and voila there you go. You have a tape in ready to be installed so back to me struggling. This is going to be the tape in install video, where I show you what not to do, because this was my first time trying it. For example, do you see how close I just placed that tape into my scalp yeah? Don'T do that make sure that you place the tape ends a little bit further away from your scalp, because it's gon na pull and it's gon na hurt. It almost feels like have you ever had like one or two strands of hair being pulled, and you cannot find where the strands are at. That'S what it feels like all over my head because of how closely I place. The tape ends to my scalp. So next time I do a taping install, I will install the tape, ends either half an inch or three quarters of an inch away from the scalp y'all. Don'T be scared by this clip. The flat iron is not on. I just didn't, have any tape in pliers. There'S some tool that people use with tapings to install - I didn't have that, so I just squeeze it together with a flat iron that was not on once. I was done with that. I took another small section, as you guys can see, and this is how skinny I preferred my sections to be for the tapings. I think you can do them a little bit thicker, but I was running into an issue where it was too much hair that I was trying to sandwich together and it wasn't allowing the adhesive on both sides of the tapings to squish together. So it can actually be properly installed if that makes sense, so you just want to take a teeny, tiny section of hair and sandwich the tape ends together. That'S honestly, the best way I know how to describe it verbally, but y'all see what I'm doing on the screen. It'S actually very easy to install them. It'S just a awkward hand and arm angle, if I'm being honest again, there's more tips on the screen so feel free to pause it and read those if you're interested but yeah. I basically just put the tapings in wherever I felt the need, but then in hindsight I was like hmm. If I wanted to wear a side part, I should have installed the tapings a little differently, but that's okay, because again I love these tapings they're amazing. So I'm definitely going to reapply buy these as y'all can see how happy I am on the screen. I was realizing how good these look and how how closely it mimics my natural hair. That'S the part that I love the most because it's exciting I can wear all of my natural hair out and I can have extensions and my ponytail looks great and it's just great. I don't have any braids in my hair. Like I just love this, it looks so good, but in hindsight I definitely would have appreciated the deep side part now that I'm looking at it, I'm gon na let y'all Vibe out to the music for a little bit and then I'm gon na come back on The screen whenever I need to tell y'all another tip, okay, foreign foreign, at this point in the install I was like uh. Oh, I only have a few tapings left and I still have all this leave out as y'all can see in the back. It'S looking a little crazy back there, so um, that's the other reason. I didn't film the back and I can't even do like a middle part. Listen mistakes were made and we're definitely going to reinstall these in the future, with more knowledge, so yeah, I'm working with my leave out. I only have like two or three tapings left at this point, so I just decided to rock the middle part. I sectioned out that piece in the middle of my hair to cover the back of my hair to cover all those tapings and now I'm working in a diagonal angle, as you guys can see to lay the last one or two tapings that I have the tape And install at this point, I know kind of what to do even on this little piece I feel like. I still should have put it a little further away from my scalp just a little bit because I'm dealing with the tension right now, while I'm recording this voiceover yeah. Just it wasn't a good time also did y'all see what I just did. There was a little bit too much hair that was sticking to the tape in so I sectioned it out with my thumb that way, you can kind of see the taping through the hair to sandwich it together. You don't want it to be a ton of hair. That'S being sandwiched together because it's going to cause the tapings to slip out faster. I don't know that's just my observation. I might be explaining it very wrong, but y'all get my drift y'all y'all, picking up what I'm putting down essentially same thing. On the other side, I took my last little section for my last taping. I don't know you guys. The install process was a struggle. It took me like two days between the silk Crest and the taping install, because my back was killing me trying to put the tape ends behind me. It was a lot, but honestly, the end result is definitely worth it. So if you are a girl who struggled with sew-ins or even if you did micro links or eye tips, braidless sew in if you did any of those things and you're still just not happy with extensions, I would definitely say: try tapings. However, I need to do a video in the future of me removing the tape in so you guys can see the removal process because, honestly, I don't know how that's gon na go and I'm kind of scared, because the tapings are definitely still in my hair uh. I just pray that I don't break off a lot of my hair trying to remove them, but honestly, I I think I'll be fine. If I just take my time with the removal, I think it'll be fun. So if you guys like how the results are on my hair as y'all can see, it definitely looks super duper natural. My natural hair is a little bit lighter than the bundles, but hey I tried and in real life. If anybody is focusing on that, y'all need to back up. Y'All are too close, but honestly I really love this inside y'all can see it looks super natural, I'm able to brush it and flip it and do all of those things I'm able to put it up in a ponytail. You guys are going to see that in a second and y'all a sew-in could never that's really. All I can say a soul in could never tape ends are my new best friend. I love it. I'M just so happy with this video and the results. I'Ve had the tape ends in my hair. Now for about a week, I'm gon na try to see if I can get to three, maybe four weeks with the tape ends in and then I will film The removal video. I just want to see how long my silk press is gon na last, but y'all do y'all see this ponytail. It looks like it's my hair, it looks like it's my hair, that's really all I can say. I have never seen a ponytail that flat. Oh, my God, a sew-in could never that's all. I can say y'all see the results, get you some tape. Ins. Now that we are at the end of the video. I hope y'all have already hit that subscribe button and the thumbs up button and definitely leave me a comment down below if you enjoyed this video, if you are a new subscriber, hey sis we gon na be each other's best friends. Now, okay, I love y'all and I'll, see y'all in my next video peace.
Comments
Cassie Burt: Love
juliet eliteson: Hi hanga talaga pas36.Online ako sa sipag at paensya isang ikaw. Ito ang hinihintay ko all this time. napakagandangr musika at palabas I Like you baby //