How To: Install Clip In Extensions With A Frontal Like A Pro |Amazon Prime Hd Frontal
- Posted on 27 January, 2023
- Clip-in Hair Extensions
- By Anonymous
Hey Guys!!
THE AMAZON FRONTAL IS LINKED BELOW!
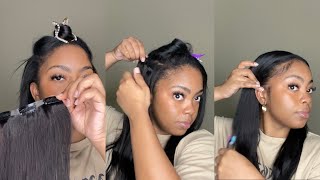
In this video you will learn how exactly how to perfect laying a frontal for a clip in install, so get your pen ready to takes some notes
I hope you guys enjoy this tutorial and I also hope you get a chance to try this out!
It’s a very inexpensive hairstyle to try if you want to switch up your look and still look like a baddie without spending hundreds on your hair.
Thanks for watching, also don’t forget to subscribe and like this video xxx
MAKE SURE TO WATCH IN 1080p!
HAIR DETAILS:
HD FRONTAL:
BERRY FASHION On Amazon
13x4
16 Inches
£119
LINK:
https://www.amazon.co.uk/shop/influenc...
LINK TO CLIP INS:
https://hairglo.co.uk/product/obsessio...
Plucking Tutorial:
https://m.youtube.com/watch?v=1YdlZf80...
Connect with me :
IG: https://www.instagram.com/nadineihena...
Tiktok: https://www.tiktok.com/@nadineihenach...
Email: [email protected]
Hello, beautiful people welcome back to my channel and I'm so excited. I have something different for you guys it's clippings in my hair, which literally cost me 20 pounds guys that was 20 pounds for one packet. I'Ve got two packets. I spent 40 pounds in total. I'Ve got it from this collection called Obsession. It'S their 30 inch clip-ins, look at how amazing this lips Guys. These are how long the 30 inch long as we. If it tickling my air scrap, I will be showing you exactly how I achieve the style and how I got it to lay this perfectly. It'S super duper lightweight. If you guys want to see how I achieved this hairstyle keep on watching. I will also link this frontal into this video. I'Ve got it from Amazon as a HD frontal, 13 times six. I can't remember the name of the brand, but I will put the link to this frontal in the description box below so don't forget to check that out. If you do want to achieve this hairstyle, I hope you guys do enjoy this video. I'Ve been meaning to make this video for so long now, but I've been so caught up with like doing wig videos and work. I haven't actually been able to be creative. I feel like this is the first time in a long while that I've been able to be creative on here, so I just hope you guys enjoy. If you guys ever see the makeshift mirror that I have right now, you guys would actually laugh at me. I am starting off with this HD fun tool that I got from Amazon, I'm wearing the top guys it is a cool set top and which I also got from Amazon as well I'll just be shopping on Amazon, guys, I'm so sorry. But personally me I need my stuff to be at my house by the next day, if I think that I want something it needs to be at my house the next day, I can't wait three to five days for delivery. I need next day things so big up Jeff for giving us the luxury of having Amazon, Prime and next day delivery from the whole guys, which is probably the best one tool I think I've ever purchased. It comes like this, but the way you know this raw HD is when the ends free away like this. So I kind of had to put to a test and say: if I pull this: will it Fray away and when I pull it pull it, you can see it frays away. So this this is real HDR. Then I'm going to link the tutorial on how I did achieve my frontal pack in so it will just be like a mini tutorial. I'M not going to show you guys how I did the whole thing, but I will show you guys how I did a section if y'all want to look Flawless Watch How I do my stocking caps, I don't think I've actually put out a proper stocking cap tutorial, But yeah I'm going to do that, for you guys now the two perfect this front tool in front of the clip-ins, I'm gon na do like a very small cane Row in the front. Just so that I can sew my stocking cap method onto the camber in the front, because I really really want this look to be seamless, just tie the hair in the back away. If you guys can't do this braid on your own honestly, it's really nothing to ask someone in the house ask a friend to come mobile just to breed that front bit down. You want to get a curved needle and a thread and literally thread this end piece of hair, just to ensure that this camo is actually like secured down, but just like that, this is a stocking that I got from my local supermarket. So you can get yours from your local teslos as stars: Sainsbury's Wilkinson, um yeah. You want to get pantyhose that are like ultra thin, so that you can have a very thin stocking cap, especially because we're working with HD lace. You need a stocking cap, that's really thin. It really does make the world of a difference. I come to find that the reason why lace will not lay flat is because there's like a line of demarcation between the lace and your skin, the thinner you can get the line of demarcation between the lace and your skin, the better the lace will look. I love wigs so much, I'm always wearing them, and you know this is just some observations that I've made as today, I'm using the hair by shopee Glue to lay my stocking cap method. I always use lace glue to lay my stocking caps just because, as you can see here, that's turning clear and I just feel like we've got to be spray. It just doesn't turn clear. It does turn clear, but it leaves like a textured. I don't know how to describe it, but this for me, just works the best. Whilst that glue is drying, I'm going to start sewing down my stuffing cut onto that braid. I'M going to make sure that I do it tight just so that I can kind of get that combo underneath flat. If I'm being completely honest guys, this is the first time I'm doing a frontal Pony with like a stocking Cactus. I used to Oh My Gosh guys. How am I going to get this out? Oh my gosh guys. Oh somebody should come and help me with this tin. This used to happen to me a lot when I used to do hair for people. I got it. I'M just gon na keep on threading this through, so that um stitching is all done now. I'M just going to cut off my stocking cap of my head and the way I do this is just by cutting it straight down the middle, and I kind of almost pulled the stocking cap back and just take my scissors and ever so gently cut like so, And I'm going to take my L'Oreal too much foundation in the color truffle. Well guys this is gon na look Flawless. I'M really excited I've been wanting to do this like tape and look for ages now. But I've just been really scared to damage my hair with the tapes, because I know how high maintenance doing tapings is and if, I'm being completely honest, knowing me, I've not maintained the tapings, because I would want to do everything on my own. I'M washing it to conditioning it. I just know I wouldn't be able to do that in the most professional way. I'Ve always kind of like shied away from doing tapings, so this clip in is literally the cheap alternative way of doing it. I only spent 20 pounds on the clip-ins and I've got two packs, so I spent 40 pounds on the packs and then I spent 100 pounds on the front door. So even that is still way cheaper than getting tapings, because tapings I've been seeing some prices at like 500 pounds and not all of them include the hair. I'M just put the front on my head. I have already removed the back thick piece already um, I'm still going to have to cut off a lot more of this frontal. I don't even know how I'm going to put this front on my head, but we're going to try I'm going to be using a bolt screw off to deep foam, because I don't have any more waxing sticks, foreign and just kind of find that braid. That'S in the back and I'm going to part the hair like this and then I'm gon na part the hair right behind the frontal. So, just like this, I'm going to just keep on finding that braid in the back and planting the hair away and then I'll cut off all the excess leaves that's behind the braid foreign secure, the lace down, I'm going to sew um the back of the lace! Frontal down onto the braid, because, if not we're going to have some serious flapping Birds over here, we don't want that. So, let's secure that down one thing about me: I'm going to figure out how to do any hairstyle. I love a challenge. This is the first time I'm doing this and honestly I am making a few mistakes. You can see that the latest lifting here, but it's fine, I'm gon na - stick that with glue them. I'M gon na try and I feel like we're getting somewhere we're, definitely getting somewhere with this. So I'm super duper proud of myself. I spent a hundred and something pounds on this frontal and I've cut off 50 pounds pretty stuff. Okay, so I've just put my melting band on. I did spray some oven spray into my lace and then I put my smelting band on. You can really see now guys that I actually really over plucked this side, but it's fine, I'm gon na touch it up. Some mascara and we can take our hair out in the back and my hair's already straightened. So if you haven't straightened your hair already at this point, you can go in and start straightening your hair, I'm going to take my clip-ins by a brand called Obsession. It'S a nine piece clipping extension in 30 inches. I what I really really do, love about these and fittings. Is that the guys, like the movement crazy, it does come with different sizes of clip-ins. So you can see like this would be a piece right at the back because it's shorter and they have like longer ones for the middle which I really really like, because it makes it quite easy to do these. Then you have like little ones for the front. So guys can just watch me put my clip-ins in and hopefully you get the gist of the story. I'Ll just show you in real time how I do the first one so I'll just take this laptop home and honestly, the patterns do not have to be neat. If you're a perfectionist, you can get someone else to do this for you. But for me, if I'm being completely honest as long as the clippings are in my head, I'm happy so then I'm gon na get my clip and take the two-piece when I open it. Like this, just like that - and that is already the first one in so that's all - turned take out another section of hair. This one is just a bit longer. This has three Clips in it and I just open them up and these blend right into my hair. So yeah, let's continue to finish that and I'll be right back foreign until I get to the top and I'll be right back when I'm at the top bit of my head, because I'm literally just repeating the same steps: okay, so we're! Finally, at the top guys and we've got like these small singular pieces and I'm literally going to use that to like fill out the rest of the spacing, because obviously the spacing on the top isn't as wide as the station in the middle. So we are going to need some smaller pieces. This is way better than a traditional sew-in. In my opinion, just if you want something fast or something cute - and I had a sew in, I would have been sitting down here for at least two to three hours. So now that all of that is done, I will be going in my hot comb just to hot clean the front will down. You can see that bit is really lifted. I put this bit down, so I'm just going to do the same on this side and tie it back. I can put it in a bun. I can tie it up if I want it to it's real cute and it's real natural. If you did learn a thing or two today, don't forget to like comment and subscribe to my channel, because we always doing lip things over here. Thank you guys so much for watching this video. I will see you guys later.

Comments
Keren Dikoko: Thank you for this. I’ll definitely get this done
Ebony Cameron: Amazinggg