Easy Invisible Locs / 2 Strand Twist Tutorial | Protective Style For 4C Hair #Naturalhairstyles
- Posted on 26 January, 2023
- Clip-in Hair Extensions
- By Anonymous
Bonjour lovelies!
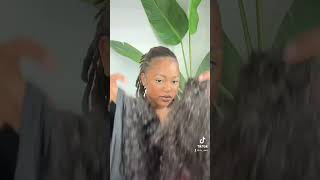
This video is a tutorial on how I did the trending invisible two strand locs on myself. It is a very cute style that is easy to achieve.
Link to purchase hair (colour T350):
16 Inch Pre-Separated Springy Afro Twist Hair 9 Packs Soft Marley Twist Hair for Soft Locs, Fluffy Spring Twist Braiding Hair Marley Twist Braids Synthetic Hair Extensions for Passion Twists T350 https://a.co/d/i6d7yvy
If you enjoyed this video, please:
#Like!
#Subscribe!
#Comment!
#Share!
Don't forget to check out my previous videos!
**FREE Ways To Support Me**
Watch at least 50% of this video.
Watch at least one ad.
Subscribe to my channel @KrissTayne
Share this video with others.
Thanks for your support
PROMOTIONS, SPONSORSHIPS, and BUSINESS INQUIRIES: [email protected]
Follow my business page @millionhairyqr_
Personal IG: kriss_tayne
#workvlog #canadavlogs #jamaicatocanada #jamaicanincanada #studyincanada #canada #travelvlog #canadastudyvisa #canadavlogs #workincanada #openworkpermit #workpermit #migratetocanada #travelduringapandemic #toronto #mycanadastory #saskatchewan #saskatoon #regina
#internationalstudentsincanada #studypermit #firsttimemom #labouranddelivery #yyzairport #immigration #jamaica #travelrestrictions #internationalstudentsincanada2021 #canadastudypermitapplication #genderreveal #3rdtrimester #firsttrimester #secondtrimester #babymomma #baby #freepromotion #promotion #collaboration #hairreview #protectivestyles #boxbraids #knotlessbraids #kalysshair #unicehair #alipearlhair #rpgshow #xtrendhair #humanhairwig #humanhair #braids #braidstyles #nadulahair #hairstylist #wigreview #hairreview #aliexpress #amazon #wigsale #wigs #hair #freewig #freehair #freeproducts #aliexpresshair #amazonhair #makeup #beauty #lifestyle #products #saskatchewan #canada #KrissTayne
Music: Wanna
Musician: @iksonmusic
Foreign bonjour lovelies welcome or welcome back to my channel. Today'S video is sponsored by Julian hair all specifications. Today'S here will be listed in the description box down below. Well guys, those are the tools that I will use for this style. Also. I had already sectioned my hair, so this is what it is. Looking like, I went ahead and added two at the back one using one method, one using the other method, but I didn't like the first method, so I will just continue with the method that I like, which you will see throughout the video. So after splitting one section into add your edge control, because this will have the hair looking very neat, take out a tiny section from the bottom of the hair for each side make a little plot. You don't have to go all the way to the end, and then you are going to use your crochet needle to pull through the hair that you'll be using to create the rope twist after you have done all of that. But then you start to do a flat twist with your natural hair at the top, so I use a flat twist a lot of persons just roll the hair. But for me I thought that the flat Twisters you are seeing here made it look way more neater. So that's what I did and then when when I get to the end, I just added the The Falls here to my natural hair, as you are seeing from the video then, after that I did it with the next side. Remember that your gel or your edge control should be your best friend, no two guys the direction of the flat twist. I would say that I did it to the left um when you get to the end of the hair. Now it's time to do the actual rope twist okay, so you are going to have to take note of the direction that I did it on. So I flat twist to the left, but I roped to the right. So I hope you can see the difference in what I'm saying. Don'T worry I'll, try to explain later on, but if you rope twist to the right or opposite to the way that I do it, I would suggest that you flat twist in the opposite way that I did it. So if I flat twist to the left, make sure that you flat twist to the right, that is only if you rope twist on the opposite angle. I hope that you understand that clearly. So as it relates to rope twisting the hair, I did it somewhat tight and then, when I get to the end, I had to add some more hair just for length and to have enough to wrap the hair to make the barrel. So I measure the hair against the one that I already did and then I started to roll up notice that I did not twist all the way to the end, because I wanted the barrel or the end of the hair to look a little bit juicy. So I did not twist it all the way down. I know that a lot of you are visual Learners, so I'm just going to leave you to watch the video and when I get to the top or to another one that I need to explain, then I will do so foreign foreign. Thank you. Thank you. Thank you so guys. Once again, you take all the little section. You detangle it. You add your edge control, your part out a little section from the bottom and you create a little twist. You do that for the next side, then you take out just a small portion of the hair. That'S one bundle take on a small portion. You crochet through the bottom piece on both sides. Then you start your flat twisting remember to add edge control to the hair before you start flat, twisting it. When you get to the bottom portion, you add the false hair to the part that was being twisted, and then you do the same. For the next side. Foreign, so the hair that is already there, that's what I'll be using to start the twisting. Then, when I get to three quarters of the hair, that's when I added the other portion like half of one bundle, foreign foreign foreign. Thank you. Thank you. Okay, guys for the top portion, you're gon na need two bundles off here and you're gon na split them in four equal parts, as you can see here, slightly roll the hair so that it can go through the crochet needle easily. And then you do your you. Basically, repeat, the steps, you add your edge control. You split the hair in two pieces. Then you take out your small parts that you're gon na twist at the bottom and you do it for both sides. Then you add your hair. Your Falls here using the crochet needle after that you go ahead and you flat twist the hair guys. The top part is the crucial part. So please take note again of the direction in which I do the flat twist. So I am at the right side, which is looking like your left, so you're going to add your edge control roll and you flat twist to the direction of the left. In other words, you flat twist toward the back direction. As you can see there, and you do the same for that piece - take note guys you do it toward the back Direction so that when you do your edge control, it can lay very neat. So after you've done all of that, you put the two sides together and you start to create your rope twist twisting toward the left or the front direction. As you can see in the video foreign, the back portion, where you add hair just once for the top portion, you are going to add here twice. So this is the first adding I'm going to add here to the front once more. So this is what I'm talking about. This is the second adding of hair, and I try to do it as tight as possible so that it doesn't slip or fall off and, as I said, I do not twist all the way to the end. I like to do that, so the twist can be as smooth as possible. Then you line up the hair with the ones that you have done so far. You twist you roll going upward and then you roll downward again so that the barrel can be nice and full note guys that, for the left side of your head, you'll be looking at it as the right side from your angle that when you are doing the Flat twist, it's no longer going to the back, but it's going forward as you can see there, however, for the very last portion at the front, I did that one going backward just so it can be uniform, but all the other ones go to the forward Direction. Big because of the angle on which I rope twist guys, I know it sounds confusing, but you just have to watch the video and follow the angle. Just know that if we Twist on the same angle, then kudos to you, if we do not Twist on the same angle, you just do it to the opposite side, and that is basically it if you are not sure about any of the steps. You can just comment it and I will try to explain for you, but that is basically it you guys. I think it is very simple once you get the gist of it, of course throughout you will make a few mistakes. That'S fine, but once you get the gist of it, then you will go very fast. It took me like about five hours to complete this look, so I know that it's not bad so guys. This is the finished look and I am absolutely loving it. It looks very neat. I couldn't believe that I'm the one who did it myself, because it came out looking so good, it's very versatile, very flexible, it's a little bit tight at first, but it will loosen guys. I am absolutely loving this style. It'S giving Empress. It'S giving natural it's giving fruits and greens it's giving Ayla Lou it's giving pineapple. I really love this style, you guys and it is versatile. You can always wear it to the side and it's still absolutely gorgeous. This is what the is looking like. I really don't have to do much whenever you're going out to just lay your edges, and that is it for your look. Also, you can put it in whatever style you want to put it in, so you could do a half a calf down. Look something looking like this very simple, very nice, so yeah. That is it you guys! Thank you so much for tuning into this video. If you enjoyed don't forget to give it a like drop. Your comment subscribe to the channel. If you are new and please turn your post notification Bell on bye foreign

Comments
Hannah-Kay Angus: Ive bn seeing these and loving them
keeraaaaaa: Im glad your did this now I can do my own hair. I actually had mine like this for just over a month and just undid it.
Tahj Rose-Fagan: Yes mi girl! Watch handiwork! Love when we can do our own hair cah God know, the prices.... Then finding someone who can do it well. Happy you'll be able to bless somebody head with this beautiful style
Igoche Ann: Beautiful
Kawna Stone: Someone have great talent . Looking splendiferous
Jason Gabbidon: The hairstyle shell!!! It tough badd
Hannah-Kay Angus: Kris yuh bad enuh, cause the way my hand set up.