Fulani / Tribal Feed In Braids Tutorial | Knotless Box Braids
- Posted on 24 January, 2023
- Clip-in Hair Extensions
- By Anonymous
Fulani / Tribal Feed In Braids Tutorial | Knotless Box Braids
Hey y'all!! I decided to try out this Fulani / Tribal braids hairstyle on my self and to share the process with you all. I created this style with knotless box braids to the back and feed in cornrows to the front.
Please show your support by Liking, Commenting don't forget to Subscribe to my channel! ❤️
**********************************************************************
Instagram: https://www.instagram.com/kurlie_keke/...
Email: [email protected]
**********************************************************************
Hair Details:
30 inch long pre stretched hair
**********************************************************************
Music by Mr. Jello - Passion Fruit - https://thmatc.co/?l=CB3805C3
Music by Mr. Jello - Island Lifestyle - https://thmatc.co/?l=6CEB2292
**********************************************************************
00:00 Introduction
00:31 Hair used, start hairstyle
11:22 Finished style
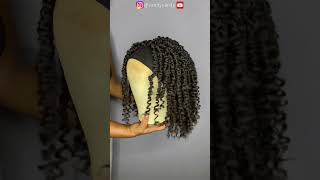
Length definitely what I wanted I'll give it a 10 out of 10 for the length, hey, yellow cigarette curly Kiki and welcome back to my channel now, if you're new, don't forget to hit that subscription button below the video and to all my retelling subscribers. A warm welcome now in today's video, I'm gon na, be doing this hairstyle for you all. So, if you're interested in seeing how I did this hairstyle do stick around and I'll be giving you the details. So this is my pre-stretch here that I sorted out now. You can go ahead and use any pre-shirts here of your choosing these I had laying around so I decided to use it for the style and I'm using this in the length 30 inches. So it's 60 inches unfold, but once you fold it it's 30 inches in length, I will start off by dividing my hair into four sections. This just makes it easier for when it's time to create my pots, it's easier to manage my hair into the different sections, especially as I have not properly blew out my hair. It'S not that straight now for the pattern I went on ahead and created my anchor pad just so that I can have some straight parts to the back of my hair. After that part, I went on to create that section to the bottom. This is what my hair is looking like. Once I'm finished with that first row, I am going to be releasing a full tutorial on how I parted my hair, so that you can see just in case. You think the video is going a bit too fast in terms of the pattern or, if you want to see how I get my parts to be this straight for the bottom section of my hair, I'm doing some individual knotless braids or not listed the best of My ability, I would say, because I'm no professional - but I am doing some not less braids to the back of my hair and I'm going to be creating these knotless for three sections. So I already went to ahead and did the first section that had three individuals in that row and I'm working on the second section. Now I'm trying my best to show how I am feeling in the hair. Hopefully you can look at the video and follow as I go along for the individual, necklace, brace, I'm feeding in three pieces of hair, and that takes me through the length. So that's what gives the length of the braids if your braids is a bit shorter than the 30 inches like what I'm using, and you want your hair to be longer. All you have to do is feed in here as you go. So if you get to the middle of the hair - and you realize it should be a bit longer - you can add here and that's going to increase the length of your knotless braids. For me, feeding in the hair at the beginning gave me enough length for the hair, so there was no need for me to feed in additional hair. As I went on for creating the knotless, I am using shine and Jam at the roots of my hair. To begin the individual braids and once I get closer to the end of my hair or where there's no shine and jam - and I realize my hair is a bit frizzy, I add some additional shine and jam to my hair at those points. So you are going to see that as I go further into the video, but for now you can have a look at how I'm feeding in the hair for the individual, knotless, braids foreign I'm going to be creating and I'm adding some shine and jam just to Make sure I keep away the here from mixing with each other or just to make sure my part remains straight. That'S what the Shannon Jam is therefore, at this point and well to eat in the pots. This is what it looks like once. I'M finished with the last row of individuals well at least to the back of my hair and I'm using rubber bands to sort of seal the hair until I get time to plot the end straight down, I first start off with a center part to the front Of my hair and separate the heel part each side of the center part to get my hair or that individual cornrow as close as possible to the center of my hair. Now, once I'm finished cleaning up that part, this is what it's looking like and I add some clips just to make sure I keep that section of hair from mixing with the other section of my hair, I follow the same steps to create the part on the Other side of my center part next, it's time to create my feeding cornrow now the very first Corner as you're seeing is to the center of my hair and for the feeding process. It'S not exactly a stitch braid, it's a regular feeding, cornrow and I'm starting with very small pieces of hair, just so that it gives a more natural look. So I don't want to start with too big of a piece so that you can see that little lump to the start. So I would advise start off with small pieces of hair and gradually increase the amount of hair you're. Adding as you go along foreign. Is you need to be patient when creating these braids or the Siesta, because it does take a lot of time? And if you try to rust the process you can, Decatur is going to come out a bit better. It'S not gon na come out um straight and nice and flat, so it's best to not brush the process, take your time and create your Stitch braid and that's what's going to help so I'm doing the same exact procedure as I go along for the braid. The only difference is that I'm adding bigger pieces, as I get to the back section of my hair. Now, if you want this hairstyle to go a bit faster, I would advise blow out your hair just a bit more than what I did. I only blew my hair out just enough to take all the major Kinks and coils from my hair everything else. I sort of use shine and jam, or I try my best to sort of cover up my hair or conceal my hair with the hair extensions foreign on each side of that Center braid. I'M doing simply some slanted pots and I'm using my very first individual braid. As a guide, so I won the first corner to end just where that part Begins for the first individual at the base or the individual. That is closer to my ear, and I follow the same procedure for creating all the other parts in my hair. Using the previous part as a guide now, as mentioned before, I am going to release a parting video, so you can see all the details on The Parting in that video. Now, if you are having problems with grabbing the heel, picking up the hair for a section, you can always go ahead and use a comb to do so. If you don't have sharp nails or long nails that can help the comb does a great job with helping to separate the hair for you to create a nice smooth braid. Thank you. Thank you, foreign, the braid. On the opposite side, this is to make sure that the braid is matching in terms of the thickness. So if it's not thick enough, you can do like me and add an extra piece of hair now. This is why it's important to add small pieces and not thick pieces. So if it was too big, it would have been just a bit of an issue, but because it was smaller, it was easy for me to go in and add a piece of hair. Once I get to that last section of hair, I'm measuring just to make sure the hair is of equal thickness or as equal as I can get it. So that's my reason for measuring and that's what I did for all of the parts. I always separate and measure different lengths of different intervals of the braid just to make sure I get it as even as possible foreign when braiding down my hair, to conceal my hair itself, I'm using shine and jam to sort of help in that process to conceal The my hair, so my hair, doesn't stick all that much, I'm also using the braid to sort of cover my hair, but because I'm doing this style on myself, it's a bit difficult to do that top method properly. So I'm using the shine and jam to sort of help with that process. Once I was done with my entire head, I proceeded to braid down all of my hair and next I dip my hair in some hot water to sort of help with that movement and to set the hair. Now, hot water is a trick in getting your hair to be nice and flowy and smooth and soft and everything, so that's the trick, always dip your hair and hot water once you're finished with the braiding process. Thank you. So this is the final look. This is what my hair is looking like after I did my edges. I did my makeup, so this is the final outcome. I think I'm loving it at first. I wasn't so keen on the hairstyle, but now I feel like it's given. I think it's it's giving something: it's it's giving something, but the hairstyle um. I do plan to do like a whole book at some point in time, because it does look cute when you hold it back in a little ponytail um because of how low I parted. The hair, you can't really do an updo style, you can do a half and half with the hairstyle you're going to half and half or you can do a little ponytail or you can separate it into two and have two little ponytails. So there's not much! You can do with the style, but it's giving something. Let'S give them something. So let me know what you think about it in the comment section below, so I'm gon na be stepping back. Let me step back and show you what's looking a full body shirt. So this is so it is long. The length is what I wanted length. Definitely what I wanted I'll give it a 10 out of 10 for the length this size. I wanted to do this just a little smaller, but I know I'm not going to keep it that long. So I went on ahead and did it this size. However, I would say if you would like to do the Cs Style, while the smaller it's going to give you more of a diva finish me. I'M not gon na keep these in too long. So this size is perfect. Let me know what you think about it. In the comment section below as usual for this style, I used some 30 inch pre-stretch here. Roughly two packs ahead was not that much at all. You can use any pre-stretched hair of your choosing any brown. It'S gon na work. It'S gon na do the trick. So that's up to you until the light top roughly um, I'm gon na, say no less than eight to ten hours to do this hairstyle because I was recording, I was doing the hairstyle. Probably if I was not recorded it would have been done faster. If you decide to try this hairstyle and you want to go with the part to the center, I would say: go a little smaller in your pattern, so I did part it a bit too thick. I would say I am going to be releasing a parting video for this hairstyle separate, because I do put a lot of work into my parting and I want to share it with you all, but I don't want to make this video too long. That'S why I'm separating the video so look out for the pattern video within one week of me releasing this video. So whenever I release it, um just count a couple days after and I'm gon na release it like within that time frame promise. But let me know what you think about the hairstyle in the comment section below so y'all. Thank you very much for tuning in. Thank you very much for staying until the end. Please do hit that subscription button below the video. If you have not yet subscribe, it's going to mean a lot to me and do give the video a thumbs up. If you have not yet given me a thumbs up so yeah until next time.


Comments
Kurlie KeKe: Hope this video was helpful someone. Please don't forget give this video a thumbs up before leaving ❤❤
simplydemi: You did an awesome job, it’s absolutely gorgeous, your method is clear to understand, it’s given ❤️❤️
Arise Shine Within : wow i love that you did this style on your own beautiful
Styles By Lovey: It's beautiful very creative.
patty nyc vlog : Amazing tutorial happy new year
Cooking With JoeBlack: Lovely video hun❤❤
Famous_K.C: Ouuuuuu these are so nice❤
Arise Shine Within : hello keke your hair looks beautiful thumbs up friend see you again please see
The Dennis Way: Love how long the hair is its so sexy
NikkyK’s World: Happy new year Kikie