All You Need To Know About Clip In Extensions | How To Put In | What Brands
- Posted on 24 August, 2020
- Clip-in Hair Extensions
- By Anonymous
Glamseamless extensions or bellami extensions? How to care, how to put in, how to style, everything!
Hi Everyone! I have been wearing clip in extenions for years now and love so much!
I like using this type of extension over handtied, tape ins, or sew ins because they are super low maintance and you can take them out whenever you want! Not having to sleep with fake hair in is so nice... lol
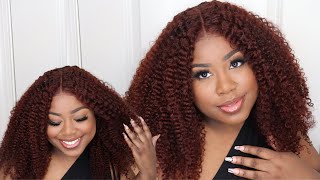
Trying out my new Glam Seamless extensions and comparing the price and quality to Bellami Clip in extensions!
Let me know if you have any questions!
xoxox - Macy
Hey guys so welcome to my video. I wanted to do a little quick youtube video on how i do my clip and extensions all the questions and answers about them. How easy it is and what are my favorite brands to invest in for cliven. So if you're interested stay watching alright, so right now i have got them all in and done. I i think they look great. These are my newer ones. I got them about a month ago, so i have been wearing bellamy, clip and extension. Probably since oh gosh, it's been forever since i was 17 so about five years now, and i love bellamy extensions, just let me tell you something about them. I always got the bellamy bugattis, which are the biggest baddest extensions. You can get like they're so thick and full, and they made my hair look so pretty and big, but it almost made it look more fake. Do you understand what i'm saying? Because it was like there was so much hair um, it was so extremely long. It was so thick and i don't know i i probably went through six different clip-in extensions because they broke like the breakage happened, so quick with that brand. So i would get them the hair would feel amazing. I would be like oh my gosh, i'm so glad i bought the homies and then they're supposed to last you a year and they would maybe last me three months before i was like holy cow. I would run my fingers through them and there'd just be like breakage everywhere and i would sit in my boyfriend's car and there'd be hair everywhere, you'd be like macy. What is wrong with you? Are you like depressed or what i'll be like? No, that's! My fake hair, i swear, the bellami's are so expensive. I think my bugattis were 480 at the time and i would get those every six months because the breakage was so bad. So i don't know i feel, like the quality. Just wasn't all there like when you first got them: oh, they felt amazing. They look so good. But after a while - and i don't even curl them that much i'll curl them like one time and then i can wear them with that same style. For about two weeks and then i'd re-curl them again, so it's not like i was curling them that much they would just break so quick. So mark's sister christina told me about this new brand that she tried for clippings. They are called glam, seamless, clip-in extensions way. More affordable, oh my gosh. These extensions were only like 280 dollars, so half the price of the bellamy bugattis and i think they look more real because a there's not as much hair, it's not as thick and boom in your face. It just looks, i don't know it looks more natural to me, so my review on them is a 10 out of 10.. I'Ve had these for a month and they still feel the same way they felt when i got them and i'm not exaggerating like they feel so good. So i'm super thankful, christina told me about them, because i will probably from now on get glam seamless for sure, and the quality is already it just feels better, honestly and they're shiny and they match my hair perfect and there was way more colors to choose from. For like different hair types and honestly, if i just wanted them thicker they're so cheap, i would just order another package. You know. So i don't know. I definitely suggest glam seamless over bill me not hating on bellamy at all because they got me through high school and beauty school like i love them to death, but glam seamless is where it's at for sure and another thing about this brand is it came with More clips, which you'll see when i install them, so i can put them in different places to fill in places that need to be like thicker or longer, or more density, so yeah. This video, i'm going to show you guys how i put them in and then how i curl them to blend in the end with my baby list, curling iron, but as of care for them, it's literally so easy, i maybe wash them and do a hair mask On them once every three months - and you may be like ew - that's so gross like don't they get gross, no, they still smell like when i first got them and i haven't washed them, yet they smell so good and feel amazing. I feel like i only wash them to condition them if they need like a little bit of liveliness, put back into them. If that makes sense, so the care for them is so easy and then i'll only i'll run a curl through them every two weeks because it will hold so easily. All i have to do is curl my real hair to blend with it, and sometimes i won't even do that. Sometimes after my blow dry i'll just keep it straight and it blends right into them too. So i feel like, if you don't want to go that long. These are the 22 inches. I would stick with starting at 16 or 18 inches and working your way up when you feel comfortable um. I started at 18 inches and went to 24 and then realized 24 was just like so obnoxious for me. So i ended up going back to 22 and i'm happy with this length. I might even go to 20 next time and they're so cute, like you, can put them in a cute little ponytail and you can do braids with them like you can do everything you can color them. You can tone them anything. It takes to blend with your real hair. You can do with them because they're real hair, too that's the cool thing about them. So now i'm going to take them out and show you guys how i put them in every day, all right! So, let's get started! Um, for you guys who don't know me, this is my real hair length. Um i like to keep it um. I don't know, would you say like four inches past my shoulders, because it's not too long, it's not too much to deal with um. I feel like it's just it's a put together. Look when you keep it at a super sassy length. So i keep my actual hair right about this length and i'll show you the back of it yeah. So my extensions actually make a really big difference and i like to have the option of having the long hair or the short hair you know like. I can rock the short hair whenever i want or when i'm feeling a little bit sassy i'll put in my um 22 inch, glam, seamless extensions to pull together the licks. So i'm going to show you guys how i put them in how easy they are. How easy they are to take care of and yeah okay, so the first thing i do is i'm going to part right from above the ears. Okay, both sides all the way around to right about there, so you can see how much hair is actually left out. I'M going to pin that up out of the way i use a little butterfly clip it's just the easiest and i'm going to start with my two piece. This is what it looks like i like to keep it like at a loose curl, but i'll also show you guys how i curl it at the end. So i go ahead and put this right in the middle back there, so that one is just going to create the most length in front because it's the lowest down so yeah. That hits me like literally, i can't even show your home, but so that was just the two piece and now i'm going to go in with the the five clip is next, so i'm going to go just an inch, probably right, where my eyebrows end all the Way around clip that up and i'm going to brush it out. Of course, i like the way these ones feel they feel so soft i've had them for about a month and i'm literally not gon na go to any other extension like. I definitely prefer these over bellamy. I take that middle clip, clip it right in the middle. Then i work all. I go all the way around the head and finish the clips. So when you pull that all forward, that's how it's looking so far, then i'm going to take down the hair go right about an inch above that last one pin that up and then this is the four piece i'm going to work with next. So it starts with two five four, and this is also just the way that works best with my head shape. You can put them in, however, you want wherever you need to fill in or wherever you need to add length. So keep that in mind. This is just what works best for me, as you can tell adding that fourth, one is starting to add more um density to the hair, so yeah, that's what it's looking like and then this is where it gets kind of tricky, but i need to start filling In the front pieces of my hair, if that makes sense, so i did the back parts of my hair. So that's what's going to create the flow in the back, but now i need to add in the front side pieces as you can see the seams blended. So how i do that is i'm going to go right about here about to the middle of the head is as far as i need to go. Pin just that side up and i'm going to use my three piece and i'm going to start that right here. So you can see that gave me like a nice long front piece and then i'm gon na let go and then you can see. I still need about one more piece right there to make that blend. So i'm gon na go in with the two go right about here, flip that over i'm going to put this piece as far forward as i can before it gets thin, and then that's what it looks like before. I curl it so pretty happy with that side. As you can tell it looks it blends pretty good and that's even without curling or styling, so yeah as this side. Compared to this side, you can just like tell a difference. So now i'm going to go to this side and fill it out as well kind of even with where i put that three piece right about there, and one thing i wish they still had is another three piece. But now we have to start working with the twos excuse this crazy clipping job, but i'm gon na take a two piece: stick it right there and then we got one more two piece. So i bet you guys can guess where that is going to go, and that is right here, symmetrical with the other side place wherever you feel like you need it, which i really like. So that's my hair with them in and unstyled and then the curling just kind of blends it all together. So i'll show you guys how i curl my hair and get it to blend fake hair with real hair. I also get a lot of questions on how i blow dry my hair and blow drying my hair just made it like super frizzy and poofy, and i always hated how it looked when i was done. So i started to air dry, which then led me to need to straighten it every single time. I would do that because, when your hair air dries it kind of just dries, however, it wants into its natural pattern, and i hate my natural pattern. It'S like a weird little kinky wave, so i got this bad boy to try. It is the bed head hand dry. I got it at ulta, for i think at most it was like 70 dollars, but let me tell you this makes my hair so smooth and i can direct it how i want so. I, like curl, all my front pieces towards my face and then same on this side and in my video before this i actually showed how i use it. So if you want to check that out, that'll be in my moving to montana part one vlog. I definitely recommend this. I will never go back to blow drying or air drying, my hair again so now when it comes to curling and getting your hair to blend, and all that i like to use a beach wavy pattern. Um it's a really loose. It looks like you didn't do too much to your hair, by which you can kind of see the old, the old curls right now. This needs a little refreshing, but i use the babyliss pro curling iron, it's a 1.25 barrel, and i like this one because it smooths down your cuticle while curling. So it makes a really nice curl and it makes it really soft and i like going through and straightening the ends of all the hair when i'm done to make it kind of like that beachy texture wave. So i'm going to go in and start the front. Take about this bigger sections and you can tell my real hair right there with the fake hair and i'm just going to blend it so always curl away from your face and then let out pieces that have been on the barrel for too long. So now let go of that and then the end i'm going to leave that out completely. So that's what the curl is going to look like when it's done. You can see the straight and then the really pretty curl and you can't even see where my real hair and the fake hair intertwine - that's my favorite part. So now i'm just going to go through and do that to like every other section. I like to leave a lot out because i kind of like the looser pieces intertwined with like the curly pieces, but my biggest hint is leaving out the top that has been on the barrel for too long because that's what's going to create breakage and heat damage. But yeah there it is again now i'm just going to kind of zoom past me doing the rest of my head and i'll show you how i blend it when it's all curled. So that's one side of my hair i'll curl and then just like on the other side, you want to curl everything away from your face. So now i wait like 10 seconds after i've curled my whole head for the curls to cool, and then i will just take my fingers because that's the best way to make a pc beach wave and just run my hand. Thank you guys so much for watching. My hair tutorial, i hope it helped you and it helped. You find a clip in hair extension brand that you want to invest in because they're not cheap. That'S for sure, so i hope this video helped you guys, and i will see you guys in the next vlog bye


Comments
Angela: O my gosh! Thanks for making this video! You really show the details of doing this and make it look super easy! Can't wait to try this!
Debbie Good: Love your thumbnail! So beautiful!
poocky100: Ty. I love your style
Lauren Saunter: Absolutely love the video girl!!! May I please make a request?
Jadyn Baker: What color and length are these ?