Best Natural Hair Clip-Ins Style No Leave Out|Under 15 Minutes! |Living With Shea
- Posted on 06 October, 2020
- Clip-in Hair Extensions
- By Anonymous
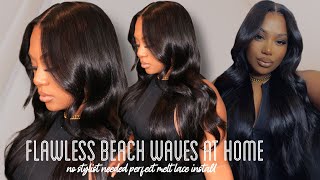
These zury clip ins have to be the best natural hair clip-ins I've ever used! This style took me only 15 minutes to do without much prep. This no leave out natural hair clip ins style is gonna be my go to!
The clip ins come in 11 inches, 9inches, 6 in, 3 in, and 1 in!
Time stamps:
0:00 Intro
0:25 Showing clip ins
0:47 Installing Clips
3:51 Invisible Part
5:50 Fluffing
Zury Naturali Star Human Hair Blend Clips ins: https://www.sogoodbb.com/products/zury...
crochet needle: https://amzn.to/36CChzV
Visit my store: http://ciaewards.com/shop
WHAT TO WATCH NEXT:
4b LOW POROSITY Hair videos: https://www.youtube.com/playlist?list=...
HOW TO CLEAR ACNE NATURALLY: https://www.youtube.com/watch?v=61r_Ev...
HOW TO FLAT TWIST NATURAL HAIR: https://www.youtube.com/watch?v=Oyz7vK...
4b NATURAL WASH DAY ROUTINE: https://www.youtube.com/watch?v=nKVHRN...
FENTY BEAUTY FOUNDATION FOR OILY SKIN: Holy Oily Grail: https://www.youtube.com/watch?v=8ffRdF...
HOW TO REVERT STRAIGHT HAIR BACK TO CURLY:
PROTECTIVE STYLES FOR NATURAL HAIR: https://www.youtube.com/playlist?list=...
Make money while you shop!
http://www.ebates.com/rf.do?referrerid...
For business inquiries / sponsorships/ collaborations
Email: [email protected]
BASIC INFO:
Name: Cia
Age: 20 Something
Location: East Coast
Camera used: Nikon D3300 https://amzn.to/33kTfPJ
Lens: 35mm https://amzn.to/2TVOIAg
Main Light: ring light https://amzn.to/3d6Yyqc
❣ LETS BE FRIENDS
My Website: http://www.ciaedwards.com
Instagram: http://www.instagram.com/nearlycia
http://www.instagram.com/achievherpere...
Twitter: http://www.twitter.com/Nearlycia
Snapchat: @CiaE7
******Video May include affiliate links meaning I may be compensated per click or purchase in order to support the channel and keep pushing out content to you!
If you guys want to see how i did this style in under 15 minutes, with only nine clippings stay tuned, i'm using the natural clip ends in the style. Coily i'll leave the link in the description box below, but it comes with nine wefts, each of different sizes and lengths. What i'm going to do is use the longest length in the back and work. My way up, you know your girl is a lazy natural. So this ponytail has been in for about two weeks now and i'm just going to work my way with it. I'M lining up the longest weft at the edge of my my hair and then i'm going to do the same on the other side and then adjust the clips within my ponytail and my hair so that they can clamp inside now. It doesn't matter. If you have sleep down your edges or your sides, because no one's going to see it sis, but if you want to go ahead and stick it down, so as you can see, the first piece did not go all the way through to the other side. So i'm just using the other longest piece and putting it on the end. The longest piece is going to be labeled with little papers. I don't know what to call them with the length, so just make sure you arrange those lengths ahead of time so that you know where to place each one. Now i just i decided to do this style because it was super simple, and i knew that it wouldn't take me very long. The only thing about this is that you have to be sure that you are clipping in the clip and you hear it snap. Otherwise, it'll come out so now i am just placing another piece right above it, each piece of space about two yeah about two or two um finger spaces apart um. Sometimes you can do one depending on how many pieces you have, but because i had nine pieces and i wanted it all to fit. I did two spaces apart. It'S really simple guys so you're just going to repeat the process with putting the wefts or laying the wefts onto your ponytail lining up the clip within the weft, pushing it inside of your ponytail and then repeating now. You want to make sure that you're spacing them out appropriately as well, because if it's not spaced out appropriately, you might have to take it off. But it's super easy to do guys, really not much left to say as you're getting towards the front. You do want to start laying them, though, within a u-shape and making sure that the pieces all fit fit in. So what you see me doing here is putting one of the shorter pieces across instead of making a u-shape this way. I know that i can fill in some gaps. I went back ahead and kind of laid that ridge down that you see there, so don't worry, but as you're getting closer to the front, you do want to lay it closer to your part, because we're going to do is in a visual, visible part which shouldn't Take too long and if you don't know how to do an invisible part, i'm going to explain it to you, but i also have another video that you can check the description box below, for this was inspired by another youtuber. If i remember her name, i'm going to put it inside of the the box push it that way, i'm pushing it away from my hair, i'm grabbing some here, closing the latch and pulling it back through because we're going to use this here to cover the left. Like that see you do it again for those of you who didn't get it again, all you're doing is you're putting the hook through making sure that the hair is going through the latch but ensuring that you're pulling it over. So when you're pulling the crochet no needle through, you should be facing the weft and when you're pulling it back out, it should be coming over the left. So if you envision you pushing your needle through, it should be going in to the weft and then out. So that you can pull the hair over now, you saw that the hair kind of teased a bit - that's completely fine, because this style is meant to be teased. I did not tease it too much, because i wanted to use this hair again for a ponytail, but you get the idea so i'll. Do it again for you and if you notice, in the mirror that some spaces look more sparse than others just make sure you're pulling some hair over to cover the weft, so it doesn't look like you're ball, headed okay, guys because you can. It will look like that if you don't have enough hair pulled over and guys i mean that's pretty much it i'm going to talk to you a little bit about what i did after this, how i maintained it, but guys this is like my absolute favorite, i'm Going to start doing this crochet, who, who has time for crochets i'll just crochet the weft and that's what it looks like once, it's fully fluffed out um. I didn't want to do too much fluffing, because over time it will fluff, but it looks good. I was going to cut it, but i'm going to actually use these wefts again so cutting it wouldn't make sense, but it's really full if you want to use your fingers to break through or if you just want to use a comb again. I didn't want to disrupt the pattern too much because over time it's going to get bigger, but this is what it looks like thus far. If i weren't using them again, i would go ahead and cut some angled layers. If you check the video in the description box below where i reviewed the coily combo, i did a brief tutorial on how i cut layers into hair. That looks like this, but i think it's pretty cool, because i did this hairstyle in less than 15 minutes. No braids required literally, you just need the pack of hair that i'll link in the description box and the um, the crochet needle, so that you can hide your wefts um. This ponytail is about two weeks old, so it works great, but i like it, i'm gon na love it when it gets even more fluffier. This hair works really well um kudos to them for it to be synthetic, but still work well with water and conditioner. I am pretty much done if you guys want to do this style again, if you weren't doing it while you're watching with me the first time just go ahead and hit rewind, and if you want to see more videos like this, please please, please click the subscribe Button right next to subscribe, but there is a lovely notification now that you can hit because it'll keep you informed whenever i post videos like these, please be sure to share this video with a friend and check out the website. It has a lot of different here. Um textures, because this was just one of them - there was a coilier one like on the box that i didn't necessarily get our kinkier one that i didn't get because they were out of stock. This was the kinky one right now i have the coily and you can see how big it gets if you really um comb it out like i said i didn't want to do that right now, because i want it to get big over time, but really lovely. No leaf out required at all, so it means you can protect your edges, you can take your ends and your hair can prime and grow. Thank you so much hit that thumbs up button, and i will see you in the next video you


Comments
Ariel June: This is such a cute and quick style! I loved how you did the invisible part it looks really good
Yasmine Lutricia: I never tried that ! I really need to try new protective styles cuz I only do twist outs and braids haha. I really never thought of doing this, so happy a came across your video. And like you said I'm a lazy natural too so when I heard 15 mins I was like whuttt ?? Okay definitely trying that out. Nice video girl !
misshulagirl05: The invisible part...GENIUS technique
Jay Johnson: Two things ur face looks great normal, im not sure you're aware of the weird faces youre making when actually doing your hair. It looks kind of disturbing in my opinion. Also, when you do your hair over a big puff/bun at the back, arent you concerned with how ridiculous that bulk in the back would look?