How To Install Dreadlock Extensions! Everything You Need To Know!
- Posted on 21 September, 2022
- Sew-In Hair Extensions
- By Anonymous
Single ended dreadlock extensions are a great way to experiment without permanently locking your hair! It is also a protective hairstyle that can help with hair growth and overall hair health! Drop any questions you have in the comments :)
0:00 What you'll need and type of dreadlock extensions.
1:50 How to install and braid in the locs.
3:19 How to section your hair.
4:50 Adding extra locs for volume
5:50 Final results
If you are interested in dreadlock extensions, please use my link below! It helps me to keep creating content for everyone!
DreadfullHippie double Ended Dreadlocks: https://dreadfullhippie.com/mileena-pr...
Blog: https://www.mileenaprows.com/style/syn...
Instagram: https://www.instagram.com/mileenaprows...
Tiktok: https://www.tiktok.com/@bohomeena
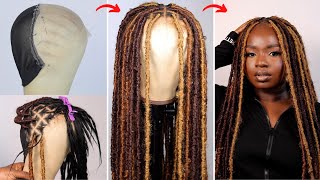
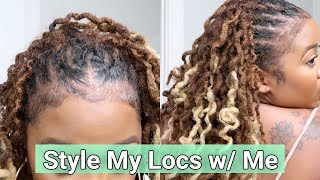
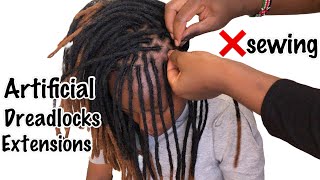
Hey everyone today, i'm going to be showing you how i install my single-ended dreadlocks from guru dread. These are made out of human hair, they have loose ends and they have a little loop at the top where you go ahead and install them. These are not to be confused with the double-ended dreadlocks, which are from dreadful hippie. I'Ve been wearing these ones for about two years and they are installed a bit differently. That'S a whole other video, so i have 40 of these single-ended dreadlocks to make a partial look. It'S going to go all underneath my ear and kind of up towards the crown. I have three different lengths of them. These ones are 24 inches 22, and these ones are 20.. This is just gon na help create a nice layered. Look that gives us more dimension and depth and you're definitely going to need a comb and these little rubber bands um. I probably should have blonde, but it's okay. I don't have any on hand, so i'm just gon na oops. I just dump them all over. So i'm just gon na use these black ones. It is also really helpful to have these little clips. That way, you can control your hair, while you're installing and just make sure to keep all of your sections, nice and clean, and, lastly, you're definitely going to need a cute little kitty cat. This is mr oates and last last last hello, a friend or a husband, to help you install them unless you're like super talented and can just install them yourself, then i'm super impressed and jealous of you, alright. So without further ado, let's go ahead and get this tutorial started. So i'm going to go ahead and start by doing a little example right here at the front of my head and obviously i'm not going to install one here if i'm just doing a partial. But, for the sake of you being able to see up close and personal, this is what we're gon na do. Oh, my gosh odi's going crazy with the dread right now. I'M just going to go ahead and grab a piece and you're going to grab one of your single ended. Reds see this loop right at the top you're going to go ahead and make sure that's nice and open. Some people use a crochet hook, but i like to make things not super easy and i'm just going to use my fingers. So i just do a little twist and then i go ahead and put the hair through and then you're going to bring the dried up top and you're gon na split this chunk of hair into two. So now you have these three pieces and that's making like a three strand braid. So all you're gon na do is make sure that you hold it close to your scalp and you're gon na start braiding down the dread, and i like to stop after getting it pretty secure. And i just go like this with my finger to make sure. There'S no little baby hairs around because if they do get caught in there they're either going to break or they're going to be pulling and it's going to be really uncomfortable. So then you would put the rubber band right on the end here and voila. So now i'm going to show you guys how we section my hair for a partial, like i said, we're going to keep it behind the ears and we're going to go up right below the crown. I cannot do this part on my own. I definitely need sami's help, and this is where he comes into play to start you're going to want to make your bottom row section. I like to put three dreads here, but sometimes people will do. Four just depends on how many you want and i'm gon na braid them in just like. I showed you before okay, so i have three of them installed now, and this is the first layer now we're gon na go ahead and take my hair down and he's gon na. Do the next section. Moving on to the next row, you wan na make sure that you keep an equal amount of space and a good chunk of hair to put the dreads onto and also make sure that you're laying them in brick form. So that means putting one dread in between the space of two other ones. That will create consistency and also just help to avoid any bare spots. So now i have three full layers in and we probably have about one or two more to go and then i'm going to start looping in the extras. Okay, now all the sectioning is done. We have all the dreads in that are going to be connected to the scalp. You can see that they're laid in that brick layer form and they're kept behind my ear. So i just finished installing all five rows and i'm going to go ahead and put that extra ones in for more volume. I'Ll show you how to do that, and it took us about an hour and a half, but when you first start out doing it, it might take a little bit longer and everyone kind of has a different head shape. So this section might be different for you, but just make sure that you're laying them in the brick form. Now i'm going to go ahead and add in the rest of these. I think there's like 12 more and it's going to just add a little bit more volume, so you're going to take the dread and push it through that loop at the top and that's going to create one bigger loop, it's kind of like loop section. So then, you can just pick any dread that you want and you're going to attach it so you're here and then just tighten it on. You can move it up or down. However, you, like whatever looks best and now you have two dreads on one. Okay and now my hair is finally done that took yeah about an hour and a half so not too bad and voila. Well, thank you so much for watching, i hope you enjoyed and that this was helpful for you. I'M going to be doing another video on how to install double under dreadlock so subscribe and stay tuned for that also drop a like. If you enjoyed this video, it really helps me out until next time, toodaloo

Comments
Marili M: you're so pretty, and I love how you explained the entire process... I just got an urge some minutes ago and wanted to learn how to do this. I am so glad you had just posted the video. I will definitely be doing this soon. How long do you leave them on without damaging your hair? How is the mantainance when you're wearing them? (showering etc)
Amy S: Thank you so much for sharing I saw you on insta and completly fall in love with those look
Chi Dam: Amazing first video! Keep doing whatcha doing! ♥
Eliba: looking forward to seeing more of you on youtube!!:D
nhi levan: Hiiii I found you on FYP on tiktok ,now I also got dreads I'm so excited you're doing video about dreads. I'm looking forward to see more dreads contents,how to style them,etc.
Eva Di Leo: Great video! Love you so much, you shine such a bright light ☀️
HairByEliana: Love the video! But where can find these dreadlocks?
Mariah Storms: Do you prefer these dreads or the ones from dreadfull?? I’m new to dreads and am going to follow your tutorial but do not know which ones are easer for beginners??
Carolyn: Do you put the different lengths on a specific spot or you put them anywhere?
argüello estefanie:
Nongyui Tinamat:
mileena manty: ❤