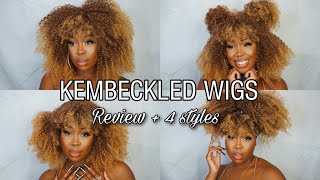
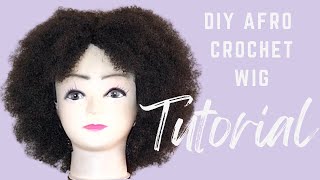
Diy Afro Wig Using Braiding Hair Extension|How To Get Afro Curly Hair Without Afro Hair Extensions!
- Posted on 02 December, 2022
- Sew-In Hair Extensions
- By Anonymous
Hey loves❤️ It’s #adjoaslay here and I’m back again with a quick and easy afro wig/big curly hair tutorial . omoni got curls, how to, diy hair tutorials, protective hairstyles, diy heaband, diy headband wig, diy headband wig tutorial, how to do a headband wig, how to make a headband wig out of an old wig, how to make a headband wig at home, how to make a #headbandwig tutorial, how to make a headband wig for beginners, shes omoni hair, curly headband wig, curly headband wig amazon, headband wig review amazon, most natural wig install, half up half down hairstyles, how to make a headband wig look natural, how to style headband wig, how to style a curly headband wig, glueless headband wig install, glueless wig install, how to put on a headband wig, feed in braids with weave, how to install a headband wig, yolova hair company, beginner friendly wig install
You can support the channel by
——————————————————-
*MTN mobile money 0241913509 (Augustina Boateng)
*Paypal ([email protected])
BOOK AN APPOINTMENT WITH ME FOR YOUR BRAIDS
——————————————————————————
https://www.instagram.com/adjoaslayhai...
Click here If you want to see more https://youtube.com/c/AdjoaSlay
HAIRSTYLES https://youtube.com/playlist?list=PLLQ...
..................................................................................
P R O D U C T U S E D
HAIR EXTENTION - https://a.co/3VjXOxS
SYNTHETIC WIGS - https://a.co/9Y3j9wg
HAIR PRODUCT - https://a.co/7AbGltM
HAIR TOOLS - https://a.co/iZVjrDN
HAIR WIGS - https://a.co/cicLSmt
O T H E R V I D E O S
How to: Co-wash Dry Hair + Everything you need to know https://youtu.be/lPzr9EKuqiE
5 Natural Hairstyles For Lazy Hair Day https://youtu.be/yp9cn7MG9P4
A TYPICAL DAY IN MY LIFE as a Nurse and a YouTuber Living in Kumasi VLOG https://youtu.be/E9om5zLoITw
HOW TO; Quick & Easy DOUBLE top knot With curls in front https://youtu.be/PUwoXk7QDeg
HOW TO: DIY SPACE BUN WITH CURLS ON 4C NATURAL HAIR https://youtu.be/1xq-q0tqLmI
DIY $1.16 kinky Drawstring Ponytail Using Braiding Extensions https://youtu.be/skZ3HRVG9bM
EYEBROW TUTORIAL https://youtu.be/d-agdfHLVx0
*QUICK & EASY* How To Turn Your Old Knotless Braids To Butterfly Locs With Curls Using Kinky Hair https://youtu.be/bGwsio6b6Ms
UPDATED FLAWLESS EVERYDAY MAKEUP LOOK https://youtu.be/-VDa2O3Ew6E
BEST NATURAL HAIR TIPFOR FAST HAIR GROWTH https://youtu.be/jH4rIcb_nKc
P L A Y L I S T
————————
MAKEUP TUTORIALS https://youtube.com/playlist?list=PLLQ...
VLOGS https://youtube.com/playlist?list=PLLQ...
REACTION VIDEOS https://youtube.com/playlist?list=PLLQ...
CHITCHAT https://youtube.com/playlist?list=PLLQ...
BOOK ME FOR YOUR MAKEUP
—————————————————
https://www.instagram.com/slaydolls_ma...
FIND ME ON ON SOCIAL MEDIA
——————————————————
INSTAGRAM: http://www.instagram.com/adjoaslay_
FACEBOOK: http://www.facebook.com/adjoaboateng
TWITTER: http://www.twitter.com/adjoaa.slay
PINTEREST: http://www.pinterest.com/ajuaaslay
SNAPCHAT: http://snapchat.com/add/ajuaa.slay
CONTACT ME FOR BUSINESS,PR AND COLLABS
EMAIL: [email protected]
Like and Subscribe for more!!!!!!!!
Love form Adjoa
New & Latest sleek ponytail hairstyles for black women | cute
New and latest sleek ponytail hairstyles for black women 2022 |cute
Sleek ponytail hairstyles for black women |cute
Ponytail hairstyles for black women |cute
New and latest braiding hairstyles for black women
Cute and latest hairstyles for black women
Cute and latest braided protective hairstyles 2022
New and protective hairstyle’s tutorials for black women
Black women with braiding hair
Latest braiding hairstyles for black women, latest braiding hairstyles, new braiding hairstyles tutorials for black women,braided hairstyles for holidays,braids hairstyles for the holidays, latest braiding hairstyles for black natural hair,baddie braids for black women, easy tutorials for black girls,braiding hairstyles tutorials for black women 2022
Cute and sleek braiding hairstyles 2022
Braids hairstyles for black women
Sleek ponytail for black women cute
Ponytail hairstyles for black women latest ponytail hairstyles for black women 2022
Ponytail hairstyles for black women,latest ponytail hairstyles for black women, ponytail hairstyles for black hair, 4C hair ponytail hairstyles, ponytail hairstyles, styling your natural hair
#afrowig Afro wig,Afro wig tutorial, Afro wig with bangs,Afro wig for black woman,Afro wig ponytail cap,Afro wig diy,Afro wig with braiding hairstyles,Afro wig with attachment making,Afro wig with Brazilian wool hairstyles,Afro wig crochet
#wigtut #hairtutorialsvideo #headbandwigcurly #headbandwighairstyles #afrowigsforsale #crochetwigstyles #crochetwigtutorial
Hi guys, what's up and welcome back to my channel, my name is ajoa ajua slay baby. So today's tutorial I'm going to be showing you how I did this afro wig using uh braiding, hair extension, so starting off um, we are going to need a braiding hair extension. Of course, you're going to need a weakness, we're going to need some straws. We are going to need some bobby pins, I'm going to be doing some rubber bands and now, let's get into the tutorial, but before we get into the YouTube we'll do hi welcome. My name is ajwa, like I said if you are new here, welcome to the channel. If you are old thanks for always coming back, please make sure you subscribe to the channel and turn on post notifications so that you get notified anytime. I upload a video and on this channel I upload hair tutorials, makeup, tutorials, Fashions videos, Vlog lifestyle, Vlogs and everything in between okay, so welcome on board, so starting off we're going to stretch out the hair. Luckily, for you, if you found a pretty stretch, hair no problem, but for me I'm using a bulky hair. So I'm going to stretch out the hair. So after stretching out the hair, I'm going to take the hair in bits and I'm going to crochet it to my wig net. Yes, so basically, that's the most important thing. That'S the most important thing as in that's the most work for this week's tutorial and if you're fast. I think this should take you like an hour to crochet all the hairs to the next, but if you're slow - and you know you get overwhelmed in between relax, you can take over one week to do this week. It'S your week, if you don't want to wear the wig, so if you decide to do this for one week, no problem just do you move, do whatever makes you happy, but just make sure you understand the tutorial and you are able to follow the tutorial and You'Re able to do your own afro wig. Okay, if you can't do yourself, you can also pay me to do it for you, okay, the link to my hair page will be in the description box as well. You can send a DM via my hair page, and I can help you do one for sale of course, you're going to pay for my time and energy and everything that I'm going to use so feel free to do you boo so continuously, slowly, I'm showing you How to crochet the hair to the Nets you're going to do it in bits? More small, small you're gon na have to pack chunky and bulky section of hair and crochet, because if you do it that way add a long. At the end of the day, you have yourself to blame so now we've got into the middle of the net and we'll continue crocheting the hair around from here we're going to crochet it around the neck. From the beginning, I only focused on the back part, but when you get to the middle you're going to try and crochet the rest around the knit as you go ahead yeah so for this channel we don't we are not looking for perfectionists, we don't do. We don't do Perfection when it comes to weak tutorial. Oh lie, I'm a big perfectionist, but when it comes to really tutorial when it comes to hair tutorials, we are all beginners and we are all doing whatever we think we want to do. I mean if I wanted to do the serious like a hairstylist. This will not be how I'll be doing it, but I want you guys to know that we are all Learners and me myself. I do things wows. I do things how they work for me. You know you don't have to be perfect to do DIYs you know. Do whatever comes to mind. That'S why I was just sitting in this. This video, I came to mind like it's, been something I've always wanted to own, like I love afro, wigs, so much and I've always wanted to own one, but I don't know why I kept procrastinating, but finally I did it. I did this so now we are the front part and crocheting the hair around the neck. So, like I said so, I didn't want my front part to be too much so I left some intervals. It wasn't close to each other like the rest of the hair, especially at the back, because I didn't want it to be too much in front of me. So that's what I did guys. So you should go into this part of the video. Congratulations like you're. More than five minutes into this video congratulations Please Subscribe. If you have not subscribed already leave any comments, I thought it could be an emoji just to make sure just to make me know that you were here. You actually watched the video. I really appreciate it when people take their time to show love to leave, comment to make sure to make sure. I know that they were here to watch the video and they've learned, something they are going to use to finish their life, because that's what this channel is about and that's what this head tools are all about. Finishing your life. Yes, you know. So now we are getting to the center and I'm going to take it slow to that to make sure the ceiling is perfect. Okay. So, after a few days later, I actually go back to the wig, and now I'm attaching the hair to the straws. So your attach the straw, you secure the straw with a bobby pin from The Roots. Then you twist the hair and wrap it around the straw. If you really want your curls to pop, you need to twist the hair. If you don't twist the hair, the curls are not going to come out like mine, so you have to twist the hair and wrap it around the straws. So, like I said you don't have to kill yourself. If you can't do this with in a day, it's fine baby because it took me time like it, took me weeks to complete this week. But then this is the video. So you won't know how many days I spent looking at just watching the video. But I would like to take me weeks. It took me like a month and two weeks to finish this week, because I was actually done with this whole part of the wig. Like I was done, I placed the wig I was done. I was left with the final part of the week and I was overwhelmed. I was going through a lot. I mean life happens, so I started to abandon the rig for like a month. My mom was like. Would you do this wig? It left it there like that for like four weeks now, what you do she was. She actually was eager. She wanted to see the outcome of the week, so she was actually pushing me to get back to work. Get back to the finished look of the week as you really wanted to see it but, like I said, you're human, I'm human, like you! So if you feel like you can't complete this video in a day, you don't have to kill yourself. Okay, take all the time you need, like I said: if you don't want to wait a week, so take all the time you need. Okay, just do you so for the last time, you're going to apply you're going to apply the straws and you're going to hold the straw in place with a bobby pin. Then you twist the hair and you wrap the hair around the straws. It'S a very simple process, guys so the more you do it, the more you get used to it and you'll be fast. So starting up will be sketchy. Yes, but the more you do it, the more you get used to it and the more you become fast in doing this. So that's it guys. So take your time make sure to twist the hair is to waste. Well, you know, and when you're getting to the end the ends of the hair you're going to twist and wrap twist them up twist them wrap onto the hair is finished. Then you fold the straws at the end and you secure it with a rubber band. Yes, this is because it doesn't come off because if you don't see crazy to come off so now we go to the last section of the hair. You attach the straw security to bobby, pin you twist the hair with your hands like so like the way they do. Dreadlocks you know twisted with your hands, then you wrap it on the straws to stay with your hands and you wrap it on the straws. Once again to stay with your hands and wrap it on the straws, whilst you go very simple right so simple, so this is where the major work is. I mean attaching my hair to the net and wrapping the hair to the straw. That'S where the major work is because that's all the work you need to do like that's the major work after you're done with this to section of working, your wig is almost done. The rig is almost done. The rest is fulfillment because you really want to see the outcome of the week after you're done with this session. The rest is for a few minutes, like you got to see the outcome of your work still simple, so you wrap the hair around. Then you secure the ends with Bobby. If you get the ends with rubber band, okay, you can also use bobby pins. You can also secure it with bobby pins, but I didn't have enough Bobby fingers. You can secure. The ends will probably be. I didn't have enough bobby pins, so I use the rubber band. If you want to see how, I think, how to secure the notes with bobby pins, you can watch my DIY drawstring ponytail that the actual just been pretty cool. I'M going to I'm going to leave the link to that video in the description box for UK. I thought I was done actually, but I left this one in the very last one, so the same process, you secure the straws attached to the hair with bobby pins boom. Then you twist the hair. You can go any direction you want. Actually, this was the direction that I was okay with you. If you are a lefty, you can go on the left side, not just left his door. Whatever side you go, that makes you fast or helps you you go. But for me this was the parts that helped me. This was the part I was okay. That was easy for me to still need to this direction, so you can't do whatever directions. You want to do. Okay, so you just to One Direction. Then you wrap it around the straws. Very simple right. Let me know in the comment section leave this tutorials because I feel like this tutorial is simple. I feel like this tutorial is very simple. Just that you get lazy, you can get lazy easily, but then you should really eager to see the outcome of the week. I don't think you get lazy because for me I wasn't eager to see the outcome. They even knew. I really wanted that fruit, but I wasn't eager to see the outcome. You know when life hits you just you just do whatever you need to do so. Take all the time. You need okay, because when you're done with the wig you're done you're going to use it forever. So we were done with the wrapping of the hair to the straws. Now it's time for the game, changer, so you're going to need hot water, and I mix the hot water with my DIY conditioner, the error conditioner, which is said to be selling very soon. So you won't need to take your time from UK application for me, but then, if you do for now you can use any conditioner you have. But for me I used my DIY conditioner. You know because it has a lot. It comes with a lot of goodies in the conditioner okay, so you're going to put the wig in the mixture of white, water and conditioner. You know you're going to set it. That'S how you set the curls. Okay, the water should be warm to be hot. Actually so that you'll be able to set the hair, because it's if it's not hot, the hair will not be properly set. Okay and The Conditioner helps with frizzy and tangles, and it's a smooth seal of the curls. So you need a conditioner okay, especially a conditioner. Like my but then like I said it will be selling very soon so have all the patients in the world for me. Okay, so you're going to wrap it around the towel or you know some cotton dress that you don't use anymore just to drain the water out of the way and you're going to leave it for it to dry if it has to take like usually for me, I leave my hair for a whole day. I actually put it on a dry line for a hoodie for it to dry, because if it doesn't dry well, I feel like the colors does not come out well, if the water doesn't, if the hair doesn't dry well. So for me, I make sure it's dry and, like I said uh, the wig was sitting on this mannequin on this mannequin here for like one whole month before. I did this unraveling, of course, but if you're in a hurry, but just if you're in a rush to wear the wig, just make sure you let the weight sit for like a whole day so that you can get all the dryness it needs. Okay, so that you can, the water can get out of the week and it can be as dry as as dry so that your colors can pop okay. So that's what you need to do so you know you. You take your time to separate the curls in bits in tiny bits, because if you leave the curves chunky, it will not be awful. It will be a different style, but I also maybe you're going for a different style. You can leave the colors as chunky as you want, but if you're going for an hour for week like what I'm doing, you have to take your time to separate the curls in bits. Okay, that's how you're gon na do curves! That'S how you get the afro curves separating it in Beats is how you get the afro curse, like I said, if you're actually going for a different style, you can leave your curls in the chunky Parts, okay, but I was going for now for a week and If you're, actually going for an afro wig like mine, make sure you take the time to separate the colors, and this will not take you to it's going to take your time like you can do the separation of the cars within like 20 minutes within 20 minutes. So, by 48 hours you should be done with this week in 48 hours. Yes, if you're actually doing it on a go, it should actually be done with this region 48 hours, because you really need it. You need a day for the curse. You need a day for the hair to get out of the rig, so the hair can be very dry for your curls to pop. So when you're done, you can trim out excess hairs here and there you know, I actually, I loved my wig big. I wanted. I actually wanted a big wig, so I didn't cut too much. You can actually shape it for it to become very small, but I actually liked my wig big. You know I, like Ash Drive you've been on this channel. You know that I love extra things. I'M extra so I needed my Afro to be big. Even this person has, because I wanted I'm sure, I'm going to be doing another full week, because I really want to get dab of a womb after weak effect. And you see there were some spaces in the front section, because you remember from the beginning. I didn't I didn't. I didn't crochet too much hair for the phone because I didn't want my phone's part to be too much. Yes, that's what I want. If you want your front part to be too much you can you know you can crochet a lot of hair there, but for me I didn't want anything too much, so I didn't push a lot of hair in my front. Hence the space this you see in the front section, but then, if you at, if you wear it on your head, you are not going to see those spaces because your hair is going to conceal it and if you're wearing it on your head, you can actually Wear like a Brown net before you wear it, you know to conceal everything, to make everything. Look like it's coming from your scalp, you get it so voila. We are done by the week now it's time to attach the wig, and for this way you don't have to do too much to your hair trust me, you don't have to comb over your hair. You can just pack your hair to the back, just like what I did and put on your wig, so this wig is for obviously for those of us that are always on the go. You just pick it you put it, I mean you can put this hair on your brains, like you, can just pack your boots in the back and put this wig on it. You know yeah switch it up in a few seconds baby. You don't have to take the whole day. You know very simple, quick and easy beautiful. I love it even though I didn't get the wrong effect like I want her, but I'm sure I'm going to do another one bit of a problem if I definitely most definitely guys so. Thank you so much for watching make sure you subscribe make sure you like make sure you leave a comment and I'll see you in another video

Comments
Esther Young: ❤️