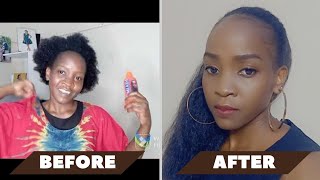
New Trend Trendy Claw Clip Half Up Half Down Quick Weave Tutorial *Do My Christmas Hair With Me *
- Posted on 27 December, 2022
- Sew-In Hair Extensions
- By Anonymous
New Trend Trendy Claw Clip Half up Half Down Quick Weave
hello my lovelies♥︎I hope you all enjoy this Christmas hair tutorial. almost all of these items can be found oat your local beauty supply store make sure to like, comment, and subscribe! stick through on my road to 1k subscribers❣︎
Items used:
Two 36” 1b bundles
One 613 bundle 24”
Super Hair Bond Glue
Black Wrap Paper
Black Wig Cap
Got2b Glue freeze spray
Black Ebin Spray
Check my storefront!⇩
❤︎︎MY AMAZON STOREFRONT❤︎︎
https://www.amazon.com/shop/akyra?ref_...
: 127 ꨄ
✨ ✨
❤︎︎STALK MY SOCIALS❤︎︎
⇩follow me on Instagram and TikTok!⇩
Instagram: @akyrasimone https://instagram.com/akyrasimone/
TikTok: @akyraasimone https://www.tiktok.com/@akyraasimone
AMOS: @akyrasimone
———————————————————————————————————————————————————————————————
: ⚠︎︎
And since we've no place to go, let it snow, let it snow, let it snow! This is honestly going to be a very interesting video. I don't have these locks in for over a month now, literally almost gon na be Christmas. I can't be going with the same hairstyle that I had for Thanksgiving can't do that one can't do that. One Kingdom. I know it's supposed to be like a protective style, but still like there's limits. Basically, there's been this little claw. Clip Trend circulating on Tick Tock and I'm really a weak girl. I really haven't been able to participate. I'Ve seen somebody do it with a quick weave and I thought it was cute. I'Ve never done a quick weave, never had a quick weave done on me by somebody else, so this is going to be extremely interesting. I don't want to label this video a tutorial, because this is my first time if it do come out right. I'Ma just say it's a tutorial. Nevertheless, I'm just gon na record everything. I went to the store and I already ended up getting me the bundles. They love bent up because they was folded up in the corner, but I went ahead and give me the bundles. I ended up getting four bundles. One of them is blonde and I'm kind of upset, because I accidentally got the blonde bundles in 24 inch, but the black bundles are in 36, inches like. Why would I do that? Why would I do that? Why would I do that? But it's whatever we're gon na make it work. Though y'all see I got my wig cap. They use the black one in the video just they said just in case like like there's space in between each bundle. You don't want to be able to see it, so that's why I use the black um cab. I also ended up getting some glue if I could find it um. I got this glue um, which was literally at the front of the hairstyle that I went to. I'M gon na go ahead and take these out and I'm gon na wash my hair blow dry, all that good stuff, because look the the hair is coming out. The hair is coming out the twist it's sick. I I prayed to Jesus Christ that this comes out. Good because I really don't have a backup plan, if this don't work, then there's really nothing. I could do let's. Let'S just start, let's just start the thing get together. It makes me look at you too out there baby, I'm talking crazy. Now it's time to go wash it also. If anybody was wondering I do not recommend getting invisible locks and I'm just gon na leave that there won't. You feel me. Thank you. What I'm gon na do now is blow dry, my hair, and then we can really start getting into doing the actual style itself. So, let's, let's do that? Let'S do that! It'S been a long rough go at it. The end to my broke and I tried to glue it back with lace, glue, asked me how that went literally peeling right off my arms, tired, is hiding this bathroom. I feel like I'm getting muscles like I'm ready to be done. This style better be cute or I will cry, I will cry and I'm canceling Christmas for the whole world because don't play it's not even funny. You want to make sure when you blow dry you blow dry as straight as you can. I did end up using a little bit of heat, protecting just to make sure that I have minimum damage, but you will be flat. Ironing your hair in the front and if you want, especially if you have hair like mine, if you want your flat iron to be flat, it's important that you blow dry well, foreign, if you guys have already seen this style. You know that in the front there is two sections that kind of slick behind your ear and you're gon na have to create a middle part. For these two sections. You want to make sure that middle part is as straight as you can. I have a moving scalp, so it's pretty difficult for me to get straight Parts with any particular style, but basically after you get the middle part, you want to also separate it into two separate sections. That'S going to be the two parts that go right here. Oh look at it. It already look a mess. Lord I'm just praying just come out right now. I lost the original Clips, but basically after I parted off the two sections I made another part from the tip of my ear to the other tip of my ear, and that was where I braided off the back of my head, and here you can just see Me putting grease applying moisture to my scalp just to make sure that it's not dry underneath the style but yeah, basically um. You want to part it off from the top of your left ear to the top of your right ear and that's the part you want to break down, because that's where the actual bundles will be glued on top of the cap. This is the cat, I'm praying and this is going to fit on my big. Oh it's already. It'S already trimming already tripping, so I already started prior to, but basically all you're going to do is take your bundle and you're going to measure it from where you want it. To start to where you wanted to end, which is what you saw me doing, then you apply glue. I apply glue on the bundle. Some people prefer to do it on the cap. I think it's more effective if you apply glue on the bundle itself first and then you're just gon na place on the cap, where you want it to be, and you're gon na kind of hold it in place for a few seconds, because the glue does not Dry right away to speed up the process, I use the blow dryer um just so that it could dry a little bit faster, but um yeah. As you can see, I kind of had a pattern going um. My intentions was to kind of intertwine the blind bundles with the black ones, just so that it kind of gives that two-toned effect. So you'll just see me um measuring out the blonde bundle and then gluing it there um. I only used about three um. I use one entire blonde bundle for this style, but I ended up um, cutting it off and using like four different sections of blonde bundles for the back part. If that makes sense, I didn't want too much bun in the back, but I wanted a good amount and like you're wrong once you finish, gluing your bundles you're, just gon na cut off that excess cap. For me, I started off using scissors some baby scissors, but it was easy for me to use um a mini facial razor that I just got for like 99 Cents at Walmart. Now this is the part where I told you it's important to blow dry your hair. Well, I have some difficulties because I did not blow dry my hair well at all, but basically the entire front portion of your hair. That was not braided, underneath the cap is going to be flat iron at one point or another, but for this particular video I did the ponytail portion first and then I flat ironed the front two sections at a later time. But basically every hair - that's left out is going to be flattered, no money. For this part, you will see me molding and it's looking down the ponytail part with got to be glue free spray. I used a pretty good amount just to make sure that I get everything and spread it out evenly for this part, if you're looking for a flatter look, you want to make sure that you do this part in sections, so you want to part it off apply The got to be glue and then blow dry it and you keep doing it like that until you molded it the way you want it to, but I didn't do it that way, because I have very soft hair and I also didn't want the ponytail to be Too, tight because I will end up having a bald spot, so I kind of only did it on the front part that was visible also when you're molding your ponytail, you just want to make sure that you're kind of molding it to fall over the top of Your quick weave so that it's covering the tracks and I feel like the further back the ponytail - is the better. The hair looks when you apply the clip so um, it's just a personal preference. I did mine to kind of go over the top of the quick weave, so here I am just flat ironing the front two sections and just making sure I get them as straight as possible. That way, when I slick them down, it'll be completely flat foreign. For this particular part, you want to make sure that you do this in sections. So what I did was I parted off the corner of the section and used a generous amount of got to be glue spray. Then I combed it out so that it's evenly spread between the piece and then use my blow dryer to kind of set it in place. Behind my ear, it's important that you comb out your edges before you start that way. Um you don't have any trouble later. So you can comb out as much or a little is, as you need to body Federal, the funny family. So if your hair is on the shorter side like mine, what I did was cut off a very small piece of the bundle I applied a little bit of glue to the bundle and let it dry um before I applied it to my head, because I didn't Want it to dry on my follicles, so I set it out for about 45 seconds um, and then I placed it onto my hair that way when it's time to take it out, it would just peel right off, but, as you can see here, the glue was Kind of halfway dry um and I applied it not towards the root, but I left a little bit of space between the root that way um. When I take it out, it's not yanking off my hairs but yeah once you finish with both sides, you want to apply this black wrapping paper that you can find at your local hair store for a couple of dollars. I applied it that way, um the hair kind of stays in place, and I think this really helped a lot. You also want to use the same black wrapping paper to wrap around the little braid that you made for your ponytail part that way um you can glue the bundles on without it getting in your hair, so just make sure you wrap a pretty good amount. I didn't do the best with wrapping this, because I couldn't it's hard to wrap, but um. I did as good as this as I can, but just make sure that you use a good amount of paper so that the glue does not set your hair. Now, for this part, I think it's better if you apply a thick line of glue on the paper itself, instead of the bundles, because trying to wrap that ponytail by herself is kind of difficult. So I just applied a little bit of glue on the paper itself and just wrapped the hair um around like normal um, and then I let it set with a blow dryer and yeah everybody remember we were taking cars and fish like a little. This part was a little bit hard for me, but I did end up using an actual claw clip so that I actually get like the full effect of it. Basically, I just flip my hair forward added the clip in the back and then cut my hair to the desired length because it was a little bit too long, but yeah. This part will take some trial and error. As you can see in this video, the clip part did have a lot of bumps in it. I did go and fix that off camera, but yeah um. I did struggle with this part a little bit, so it might take some trial and error, but once you're done you're just gon na fluff it out um comb, it out cut it to the desired length until you like the way it looks now you better keep Your distance McDonald's, so this was the final look with my edges done and everything um I had walked around with this hair all day I got so many compliments, but yeah make sure you guys like comment and subscribe, and I will see you in the next video Yeah, I just had a lot of me, but let me tell you I, like my life, you ain't got ta, do it honey,
Comments
Azriel Steele: yopppp