Diy Lace-Wig Braids Like A Pro. #Hair #Lifeofanactor #Viral #Viralvideos #Youtubeshorts #Youtuber
- Posted on 26 December, 2022
- Sew-In Hair Extensions
- By Anonymous
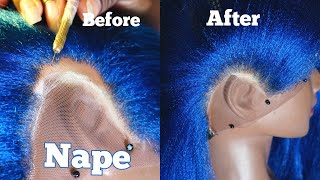
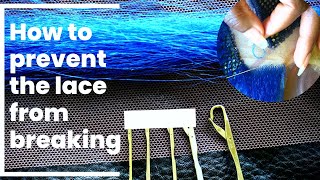
Good day, lovely people all over the world effects for joining and subscribing to family's Fitness TV. If you're new here, that's the channel, where you get to learn a lot about hair painting all the secrets, all the tips that you need to know to get better at your craft, okay and I'm your head, Dr filming coyote, see you with everything and today today Today, I'm being very excited excited at the fact that I'm going to be sharing some beautiful secrets with you and yeah we're going to be talking about hair ventilation. Oh my! What is happening and the Hair World hair ventilation is a process of passing hair strands through the tiny holes in this lace. This lace is what we use to make the lace wigs, what you call the lace, wigs closures, the frontals and all of that to make a very beautiful wig like this. You need to master the act of hair ventilation properly, and you need to be able to do something that can wow your your clients. You know your audience and one thing I need you to take home right now. The first thing you must know is the fact that hair ventilation is very very time consuming. You need to be patient. You need to be really really interested in the fact that you're going to be spending a whole lot of time doing it. So that's the first thing and secondly, you need to know that you can ventilate with synthetic hair, fiber or pure human hair. Now, if you're, making breaded Wings, you don't need to ventilate with human hair, because it's going to increase the cost of production, and things like that like that, so what you need to do is get a good fiber. This is the regular attachment used here mechanical on fiber. You can buy any pocket hair synthetic to ventilatory to reduce cost of production. Now what you need, apart from the lace, you need the ventilating pins. They come in different sizes and the one to two two to three. You know the fewer the smaller the number, the fewer the number of strands the pin can pick to ventilate. Here I was trying to cover the excess holes in the lace. I got this lace. Wig like this, because I needed to save time of production for the person who ventilated it did a hasty job. You know mass production and all of that, so it has too many strands going into one hole and lots of spaces in between hair ventilation is supposed to create the impression that the hair grew out of the skin. You know creating a false scalp, so you're not supposed to see the the hair strands, go how it goes through from afar. Look at this one now you this is what you see at the regular markets. You know now other things that you need other tools. You need the big needle there, you need ventilating pins and they have two types: the one with the metal handle and the one with the wooden handle. You see that soon, so you feeling those um you feel in the head of the needle. Yes, it's the head. Without the pain you pick, you fixing the pin of the size that you want when you're dealing with the metal handle. Then here it comes like this. You can't refill the pin in the we don't have wooden handle. You can only get wooden handles of different uh. Pin sizes, then here is the fiber, I'm going to be filling that wig width. I had started feeling already you're going to get a closer look on how to ventilate. Now, I'm filling the lines to cover, I'm not feeling everything, I'm feeling the lines so that by the time I weave this can cover up for the other parts that you won't see this this line here is what will be seen when the weaving is done, and The big needle the head of the big needle is used to to cut to clean these lines, to create your lines, what you can call patterns too now the pin is fixed into the hole of the lace. I picked the number of strands I needed to cover. I I'll coil it around the pin and drag it out, while fixing the pin into the lace be sure that you're sliding it in while taking it out, be sure that you are not going to break the lace. You have to slide it out. Then you're picking the hair. Now you drag out your coil, then you turn the hook towards you and pull it out. This pin has a tiny hook close to the to the to the mouth close to the edge of the needle there's a tiny hook very tiny. You can only feel it with your skin. Maybe your the face, the tip of your finger. You can touch it and feel it, then that is what actually drags out the hair while ventilated, I plucked some strands from that other one. Now, because the number of strands in that hole was too much the one that came with it - and I didn't want it to be like that, so in other words, you can actually reduce thick knots by plucking a few strands out of what was ventilated. I hope this is close enough. Um we're still doing the ventilation process, it pick it out you roll twice, then you drag out while dragging that out. You need to make sure that the pin that that's hook at the edge of the pin is what you used to drag the hair out after coiling now slide out of the hole. Roll roll then turn the hook to face you. The hook is like a question, mark shape. Uh-Huh, you turn it to face you carving back to you, carving back to you to to drag out. You understand. I. I really hope you understand. Hair ventilation requires a whole lot of patience. Trust me. You need to try and try and try again until you get it so good luck if you're very busy. You can't really go through all of this and we want to buy from those who already even ventilate to sell. Maybe something like this like this. If I you'll be able to know the right thing to buy or what to ask for what to how to customize your list to look exactly Prof it as you want, you know, if you go through the holes, you see that they are often in a hurry. They have a lot of they put in too much strands into one hole and it doesn't make me look very beautiful, but now you'll be able to know the consequences of that. So here I succeeded in covering those holes. Yes, so it's going to be smooth because I um I was actually making big cornrows. You know, so it has to look really natural right there. I had not covered those ones. I just showed you now, but these ones are covered. Okay, I'm going to cover everything before I start weaving. You see that's covered and smooth. Yes, that's the effect you get now, I'm going to ventilate baby hair around there. Well, while ventilating your baby hair, make sure you use human hair so that I can melt it. Can stick to the skin when you're using um your edge control, then here this is the black one, color two precisely now after covering those edges. What like what I covered in the other week, you know how to you have to prep your your wig like this to be able to have those lines that make your cornrows stand out. You understand you, you prep it this way, then you begin to weave before you weave like this, so you see that I mattered after creating those lines um, I mattered them to stand out separately so that I can pick them as one you know like. I don't have to separate it with my finger or comb or anything they are already separated. So what I need to do all I just need to worry about yeah. This is how I uh actually mattered it to make them Stand Out separately. Okay, you do this. One after the other, so that when you when you're weaving you all you just need to do, is peak and add up as you're weaving. Yes, like that, so you need a big knee to the head of the needle to cut through to open yes open like that, then, in order not to make this weave the these weaves very bulky, I had to pluck a lot from The Middle. You know from where the weave will lay on. I had to pluck some strands from it, so that I don't have to deal with too many uh bushy strands. So here is the weaving process. Um. You don't want to make any mistake. You want to make sure it's smooth and this process, this uh feeding, cornrow um uh process. I am not allowing the the lines to show. I mean the line of the of the added extension. Yes like this cross. If I continue weaving like that, it's going so I'm taking it back, I'm taking it out; okay, yes, I'm taking it out! Yes out like that, so that you don't get to see the cross the crossed lines of how I added my attachment. You don't get to see where it passed, yes, taking it out now, so this is another process. This is another thing of its own, but it's recommended to make your weaving look more natural, more natural, yes, and you have to be detailed enough. Your attachment has to be well brushed and oiled, I mean creamed, you understand and you don't need somebody to be giving you what you need to feed in or you you prep them somewhere and you're picking it yourself. If you have to do it yourself, then you have to keep it. You have to prep it somewhere and be picking it. You know then um the lines in between the weaves depend on how how clear how Vivid you want it to show like. I have three line spacing in between each cornrow. You understand. Yes, you see how clear it's it looks very clear so in between each wave from one weave to the other. You have three line. Spacing that's another thing about ventilation. You have to count the line. Spacing you have to come to the whole. Spacing should be able to get what you want to be able to determine the density of the hair density like how full it becomes when you're done. So you see that this is looking beautiful already, oh, my goodness, then I actually weaved it very long, because I wanted it to be bomb length yeah and I added some beads at the end of the day, you're gon na love it when you see it for Those of you who just viewing for the first time this this is the channel where you get to let a whole lot about the hair industry. You got to know a lot about weave, making braided wig scintillation. You know just check out how beautiful your weeks can look with this skill of ventilation check out how much you can do, hair weeks, braided, wigs and how professional they can they can look. Your jobs will stand out with a proper knowledge of this game. If you're new. Here you need to click that button, you need to click that notification bell too, so you always be notified when we have stuff for you. Come on famous fingers here check out the completed version. I mean there's the color 30 and 27 mixed bomb length, cornrows beaded tips come on. This is beautiful. The baby here there are human hair, it's best to use a PC coil with that. You can be sure that you can lay your edges well and it will blend. It will stick to the skin, hey my darlings. How do you feel right now? I hope you really learned a lot. Okay, you. Let me know down there in the comment section. Let me know what and what you need me to share more life on and other topics or other things. You would like to know about hair the hair world, but then I can't live without saying. Thank you. Thank you. Thank you for watching for staying for subscribing. Oh, my God, I love you. I made a good luck. Continue to cross his face to shine upon you, the mighty name of Jesus. Then I am still your humble hair, doctor actor singer makeup artist, Finley coyote and until we meet again on this beautiful space, Venice fingers here,


Comments
officialMinisterKelechi: Woow this is nice
ADAMS FARUK: Nice one