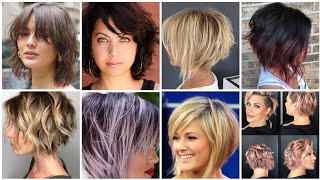
How To Do A Quick Weave Mullet Like A Pro In 2023
- Posted on 21 January, 2023
- Sew-In Hair Extensions
- By Anonymous
Heeeyyy to all of my amazing SUBSCRIBERS! Thanks for subscribing to my YouTube Channel! Please Like and Share! Let Me Know What You Think.We’re making the Mullet great AGAIN!
Get A Pen & Paper and Take Notes
If you’re doing this on your client always do a thorough client consultation so you can set the expectations for the desired results!
Tools You’ll Need:
14” & 10” Milky Way straight
1 27 piece Milky Way
Stocking Cap, Protective Shield, Razor Comb, Shears & 30 Sec Glue
Blow Dryer, Flat Irons, Clips, Comb & Wide Rake
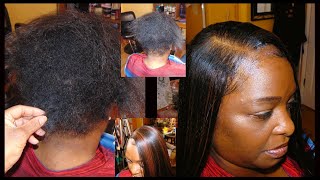
Uh, it is your girl, Solis Noel you're, a beauty industry coach. Thank you for subscribing to my channel and if you haven't subscribed, make sure you do it we about to eat this subscribe now. I hope you're ready. Let'S go that's right, we're back at it! We'Ve molded it up we're putting on our protective shield so evenly and smoothly, and guess what once we've done, that we are going to believe it dry, make sure it's dry completely, all right! So now that we're done with the blow drying process, everything is completely dry. It'S not wet at all, there's no moisture there. However, I am going to cut right here. Some slits into the stocking capsules in my ears can come out just so. I can make sure that I hold that cap in place today, we'll be using the 10 and 14 inch of Milky Way cute and the famous 27 piece that's going to be on my size. You got your 30 second glue. You also have your razor comb and your little nipples, I'm starting off my mullet, I'm going to start with my shorter hair on the side from with my 27 piece now, my medium, my smaller shorter pieces, which is this right here in the side and then close. It to the top I'm going to use my longer utilizing my shorter pieces. First, I'm going to go ahead and get this out of the way as far as the short hair on the side goes, because I just want to go ahead and cut that down. Think about this, as you can see, they come curled, but what I do is flat iron them out, because that's how you get that Wiggy look out. You know how you can see some individuals, hair and it's cut and they'll have have like a 27 piece. They have an extremely cute style, but it still kind of look old. Ladies, that is because they did not flat iron. It sideboards are key. It is like that signature piece, so you want to make sure that you have cut four pieces. I just measured it out from the left to right and I am going to cut four of these and the reason I'm cutting four is because I want to make sure that I don't have any gaps. I want to make sure that it's going to be thick enough when I start utilizing my Razor to razor it and blend it, so you can never overdo it. You can under do it when you start trying to get your sideburns to look amazing like you would like for them to look. You got to make sure that you have those stacked on top of each other, each other like so excuse me, and you want to make sure that you place them right where they belong, putting enough glue on there enough adhesive, so that it'll actually hold, and when You start combing that they don't come down, so you got to be strategic with your placement, make sure that you have them close together, because this is a part of that signature piece at the end, when you start to blend everything in you see how I'm laying That there yeah and make sure that you are putting a little bit of applying a little pressure on there and get your blow dryer and there you have it straight to the point we're going to do that on both sides. I'Ve already done on that side. So now I'm doing the exact same thing on my left side, so you guys see The Sideburns that are here and I'm excited already. I think I should just leave it like this. I mean with everything they're coming up with. Why not they're doing everything up I mean I don't understand why we couldn't rap a woman, so during the next row, which is literally going to be I'm gon na be coming around the size because remember this isn't a Mohawk, The Mohawk that we would go ahead And do it all the way back, we're not doing it back, I'm just going to kind of curve keep curving like so because when I get right here, I'm going to stop because when it's a moment the hair still kind of comes around on the side. But it's shorter right in this area, this area, only you heard that all right, let's get to it, be careful with your placement, make sure that you're not doing the Mohawk that you are placing it right around your ears. You wanted to cuff your ears so that it will give you the mullet. Look that we're ultimately trying to achieve, if you put it placement, is everything if you put it wrong. If you are not placing it, you see how I'm actually curving that around the ears, making sure that I have enough adhesive and I'm applying pressure but again putting them close together so that when you start utilizing your razor, you do not have any gaps. Any holes or anything like that now I hope you remember what I said now, I'm going to start utilizing my shorter pieces utilize, my shorter piece of pieces, because when I start razoring I want it to lay really really really tight to my head really tight. In my head and when you're laying your tracks, you want to always make sure that you are doing them close together. You want to do them close together, because you don't want to hit it with the razor and then have a gap. Do them close together. You don't have to do them it's too, too close, but at least maybe about literally about that far apart. No more than that, you see, I even see my little light shirt in the back. That kind of shows you the difference. It'S very far as you should be able to you, should leave them if you leave them. If you do them like that, that's going to be a problem when you start razoring it and you're putting them that far apart, that's going to leave a huge gap whenever you hit it with the razor and that's not what you want you want to do it As close as possible, let's get back to it. We'Ll continue to move the process right along. As you can see, I am doing it from a little bit higher now and I'm not going all the way to the back. I'M just stopping right there in between with my fingers, and that is because I want to make sure that I put it right there in my parietal Ridge, okay, so this is, it should be looking now. You should see from the front view. This is exactly what it should look like. It looks like it's going to be balanced. If you put the hair up too high, then you will not get the results that you're looking for a lot of time. People do not know how to balance out a face. Facial shapes are everything you have clients that have a heavier face down here. You have a client that may have high cheekbones. At the end of the day, you have to learn how to balance a facial shape. The ideal facial shape is oval, so you want to make sure that when you're doing your placement that you are placing the hair in the proper place, so that when you finish your overall style, it gives you the desired. Look because my place is what these tracks all the way up here, just think about how that's going to look. That'S because you're gon na look like you're gon na have a mohawk for sure all right mission accomplished on both sides. Don'T look at the disrespectful kitchen! I feel so secure just cutting this like this, because I have it close enough. I have my translate close enough that it doesn't matter. I can do this with my eyes closed, and I know it's going to give me what I'm looking for you see that you see that. That'S because I remember I told you to press that hair out. You see the difference in how the hair lays you don't see that wig look now when you cut this, you want to leave this long still we're going to do that at the end. That'S part of the finishing touches so that once we've cut all this band off, everything rolls up. We want to make sure that everything is in place, because what can happen is depending on how you've actually laid your your tracks, if you didn't bring them down far enough, what can happen is this thing is starting to roll, especially being that we didn't put a Braid or didn't braid down the stocking cap and we want to make sure that our hair is long enough to do any type of camouflaging that needs to take place at the end. So all yes, ma'am! We raising that to the gods honey. Now we're ready to go ahead and nip this cap and get comfortable and start cutting off all the excess so that we can move right into laying our hair we're starting off in the back. As you see from left to right going in a small Direction, you see how I'm gon na actually lay this in the back and I'm using the 14 inches because we're going to put the longer hair in the back. But you see how I'm doing the smiley face. You want to make sure that you have a semi-circle in the back, because we want that hair to come around on our sides. We don't want to do it straight across horizontal. We want to make sure that we have someone of us of a smile shape placement so that we can lay the hair the proper way. So it gives the results that we want make sure you put enough adhesive we're going to start in the back and we are going to work our way up, applying that adhesive applying pressure and doing it like so whenever you're laying your wefts make sure you apply, The pressure - that's everything as well, because you do not want them to slip out we're going to continue to repeat this left to right left to right doing the same technique. You see how that's semi-smiled we're going to do this all the way up to the top part right here, where you see the hair, that's meeting just like so, and that's where we're going to stop right. There we're gon na stop there, because we know how we want it to look and we want it to come around on our sides and we're going to still keep it close together. Keeping it close together is everything pay attention, not that wide, very, very close, because we know we start cutting. We know the results you see. This is how it should look see how that's coming around on the side and all that was done with a smile. So that's exactly how it should look everything moving in the right direction. We'Re still smiling it we're still so happy about this. So there we go we're at the top. Now we're going left to right we're finally putting it horizontal because we we already know that if we place it at the top, it doesn't matter it's going to automatically fall on the sides anyway, so left to right all the way right here at the top. I hope you guys took some detailed notes in our understanding what we're talking about, let's get right into it, a little bit further. This is what you should look like now: we're going to start working our way around the front, as you can see from the left to right we're going to make sure that we continue to move it up, because we're going to start working on closing this baby Up you see that that's where it's going to end, that's where the closure is going to go where the closure goes, is everything you see how that is a circle, make sure that it is a complete circle that it is not a jacked up Circle? Here we go, that's what the closure piece is going to look like, and it should be able to fit right in there remember everything is a complete circle. So what we're going to do is kind of palm tree. It out take your flat iron and what the flat iron is doing is smoothing out that actual weft, making it flat as possible put a little bit of adhesive on there and it's going to fit right there in the top. And that is how you do your closure. Take your time, let's get to the mullet all right so now that we have all that out of the way, let's focus on section sectioning is for control for those of you that are beginning, I'm going to always say even for those of you that are more Advanced make sure that you section section pretty much, gives you a guide. So what I did I parted this out, as in a triangle shape what you see. I'Ve actually sectioned it out of my way. So I'm going to be focusing on cutting my sides right here, because I know how I want it to look. Remember always start off taking off less because once it it's cut, you cannot add you can only subtract. So what I'm going to do is start off cutting this area right here, as you can see, it already has like this mullet appeal to it right, but I'm going to start cutting right here so that I can gradually - and I do main questions I'm going to Hold it out of somewhat of a 45 degree angle, because I know that I wanted to kind of give me a stacked. Look. 45 degree angle gives you Stacks. It gives you anything, that's elevated. So what does that? Look like holding my side out right here on the side holding it out at 45. This is 90 straight out from the head. This is 180 degrees, which means over Direction 180 degrees. What we're going to do in the back. That gives you long layers, and this is your 45. If you was doing a bow and you wanted to stack up in the back 45 degrees - is what we would do. So what I'm doing is. I have my razor comb holding it 45 degrees. Remember I'm starting. It longer make sure you have you see that that will give that step, make sure you have sharp razors get you some new ones, keep changing them out, I'm leaving that longer, because I know I'm going to be able to go back in there and play with It, but I didn't know, y'all see that mullet coming alive. I know you see it. Where do we put that heat on and finish it off? Remember I told you to leave these long ones, because that's what we're gon na bless them with. That'S that last Finishing Touch so again: 45 degree, 45 degree and always when you're looking straight ahead, I'm gon na look what you guys when you're looking straight ahead, you should be able to see the balance whenever you're doing it to start creating my bang and I'm Leaving it longer and I'm just raising it, this is just going to cut out before I go in there, and this just allowed me to see and I'm just holding it down at a zero. It'S not really any elevations at all, because I don't want to start creating the layers too. So this is just to get it out of my way so that I can see what I'm gon na do to the back all right so still cutting that leaving the sunlight long. I know y'all see the dish all right. That'S a little bit long! You see that - and this is how it should be. Looking I'm going to go in here and put some I'll see that now what I'm going to do is go connect this all right. This is where the magic takes place. As you can see, I am taking my hair and I am over directing it at a 180 degrees. That'S right, 180 degrees gives you long layers in the back. It'S going to be longer and we're going to have a lot of layers. You'Re going to do a 180 degree cut, and all that is, is a matter of putting the hand hair in your hand over directing that 180 degrees and cutting it like, so don't make it more difficult than you ought. Okay, you guys see those last remember: your customization is what's going to seal the deal with curling his hair forward and we're going to just take this flat iron and run through the whole entire head, just dragging it and guess what I think these are the results Of a 45 a 180 and a little bit customization remember proportion is everything as you guys can see. Now I'm not a fan of the mother that was back in the day type style, but you know it's trending, so I said everybody you know wearing this. Why not show you how to do it and give you a little information on it? Look at the back silly snow! Well, your beauty, industry coach, make sure you like it. You share it and subscribe. Do we eat this mullet up or what? Ah, let's go


Comments
Indiaah Alexandra: You explaining balancing facial structure is everything! Such a great teacher I looove this look !
Cassidy DonShae: This came out really pretty and you gave a real tutorial. Thank you!
LAliza Ayers: When I tell you I'm on the edge of my seat like !!!! I need all the styles and education!!! YOU ATE THAT!!!! Beautiful explanation and execution!!!! New subbie can't wait for more videos!!!
Shameka Mathews: YouuuuuuDidThat This is absolutely gorgeous on you and you have beautiful skin too btw!!! Thank you …. I’m trying this next ❤️ Great tutorial!
Lareeceia Harris: I have watched plenty hair tutorials and this by far was the best and was very descriptive. I am about to try this on my head. Yours came out
BBeasley: This is EXACTLY how I want my next style! Thank you for the tips!
Ms. Mommie: This is so FAB! I truly appreciate you explaining the angles and the shapes they provide. I’m ready to cut my own! Thanks and you’re a natural beauty.
Cassandra JG Baugh: I’ve been wanting to do this style for the past 3 years I don’t even do hair. This was so detailed. Thank you looking forward to more videos
Nubian Coils: I’ve been looking for a simple but detailed video . This came out super cute
Sarah Moses: This is the best mullet that I've seen this far. I would like to have my hair done like this it's very sharp.
JackjackSpice: You did amazing and it looks bomb, this finna be one of my next style
Brown sugar: Omg I absolutely love it! Super dope and you did it your self
Sabrina Thomas: Your explanation was amazing. I need you to do my hair!!!! People do not respect face shape when styling! Thank you! Loved trip about flat ironing short wig/weave so it doesn’t look “wiggy”. Thanks for your video!
gods beauty on earth: Thank you beautiful black woman I love the help and detail I needed this now I’m confident to try it
Ariel Maliha: You have a nice balance of education and relatability Definitely a person many people would be willing to learn from
Simone Sharese: I normally wear my signature high bun, or a bussdown middle part weave every now and then. Since I’ve seen these mullets….. I’m so infatuated with this style. I want it in several colors. Thanks to your tutorial, I can see me having this style in no time. Thanks for such a detailed tutorial!
TBASH HAIR CREATIONS: As always AHMAZING❤❤❤❤❤❤❤ NOW I CAN TRY THIS ON MYSELF
Natasha Beverly: Girlll now I just found u yesterday with the bob I’m gonna do next week. And now this ❤️❤️
simplycharming46: Gorgeous style . You're a great teacher as well.
SWISHA SWEETS: JUST GOT A SUBSCRIBER AND I JUST DID THIS THANK U CAUSE I COULD SEE HOW IN MY HEAD JUST COULDN'T GET IT BUT I GOT IT NOW GIRRRRRLLL
Bria A: I’m running to the hair store! You killed this
Whitley Jahné: This was so helpful ❤️
Panda: This is a great video when you razored the sides that u used the short hair, did you use the shortest side?
tamiera stinson: Great job I’m trying this soon
Nicole Pringle: I can not wait to do mines!
April Latrice Humphries{Vessel of Christ’s Love}: ❤❤you favor Monica with this look Love it
Creducation: Your a phenomenal teacher!
Deidra Star: Omg I just love it u did a awesome awesome job
Michelle: Amazing job. What hair did you use for the sides?
Jolie.19: Needed This Sis! & You Are Beautiful!!!!
#Sooomefit4lyfe: Simply Beautiful
Jamilla Worsley: Yesssssss maaaaaaaa’aaaammmmm this is straight i absolutely love this!!!!!
#Sooomefit4lyfe: Such and inspiration to so many of us‼️Continue to trust God and allow him to lead guide and direct your path.I see Great things in store for you.Awesome teacher and Amazing work.I Absolutely Loveeee It
Lunalnofficial: Great video❤
Beverly Lino: My favorites teacher I love you ❤️ Beverly
Keyte S: You ate that up I love it
Nakita Harper: Flawless work
Riah Butler: This is how I want to teach! Yes ma’am you are appreciated!! Btw on my sons account lol. Where are you located?
Relly Brown TUBAL REVERSAL JOURNEY: You definitely ate that tf up!!!!!!
DeAnna Moore: Geeeeezuuuuus!!!!!!!❤❤❤ yesssss maaaaaam!!!!! Bravo !!!!!!! Beautiful!!!!!
Chandra Anghuy: This is really fire
Roxanne Baptiste: ❤❤❤❤❤ love it
Keyte S: Lol why not wit everything they coming up wit!
Keyte S: Dope❤