Detailed Micro Bead Weft Install | Diy Beaded Micro Link Wefts
- Posted on 12 February, 2023
- Sew-In Hair Extensions
- By Anonymous
#microbeads #microlinks #diyhairstyles
♡ Hey Babes ♡
Thank you for tuning in on todays hair video - I wanted to share my DIY Beaded Weft Hair Extensions and Install today. This is nice way to get length and fullness when you’re wearing your hair straight. It is a little time consuming to DIY the wefts/ they can be bought pre-beaded though. Overall it’s super easy to install and I love how flawless it is!
Products Links ⤵︎
hair: Indique hair
micro beads kit: https://amzn.to/40SO7jd
silicone thread: https://amzn.to/3YrVDja
needles: https://amzn.to/3YMJQMq
three way mirror: https://amzn.to/3E4BB6q
Wig/Extensions Essentials: https://amzn.to/3XlgUK1
Amazon Storefront: https://www.amazon.com/shop/bysamantha...
CONNECT WITH ME ⤵︎
Email - [email protected]
Instagram | @BySamanthaHenry https://tinyurl.com/yh76v4n3
CHAPTERS ⤵︎
00:00 -- Intro
01:31 -- Tools
02:13 -- DIY Beaded Wefts
05:22 -- Install (preview)
06:52 -- Detailed Install (tips)
08:09 -- Parting & Extension placement
09:11 -- Crotchet Needle tips
10:39 -- Sectioning
11:11 -- Problems I encountered (Removal Tips)
12:00 -- Loop tool tips - Why I prefer it over the crotchet needle
16:19 -- A look at the extensions placed down
16:50 -- More parting
_____________
FTC : This video is not sponsored. All thoughts about the products are my own.
This may contain affiliate links, and I get a small commission for each click and purchase. As a customer, you do not pay any more or less. I appreciate your support! ♡
____
Affiliate Links/Coupons ☟
-- Best Clip in Extensions https://tinyurl.com/3fsefzpy
--
--
____
Music by Bad-Type - Slow Down - https://thmatc.co/?l=248006B1
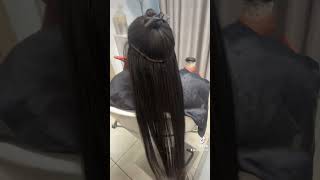
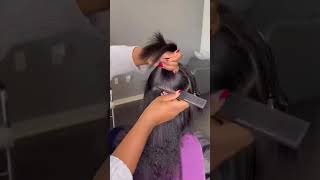
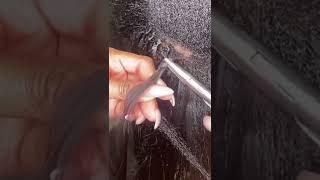
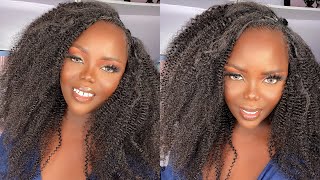
Lovely or recently I just don't care, hey babes, welcome back to my channel. My name is Samantha, and today we are going to be doing this seamless, install and how I did these micro beaded wax at home. Right now, in the back section, I have just three layers of tracks that I've already done and I decided to do this um while I was already trying this style for the first time. So this is why you see me um starting kind of mid install, but this is super seamless. It looks just like my hair. You can see that we can put it right up into a ponytail and it's super seamless and not even at all clockable. So I wanted to kind of show you how I got this style, how I made these extensions myself and how I installed them today, I'm going to do voiceover style, but I also have some information listed on the screen, so pay attention to the screen. I'Ll also have everything listed in the description box with links for your convenience. A lot of things were found on Amazon, so they're super convenient. Nobody can tell me that this is not my hair like this is all me right here all me. So without further Ado. Let'S get started on how I made these extensions perfection sewing. These beads were pretty easy, but it was time consuming. So what you're going to do is first place your needle through the bottom of your waft and then back through the top of the left you're going to place a bead just like this and then pull that needle through, so that the bead is at the base Of your weft, now we're going to go right back through the bottom of the web, and you notice that the bead is flat against the weft you're, going to kind of turn it so that the top and the bottom are the open sides of the bead. And basically, you just want your bead to be kind of taut on your weft in the right position. Now we're going to come back through the top of the weft, we're going to go through the top of the bead out through the bottom and then through the bottom of the left and you're going to want to do that. Two or three times sewing through the top of the left through the bead and then back through the bottom of the left. Once we've secured that bead on the left we're going to go ahead and tie it off, but I do want to highlight that I did go ahead and double weft these wefts, so it's not just one single track. These flaps are two tracks that I sew together on my sewing machine, and that was just because I wanted a lot of volume and a lot of body for my hair. So I think this is about the last time I'm going to so we're gon na go ahead and tie that string so that everything is taut. So I used silicone thread for this process because I believe that it is gentle on natural hair. The beads are also lined with the silicone, so I thought that that would be smart to just use silicone thread rather than regular thread perfect, and here we have one bead on our web. This web is going to have about five feeds. Look at that back. It'S super Flawless and we're gon na go ahead and fold it in the middle we're going to put the bead on the opposite side, one in the middle and then we're going to put two beads on those middle sections right here and right here, and this is What that's going to look like with side beams on this left I'll have the number and the length of each web that I created but you're going to want to measure your head to see what length you need your wefts to be. But all of that information is going to be in the bottom section in the description box. Thank you. You just saw a little preview of how we're installing these extensions. Now I'm going to go into detail about placement and technique. I have a three-way mirror in front of me, but I have super high ceilings and the doors are way too high. So I also needed my camera and viewfinder to see the back of my head. The mirror will be listed below I have this back section finished the track placement is fully up to you. I just have three wefts with about five beads placed in this section. You want to make sure you have about one and a half inches to two inches of hair left on the side, perimeters to cover your wefts and before placing your wefts make sure to test to see if they lay flat in a ponytail. You also want to make sure you're closing your beads close to your scalp, not too tight pulling your hair. You can see that this is a little loose, because this was my first time doing. It make sure you're closing your beads not too close to the scalp, but also not too loose, because you want it to be hot. I'M gon na point at my laptop viewfinder and that's really helping me see in the back of my head, but for your parting you want to make sure you have a nice neat straight parts so that you don't have any unwanted hair getting pulled into your beads. I place the track upside down by the part, and I use two alligator clips to hold it in place notice, I'm leaving about two inches of space on either side. I like doing it this way, because I can see the bead and I can get as close to my scalp without pulling too much hair and when I flip it down, it is nice and neat and the tracks are laid right. On top of that part, I'm gon na go ahead and throw my hair up in a claw clip so that it's out of the way. So I'm going to start with the crochet needle technique. I'M going to take my crochet needle I'm going to make sure that the crochet needle part is open and then you're going to stick your crochet needle through the top of the bead you're going to come down to that section and grab a section of hair. You don't want to grab too much. You don't want to grab too little so go ahead and close your crochet needle or try to, and then I'm just going to pull that section through the bead you're going to pull it straight through, so that the ends come through as well. And I'm just going to move any unwanted hair from that section so that all of the hair is pulled through and there aren't any little stragglers who are halfway in and halfway out now you're going to grab your plier. You want to place it underneath the weft and on top of that bead and you're, going to clamp it shut, make sure it is closed. You don't want it to be loose and I'll show you why later, but clamp it completely closed for sectioning. I parted the crown of my head from ear to ear and at the back section I did tracks going straight from left to right and then towards your friends. I place the Pitta extensions undiagonally so that they would fall towards my face and be easily placed in a ponytail seamlessly right here. I'M just parting right across you can see. I have a clip here holding the end of an extension. That'S because I didn't close the bead completely so the hair got caught. When I tried to open the bead with the plier, I ended up mangling the bead and my hair was really caught. I was waiting for the remover plier to be delivered, so I have to make do I just clamped a clip in on this section so that it wouldn't pull on my hair, but I suggest getting the remover pliers because they are so much easier to remove the Beads than using the actual plier that you use to install a lot of people say you can use the regular plier, but I warn you it's so much easier and safer to remove it with a remover fire. Okay, so for this section I'm going to use the loop tool because I prefer it over the crochet needle tool, I feel, like you, get more control over your sections this way and you get just like a nicer cleaner finish, so we're gon na part out a Section of hair make sure it's not too big, make sure it's not too small. You want it to be just right under that bead. You don't want it to the left. You don't want it to the right directly under that bead. So get your section and then remove any unwanted hair from that suction. Any strains that is not going to go into that bead and here we are. We have our section so now we're going to go ahead and place the crochet, not the crochet. Sorry now we're going to go ahead and place the loop through the bead, we're gon na place our fingers through the loop, we're going to grab that section and then pull it directly through that Loop. Sometimes, once the hair is through the loop, we're going to pull the loop through the bead and now we're just gon na adjust and make sure that everything is aligned and then make sure. There'S no stray hairs. And now we're going to take our pliers and we're going to clamp this bead shut, making sure to make sure it's taut, but not tight. You don't want to feel any pulling or any discomfort you just want it to be taut and I'm going to do this. A couple of times to show you how I parted off the hair, how I removed any unwanted hair and how I did the loop method and then we're just going to go ahead and do that throughout this section, slow down baby. The feeling is she crazy. She go on attack. Oh I like, when you do that rolling and wrestling baby. You know I don't have pinning that ass to the mat black beautiful, powerful girl is a fact with me. Girl, it's cold come inside with me when you do that thing. I'M high baby, my lady, my queen anything you want it's yours, I'm shining for you in my armor. Yes, I love you, CEO, I'm more guilty as charge. No, please I don't mind leading me on what will I find God's design, perfect, craftsmanship, You're, So Divine and your mind. We'Ve got so much. I know you wan na go down nice to meet you. I feel it coming slow down. Let'S chase it baby. Take my time and drive you crazy, that's how I like it baby hold down. Take it easy. So this is what your track is going to look like when you kind of flip it back over, and this is what I mean by Clean sections. You see that the track is laid right near the part and it's a pretty clean section. That'S why I like that upside down method. I think it just gives you a clean finish, so I went ahead and combed everything out just making sure that there are no stray hairs or any Tangles, and I'm gon na just continue doing this straight tracks up this section and then the diagonal tracks towards the Front, but that is pretty much it for this install you see how seamless it is, it can be pulled up into a ponytail, it can be let down, and it literally looks just like my hair, so many compliments on this style, so I hope you guys enjoyed This and I hope that this was kind of an informative tutorial um, and I hope that you guys try this at a home, but this is pretty much it for today's video. Thank you guys so much for watching and thank you guys so much for subscribing. We are at 680 subscribers. Thank you. Thank you. Thank you, we're so close to 700 and even so close to a thousand subscribers. So I hope to see you guys in the next one. I hope you guys like and leave a comment down below. Let me know what you guys think about this style. Would you personally try it? Would this be something that you can see yourself doing for yourself and let me know what you guys think, and I will see you guys in the next one: bye, babe foreign
Comments
SAMMY OUATTS: I love it! ✨♀️