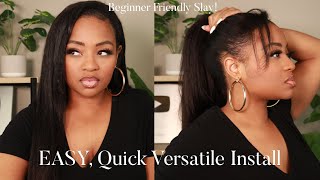
Detailed! Versatile Quick Weave Install With Leave Out Using Kinky Straight Hair 2023|Ft. Unice Hair
- Posted on 11 February, 2023
- Sew-In Hair Extensions
- By Anonymous
In this video, I'm showing you step-by-step how to install a middle part quick weave with leave out using kinky straight hair. This style requires leave out which makes it versatile. Watch to see how to install the hair.
❤️OPEN FOR HAIR DETAILS ❤️
Super long standby”wigs with free 48 hours Fast shipping
●▬▬▬▬▬▬▬▬▬▬▬▬♛#UNiceHair♛ ▬▬▬▬▬▬▬▬▬▬▬▬●
I'm using Kinky Straight human hair bundles 26inch*4: http://bit.ly/3HdG5tm
➤New Trending Kinky Straight wig with Kinky Edge: http://bit.ly/3GUPYed
https://www.unice.com/ ➤RICH 50% OFF lace Wig: http://bit.ly/3IVLyWP
☛☛☛ NEW flash Sale $99 get lace frontal Wig: http://bit.ly/3Ja4f9l
Get Extra 10% Off+ Free Robe Use The Special Code: Nicelace
Afterpay & klarna & Quadpay & Sezzle, PAY 4 Equal payment Within 6 weeks!
Natural 4c hair trending kinky lace frontal wig: http://bit.ly/3XKT23j
Affordable & Popular Glueless V-part Hairstyles: http://bit.ly/3XHVPu8
Aliexpress TOP UNice Hair store➤ https://bit.ly/3HdluVV
Amazon UNice Hair Store ➤ https://amzn.to/3afUszy
[email protected]: https://www.tiktok.com/@unicehairoffic...?
Instagram @unicehair: https://www.instagram.com/unicehair/
UNice YouTube Channel: https://www.youtube.com/c/UniceHair
Facebook @UNiceMall: https://business.facebook.com/UNiceMal...
Want to Promote UNice hair? Contact us: [email protected]
#unice #unicehairstyles #quickwave
**********
❤️❤️❤️❤️❤️❤️Supplies Needed:❤️❤️❤️❤️❤️❤️❤️
Hair
Hair glue
weave cap/ stocking cap
hair protectant or Got 2b glued hair spray
blowdryer
scissors
White eyeliner/lipliner pencil
Steps to install quick weave:
PREP:
1. Braid down your hair (optional, can pull into ponytail/slick down), and make sure to leave out enough hair at the top to cover your tracks.
2. Put on the wig cap (any color)
3. Use a white eyeliner/lip liner pencil to mark the area around your leave out
3. Apply hair protectant to cap avoiding areas of leave out , can use gorilla snot hair spray or morning glory hair protectant
4. Blow dry hair protectant making sure it is COMPLETELY dry
INSTALL
1. Measure the track hair against your head from ear to ear
2. Cut the weft that you measured
3. Apply hair glue to track and allow to dry for no longer than 30 seconds
4. Lay the track onto your cap beginning at the bottom working your way up
5. Repeat the above steps until you reach your leave out
6. cut off the remaining cap that's exposed (be careful!!)
7. Style your leave out as desired
Watch my other videos!!
How to Takedown your quick weave:
Quick Wweave install with Wiggings hair:
Hair Link: (can be purchased at MOST local beauty supply stores)
https://www.zuryhollywood.com/hair/pro...
Top: Fashion Nova
Follow me on IG https://www.instagram.com/dionadollxo/...
For Business Inquiries ONLY:
Music:
https://www.youtube.com/watch?v=T5o_0B...
Hey guys so today, I'm showing you how I installed this quick, weave, um hair, that I got from a Unis. All the information for this hair will be in the description box below this is 26 inch, kinky straight hair. It'S four bundles! I don't have all four bundles in, but I have four bundles of hair. So if you want to see how I got this look and how I installed this hair, you got to keep on watching. I am so sorry y'all, but the beginning. Half of this video was completely out of focus, so I had to cut it out, so I'm just going to catch you up on what I'm doing right here. So what I did is I parted my hair on the sides for my leave out. I left out about like an inch worth of leave out on the sides and then the back, and then I left out about two inches at the top, as you can see there for my leave out at the top. That'S how I'm going to make this style versatile. I left out a lot more hair than I usually do. I usually do not leave out this much leave out, but I wanted to really get that clean, versatile. You know effect. So what I'm doing now is just braiding down my leave out um just to get it out the way, of course, we're not going to leave it like this, but um. This is just how my hair is going to look underneath my cap and then I did go and braid the rest of my hair in the back. So after I'm done braiding, the finished result looks like this, I'm so sorry it is blurry again, but this is the last time it's blurry um, but I just have my leave out in the back braids going straight back in my leave out at the top. Now I'm just putting on my black wig cap this time, I'm going to pull the wig cap like all the way down over my whole entire head. Usually I don't do that. Usually I stop the wig cap um like back behind my hairline a little bit, but I wanted to do something a little different um for this style. It really doesn't matter how you do the wig cap, honestly, whatever works for you um. If it's like too much left out on the side, you can always cut it off um. But yes, so now I'm going to go ahead and Mark out where my leave out is so that um, I know where to stop. When I'm applying my tracks. All right. Foreign cap is sitting in place properly. Now it's time to apply your hair protectant, I'm using the Morning Glory, Hair, protectant, and I'm also going in with the got to be free spray. If you don't have the Morning Glory, Hair protectant, you can just use free spray. I'Ve done it before I've just used like a bunch of free spray and blow dried it just to make the cap hard and that works just as fine to me in mine. In my opinion, honestly, you don't really need the Morning Glory. I just do it because I'm used to it and I have it so I'll, probably just keep using it until it runs out. Something else I want to mention is that I am saturating my cap with this free spray. I did apply like the Morning Glory, but honestly I applied like a thin layer of the Morning. Glory Hair protectant, mostly I'm applying the freeze spray because to me that's what makes the cap hard and creates like this. Nice base, shell. So that's what I'm using the most and I'm making sure also to get it um to saturate it near the edges of my hair so that it can hold the cap down. So the hair that I'm using for this install is kinky straight hair and 26 inches. This hair is super thick, it is so thick and I absolutely love the texture and it matches really really well with my natural hair. So I'm super excited to do this style. You can see how much hair you get on the weft here. You get a pretty good amount. This is how much hair you get when it's like fully um opened and yeah it's a lot of hair. So let's go ahead and get to it. So the first thing that I'm going to do is measure the track from ear to ear. Starting at the bottom now mind you, I do have my braid at the bottom of that's going to be my leave out. So I'm measuring right above that braid and I'm using my 30 second hair Bond protector, my go-to glue um. This is the glue that I'm going to be using to glue my track down but yeah after I measure my cap from side to side, I'm going to cut it, apply the glue and apply the track, and I'm going to show you that process. Like a few. More times, but ultimately that's all it is. This part is super repetitive foreign. So, in my opinion the first track is the hardest, because after you have that done once you have the first two then you're on a roll. So all the only thing you're going to do is use your fingers to feel where you put the last track and lay the next track a little bit above that I usually do about like a finger. One fingers width apart or two because this hair is so thick. I probably did like about two um finger tips, width apart, but yes, so now I'm going to um measure the track. I measured the track from side to side. I cut it and now I'm putting the glue on the track, and now I'm going to apply the track to my cap. I like to blow it a little bit just to get it um like tacky, because it is like 30 second glue. So you are supposed to let it dry for 30 seconds um. So one thing that I do because I really can't see the back of my head um is: I look in the mirror, first, just to make sure um I'm able to get one side down and then I literally walk the track like across the back of my Head with my fingers, um to kind of feel my way across just to make sure it's laying properly that's the easiest way to me, since I can't see the back of my head really, I'm just feeling my way around. It'S really not that hard. If you mess up or you feel like you, applied the track in a weird place like before you press it down super hard. Just make sure you like the placement, because then you can just slide it to how you, where you need it, foreign, the first few tracks I like to blow dry it just to make sure it's sealed in place. You don't have to do this, but to me I feel like it helps the track stay a little bit better, so I'm gon na go ahead and want to skip a few. I'Ve made my way through the first bundle. The first bundle went pretty freaking, far mind you. I was putting the tracks about one to two fingertips with a part or whatever, and so now half my head over half my head really is done so now, I'm starting on the second bundle and I'm just doing the same thing measuring from side to side, but As I get towards the top, I'm like going to try to curve the ends of the track and up a little bit um, just so like if the wind blows or something, even though I have like a lot of leave out, if, like the wind blows, like It'Ll fall appropriately. If that makes sense like, if the wind blows, you won't see any tracks um so yep, I'm just going to measure from side to side, put the glue on it and place the track. So it's pretty much a repetitive the same way until you get to the white lines. Thank you. So this is the last track that I'm going to apply in that u-shape and that's because this track hits the back of that white line in the back there. So if I would apply another one in a u-shape, it would cover my leave out and I don't want that so I'm going to apply the next two pieces of track going straight across the white line, foreign. Just like that, the install is complete. We are done now it's time to cut off this excess cap and get to the real get to the real deal, because throwing on some tracks that's easy, but now we got ta style the hair. So, instead of waiting to take out all of my leave out to flat iron, my hair, I decided I'm just going to go a little bit at a time. So now I'm just taking my super small mini flat iron and I'm flat ironing my leave out in the back honestly. I probably could have left my leave out in the back, like I honestly didn't need to flat iron it because this is kinky straight hair. So it probably would have Blended anyway. I just need to brush it, but I decided I wanted to flat iron it. Thank you also. I just thought of this. Whenever I do these videos, people always ask like how does the cap stay on and honestly it just. Does I think it has to do with um the protectant, the freeze spray and the glue from the hair, like all of those combined, just makes it stick to your head? I don't know child because, as you can see, I'm cutting the cap off and it's not sliding like at all it's it's staying. So I think it's magic or maybe a combination of those products, but the cap is not sliding all right. So now, I'm just flat. Ironing my leave out at the top, but I wanted to let y'all know that I did go back later off camera and add um like two tracks, like one on each side, to my leave out um just to make the front of my hair Fuller. I probably left out a little bit too much leave out um, because my hair is short at the top. I really shouldn't leave out a lot of hair because it winds up looking crazy, so I had to add a couple of tracks to kind of fill it in. So it looked full. But if you have like normal hair at the Top, If you don't have like breakage or anything, you should be fine. Now for my edges, I'm first going through and I'm shaping my edges with my black Eco gel um. I just do this like as an outline to kind of get. You know how I want my edges shaped um, but then to seal them in place. I use my Edge booster wax and I put that on top of the gel um, because to me that, like solidifies my edges, now, if you don't have kinky edges like mine, you probably don't have to do all of that. But I do especially since I'm used to like relaxing my edges, but I haven't been doing that lately. So me, I just go like overboard with the products just to get it to lay down all right. So this is the finished result. It is super super thick. You can pull your hair up on the sides um and you won't see any tracks just make sure to leave out enough hair. That is the key um yeah, so I'm gon na do the little high BUN test. This is what it looks like in a bun um yeah. Oh, I did go back and add some extra tracks to the back just to make the hair thicker. I don't know if you could tell like when I was installing it. It looked a little thinner, but I had like two tracks to the middle and it's super thick and full, and I really love how it looks here. This texture is amazing and it Blends really really well with my natural hair. It looks like it is growing out of my scalp um yeah. I absolutely love this hair, but anyways you guys. Thank you so much for watching this video. All the information for the hair will be in the description box below and that's it adios till next time.
Comments
a j: Girl Those Spider Eyelashes ARE OUTRAGEOUS! PLEASE DO A TUTORIAL ON HOW YOU ACHIEVED THEM! ❤️
Alpha Goddess: To make it stay on also put the hair over the edge of the cap dont rest it on the edge
Alpha Goddess: Ok am hear for ig