The Best Cover-Up For Alopecia Areata! @Uniwigs Hair Patches
- Posted on 22 August, 2022
- Tape-In Hair Extensions
- By Anonymous
Tutorial and review for @UniWigs Full Skin Base Human Hair Cover-up Hair Patches. These are amazing for Alopecia Areata!! So easy to apply and last for a few weeks with double-sided wig tape or glue. Such a game changer for small to moderate hair loss. They can be dyed or trimmed to match your hair.
Code: SF ( Save 15% off)
UniWigs 1" skin hair patches: https://bit.ly/3AzI8EK
UniWigs 2" skin hair patches: https://bit.ly/3AaxxyF
Color: 210# Truffle Brown
Length: 12"
Instagram: @uniwigs.helperhair
See more pics and reviews on my Instagram: @thebaldponytail
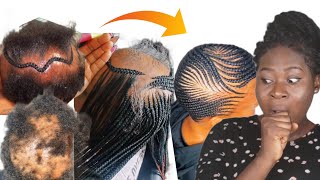
Hey everybody. My name is sarah. Today, i'm going to do a little, how to video on a new product that uni wig sent me it's their new hair patches. So this product is super great for people with alopecia areata like myself, whose hair will just kind of fall out in random unpredictable areas. As you can see, i try to cover them up, but the front's a lot harder to cover. So i'm going to show you today how to cover up these front two spots with their new hair patches, basically um. They come in different sizes, so i've got a one inch and a two inch for these spots. They'Ve got a skin base and then it's human hair super soft. These are 12 inch and then i went with the medium brown which actually matches my hair perfectly, but they have a variety of colors and then they come in one inch, two inch or three inch. Then what you're going to do is measure in the exact shape and size of your bald spot and then apply it with a double-sided, wig tape or glue. Today, i'm going to go with the tape it's waterproof you'll be able to have it on for a while. You can wash your hair and go about your normal activities, so these little guys are really good option, especially in like 100 degree summer, where i am you don't want to wear a full wig or hair topper the whole time it's a little bit uncomfortable. So while i have a little bit more growth like i do now, i really just need these main spots covered up and then it'll blend right in with my hair. So i'm going to do a little tutorial. Show you how to put them on so first you're, going to measure the bald spot with the paper. That'S provided you're, going to outline it with a marker. I went ahead and did both spots here to get the exact shape of the bald spots. Next you're going to cut out the size of your bald spot, and this will be your template for putting on to the hair patch. So after i cut this out, we went ahead and traced it onto the hair patch and then once it's traced on you're going to separate the hair as best as you can and cut along the traced lines, we did the same thing with the double-sided wig tape And now we're ready to apply so you can see its exact size of my bald spot here. So we go ahead. I had obviously my friend help me and then you're going to apply it exactly the size with the double-sided tape right onto your bald spot and gently press to apply. So it's pretty easy. It goes right on and then you're ready to go. So here is me with the first patch. Just on one side, you can see that it just blends right in to my hair looks super natural and you can't tell next we went ahead and did the same thing trace the other one, and then we went ahead and cut it out. You want to just be as careful as you can about not cutting the hair during this part, but it's pretty simple. Then you go ahead and do the same thing with the tape and apply the tape to the back of the next one, and then just go ahead and pop it in place being on. The hairline is a little bit more difficult. You want to get it back far enough, so that it blends into your hairline. We actually ended up cutting the very tip of this one off after we got it applied just so that it blended back into my hairline better, but all in all it took just a couple minutes and then they were ready to go. Okay, so close up of the hair patches, i've got two in right now this whole part was bald. It'S like so insane so right here. This is all a hair patch and then, as you can see, i have some thin spot there that i didn't put it on, but this whole area was bald. So this entire thing is a hair patch, like the hairline, so crazy, but i just wanted to show you that, like on the line, this is one piece right here. This is other piece right here. You cannot tell and they're really comfortable. It'S actually pretty crazy. That, like this just looks like my normal hair all throughout this is this is a hair piece, and then this is the other piece right here, so you want to put them in the direction that your hair lays. That'S why this one wants to come back. That way, so my normal hair part is over here, like as you can see, they totally blend in it's pretty insane, and i can't even tell they're in and you can i'm like tugging on them, they're not moving. So this is how i would do my normal hair. Now you can see if it's windy, if it's blowing around, if i put it back you, you can't tell at all before this whole side was bald. So i'm super happy with this outcome. It'S pretty insane, but these can stay on for two to four weeks. With this wig tape, you can wash your hair, it's waterproof. This is really exciting for me actually, because i don't have to do anything or like put on a topper every day. I can just leave these on and i curled them to kind of blend into my normal hair. You can do whatever you want with them. I'M excited to actually be able to like put my hair up in a ponytail, so pretty cool guys. You should check them out, uniwigs.com um. Let me know if you have any questions and i'll put the link to where you can get them as well. All right thanks!


Comments
UniWigs: Thank you for your review! Very useful and helpful! We appreciate every effort you've done for this video!
Allison Roberts: most precious beautiful angel cutie