Installing Tape In Extensions At Home! Natural 4C Hair Texture Ft. Ali Pearl Hair
- Posted on 09 September, 2022
- Tape-In Hair Extensions
- By Anonymous
I'm showing you how I install tape in hair extensions. I have thin 4C hair texture. I'm also discussing the Pros and cons of having tape ins.
Shop Now➤https://bit.ly/3vJs5kM
Hair Info: 24inch straight tape ins, 300grams
❤#AlipearlHair Official Store:➤ https://bit.ly/3Q9Dbb1
Up To 50% Off, Lace Frontal Wigs!➤ https://bit.ly/3BKJrlb
In FB Group, EXCLUSIVE DISCOUNT! ➤https://bit.ly/3O1I8ku
1. 24h Flash Sale!
2. Free Hair and Cash Back!
3. Unlimited Coupons!
#alipearlhairwig #alipearluparthair #alipearlhdlacewig
Instagram @alipearl_hair: https://bit.ly/34I3Oyd
Youtube @Ali Pearl Hair: http://bit.ly/2H0Gmmc
WhatsApp: +86 15890076489 E-mail: [email protected]
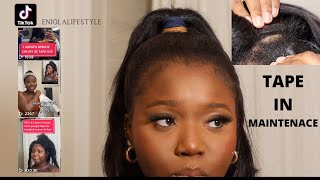
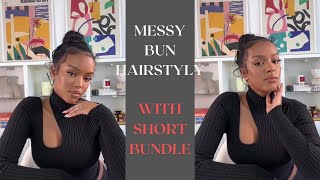
What'S up guys in this video, I am installing tape in hair extensions for the very first time I am so excited and they came out so cute. So, if you're interested in seeing how I installed this hair and all the struggles that I went through, you got ta keep on watching the hair that I'm installing is from Ali Pearl. All the information will be in the description box below they sent me three little bundles of 22 inches, but I'm not sure how many pieces, that is sorry it'll, be in the description box. Um, I'm just a little nervous because the hair is a little more silkier than mine, but let's give it a shot. So this is my very first time trying tape-ins I've never ever had them before, but I've seen them everywhere and I was super excess obsessed. So I'm so excited to try it. So let me tell you: I first went to the Dominicans to have them flatten my hair or have them straighten my hair but girl the next day it was poofy, so I'm having to re-flat iron, my hair um. I guess I thought going to the Dominicans was going to help my hair stay straighter longer which it has in the past, but you know whatever. So I'm straining my hair now um yeah, my hair is getting super heat damaged. I will say this is not a protective style if you've been looking into this, it's your hair is definitely out underneath um. The benefit of it is versatility. So just keep that in mind. So after my hair is straight, the next thing that I'm going to do is go off and section my hair. This is probably the hardest for me because I've never done this before so I didn't really exactly know how I wanted it section, but I did wind up doing a pretty good job. I just want to make sure that you can't see any tracks through my hair, so I use the comb method where you stick a comb behind your leave out just to make sure you can't see anything. So I left some hair out at the back and now I'm parting out my leave out at the front and then I'm going to go and part out. My leave out on the sides, including my edges, also to note my hair is very thin when it's straightened. So I have to leave out a lot more than the average person um. So if your hair is thinner like mine, just make sure you leave out enough, as you see, I had to go really far back on the sides just to make sure you couldn't see the comb or anything. But if you have thicker hair, you should be fine. When it's all said and done, you should only have hair in the middle of your head at the back left out. All of your sides, the back and the front, should be put away foreign, so applying the tapes took a lot longer than what you're going to see here, because I'm speeding through everything, but a couple of key things to know, is to one take your time. Two. When you're, starting at the back um, I kind of went in a u-shape, as you can see my part right there, it's like in a: u, i don't know how to explain it and that's how I decided to lay my tapes. I didn't just place them sporadically in my hair or like randomly like it's it's in an order. Um, the hardest part is really figuring out like how to attach the the hair at first attach the tapes, because you can't see what you're doing so. It'S hard to like hold a mirror and then attach the tape and then pull down some hair and attach the other side um. So you just have to take your time after a couple of tries, you'll get it right, but at first it's it's very tedious. So, to kind of walk you through the process and what I'm doing what I'm doing is taking about an inch section of hair, laying the tape onto the hair that I want to apply the tape to and pressing it down. Then I'm taking the other end and I'm sandwiching my real hair in between the two tapes and then I'm mashing it together and there you have one tape-in installation, as you can see here. Well, I have three I'm leaving a little bit of space in between each tape, just so they're not like right on top of each other and I'm not going all the way to the end so that I can pull my hair up. As you see right here, foreign, as you can see, I'm not putting it directly on my scalp, I'm coming down about half an inch and then sticking the tape to my hair and then I'm going to attach the second side. Also, you don't want to leave like a bunch of hair in between um the tape, because it won't stick but then also make sure not to leave too little, because that can break your hair off. I'M going to actually have that trouble so make sure to leave. Like a good amount in between each tape, once you've got that down, pat the rest of it is pretty repetitive for the most part, um you're, just going to place the tape onto the hair make sure it's not too close to the scalp lift up just a Good amount of I don't even want to say a little bit but like a medium-sized amount of hair and then sandwich the other tape in between the tape and your hair. If that makes sense, I don't know if I said that right but yeah and then you just want to apply a good amount of pressure when um sandwiching the two pieces of tapes together, some people use a flat iron, but then I heard like you're not supposed To do that or some people said it's okay to do it on low heat. I did not use a flat iron to mesh them together for this installation um, but it was just a personal preference um. Yes, so now I'm going to go through and you should have something that looks like that, you just want to make sure you leave enough hair out in between. I wanted a fuller look because again my hair is super thin, so I was afraid it was gon na, like the style would look thin. So I wound up actually using all of the bundles. Well, not all of the bundles but like over two and a half bundles. I had like a couple of pieces left. Thank you and again, as you can see here, I'm going in a U-shaped motion around the perimeter of my head kind of like I would, with a quick weave how you would go in a u-shape. You just want to do the same thing. This is because it allows you to pull the hair up into a ponytail um easier and it lays flatter against your head foreign, okay y'all. So it's a couple days later. This is what my hair wound up, looking like in the front, but I don't like how it doesn't fall in my face. It kind of falls to the side, so I stumbled across this Tick Tock that showed you like how to make the little tapes fall more into your face, so I'm actually going to take some of the tapes out in the front um and reinstall them. So that's kind of why I didn't show you the finished product of the last of my last attempt to install it only because I'm using a different method so to take the tapes out um, rubbing alcohol will take it out and you can still use the reuse. The tapes with rubbing alcohol, so I'm using. I think this is like 90 rubbing alcohol and I put it into a spray bottle and I'm just spraying the tapes and maneuvering my fingers around like rubbing it in with my fingers, and then the tapes should just slide on off, as you can see here. If it's hard, if it feels like it's hard to slide off, just take some more rubbing alcohol put in between the tracks and just rub it until it slides out and it comes out super easily, I promise you and my hair did not come out at all And the tape is still sticky so now I'm taking the tape again and I'm applying it at an angle. Applying it at an angle allows it to one fall on my face and allows me to to easily pull it up or back if needed. As you can see, it really makes a world of a difference at first. You think, like it's not doing anything, but it really does. It was just a little bit like weirder to apply it like this, but after a couple of tries, I got used to it. So now I'm just going to show you a couple more times how I did that yeah. It is pretty close to my scalp right there, but because of how it's angled, it still allowed me to pull the tape up without any trouble. So I'm just taking a little bit of hair, taking the tape and applying it at like an upwards angle. I can't really explain it but um once my hands move you'll be able to see what I'm talking about. But I'm going to apply it at like an upward angle, um and make sure just to leave a little bit of room still in between the tapes and then press it down. So I repeated this for about two rows on the side of my head two or three rows. I think two though um I'm going at this angle um. So now I'm just on my last piece here. I just took a small piece and I'm going to take my last piece of tape and apply it going in the same direction as the tape beneath it um at this little weird angle here and then I'm going to press it down and apply the second piece Of tape to the bottom of it foreign, so you can see the difference in the two sides. It'S subtle, but it makes a difference to me this side right here, as you can tell comes more in my face, whereas the other side just kind of like flops down and does nothing to shape my face, and I can still pull it up. Just fine so yeah this is definitely way better. So this is what each side is looking like once I'm done, it could be a little neater, but this is my first time and I did what I could now. I'M just going to go ahead and blend the rest of my hair with the tapes foreign overall. I really I've worn the tape ends for about like a week and a half. Now and overall I give them about like a 6.5, maybe a 7 out of ten, really leaning more towards a 6.5 and here's. Why they're very versatile? Yes, like I said your hair is out um the tapes like if your hair is super natural. Like me, like, I have a 4C texture, so I have to constantly put heat on my hair to get it to blend with this hair texture. Now I am going to try tape ends again with like a kinky straight texture, um and maybe that'll help, but having this silky texture, it's very very hard. You know like I have to apply heat to my hair every day. Now it looks super. Pretty don't get me wrong. I love this hair texture, it's so pretty and silky, but it just does not match my hair texture so also. The other issue that I had is my hair is very, very thin in the front and it's also shorter in the front. So it was harder for me to get the hair to shape my face. How I wanted it to yeah. I did have the tapes um going at an angle which helped, but they just did not look how I've seen other, like professionals install the tapes, and I don't think it's like necessarily My Method as much as it is my my real hair. I don't think I may be like the best candidate for tape-ins, honestly, just because how thin and short my hair is in the front, if you have like a thick head of hair, especially in the front and your hair is longer in the front. These would probably look amazing and work really great for you, but for me with my thin short hair it just it. It was a struggle like I got it to work, but you know it's just constantly having to maintain it. Now again, it's so pretty. I love being able to put it in a bun. I feel like that girl and once it's styled it feels amazing. Don'T get me wrong, but it's just the maintenance for me. Anyways, like I said, if you have any questions about this hair, make sure to leave it in the comment section adios till next time.

Comments
Ali Pearl Hair: So natural! Thanks for trying our hair~
Eden Negussie: I tried your quick weave method and you made it easy to follow and looks good! ❤️ but lord does it tangle every hour will be trying the tape in method sooon
Nana Traore: Beautifull
JennPenn TV: Very cute