Curly Hair Tape In Extensions At Home On Short Natural Hair + Washing - Curls Queen
- Posted on 07 September, 2022
- Tape-In Hair Extensions
- By Anonymous
HOW TO INSTALL TAPE INS AT HOME: Curly Hair Tape In Extensions at home on natural hair | Super Natural | Extra Length & Thickness | Tape ins on short natural hair.
Hey Girlies! Im back with another tape in video, but this time I'll be installing them myself! Watch me install some tape in extensions on myself at home. Installing these tape ins on myself took me about 3 hours. This was a task, but you still can do them on yourself if you try and take your time. I do recommend letting a professional install these though.
▬▬▬▬▬▬▬▬▬▬▬▬▬▬▬▬▬▬▬▬▬▬▬
Use Code YTCG to save $$$ OFF
I am wearing a 16 inches tape in hair extensions in water jerry curly comb texture from CURLSQUEEN .
Shop the same #waterjerrycurlycomb #tapeinhairextensions for #naturalhair
https://www.curlsqueen.shop/a562486F
Suitable for 3c/4a natural hair type
√Natural Glam Set-80 Pcs-200 Grams
√ 100% High Grade Brazilian Virgin Human Hair √ True To Length √ Thick & Full From Top To End
Connect with Curlsqueen :
Instagram: https://www.instagram.com/curlsqueenof...
Tiktok: https://www.tiktok.com/@curlsqueen.com...
▬▬▬▬▬▬▬▬▬▬▬▬▬▬▬▬▬▬▬▬▬▬▬
#tapeinextensions #tapeinhairextensions #tapeins #tapeinhair
STAY CONNECTED WITH ME
• TikTok: @CharniqG
• INSTAGRAM: https://instagram.com/charniqg?igshid=...
For business inquiries ⤵️
• Email: [email protected]
••••••••••••••••••
Amazon Store for products I use + MORE :
https://www.amazon.com/shop/charniqg?r...
—————————
FAQ
• Age: 26
• Camera: Canon 90D ( https://amzn.to/3zJg12J )
• Vlogging camera: Canon EOS M200 ( https://amzn.to/3l18A2O )
** Some links are affiliated links from which I get a small commission. This does not affect you as a shopping customer.
00:00 Introduction
01:18 Quick hair unboxing
02:36 Installing the tape ins on blowed dried hair
07:31 Finished results + Washing the hair
08:43 Detangling + styling the tape ins
09:23 Finished look
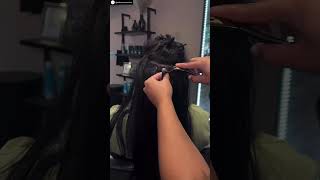
Hey girlies welcome back to my channel. So if you are new here, i am charney, as i can tell by the title. I am back with another take-in extension video for y'all. This video is brought to you by curls queens. If y'all haven't checked out my last tape in video featuring mom, the tape and extensions from curls queen i'll link that down below so y'all can go check that video out, i decided to try out a different texture this time, so i did get there. I believe it was a kinky curly, i'm not mistaken. All the information is just down below in my description box, y'all can go check out the actual hair, the texture and all the details, but i decided to go with a natural look this time and i like it, i like it. So i want to see how i did this and continue watching this video. Let'S get this video to 100 likes in the comments down below and subscribe. My channel, if you are new, if y'all, want to see how i achieve this then continue watching this video okay. So here's a quick unboxing of what's in the bag, so they sent me some new goodies. I got a new detangle brush some new hair clips um some. I believe this is for like to help divide the hair, a new comb and also some extra tapes and a new bunny. Let'S get into this hair, they sent me two bundles. I believe it's 40 pieces for each. So i want to get curly this time because i'm not gon na. I wasn't gon na straighten out my own hair, so i figured i could just wear it in this natural state and then just wear my hair out and then just call it a day. So i could i could easily and i i also want to get curly as well, because i could just wash my hair like i could do like a wash and go and then, of course like with the with the straight hair, the straight bundles. If you wash your hair, your hair is natural. You got ta restrain your hair out and i just feel like i didn't feel like doing that. So i figured you know what i'm just do curly this time and just see how the curly goes for me. Let'S get into it, i'm a little nervous because i hope i know what i'm doing. I have to go get my mirror, so i can see what i'm doing okay girl. So, let's get into this install so right here, i'm just showing you guys um, how i'm parting my hair. So that's going to be the piece that's going to go over the tape ends and i'm going to go ahead and part. A small skinny section um, and these are going to be the pieces that are going to be pretty much inside of the tapes, so i did not realize until after i already did the tape and install for this first row that i forgot to part my hair. Also on the outside perimeter, as well like on the sides as well, i just only parted the back section and i literally forgot like you're supposed to part the outer parts as well girl. I can't talk straight but yeah. I didn't realize that until afterwards, so just to fy, i'd be mindful of that. So i didn't mess up on that part, but it wasn't too bad. It wasn't too noticeable when i did put my hair up. So it's all cool, so pretty much, i'm just taking the first tape in piece and i'm going to put it at the bottom first now. Also another thing that i should have did was: i should have started at the top and then do the bottom. I did the bottom first and then i sandwiched the hair on top, and then i took another piece and i sandwiched the hair together and, like i said, i realized that now that i'm watching it, i should have, did the top sandwich the hair and then connect The piece at the bottom last i felt like that would have been easier and the little black things that you guys seen me show at the very beginning. I believe that was something that was supposed to help me to buy my hair. I just didn't know how to use that, so i just didn't use it, but i believe that was that's what it was for so yeah. So first roll coming together really nicely, and you also want to make sure that you don't do it too tight on your hair as well, because then it's going to be uncomfortable, it's going to be very tight when you lift your hair up in a ponytail, etc. So make sure you leave a little space to kind of move. The tape ends around and i'm just lifting the hair up to make sure it's looking sometimes some kind of way, but yeah y'all can kind of see where i messed up it like i said i should have parted on the outer layer. So that's what i'm doing now, i'm going in and i'm actually parting my hair um on the outer layers so that i won't tape in the cream the outside perimeter of my head. So that's what y'all see me doing so yeah, i'm just going to pretty much repeat these same steps all over my head. It was hard it very. It really was like tricky a little bit because you really have to make sure your parts are at least some type of like you know they look some type of way like they actually look straight like they can't be messy and sloppy. So that's the only thing i can really say that was a challenge other than that. Oh also taping. The tape like making sure the pieces are laying evenly on top of each other and not like uneven or you know not like one - is a little too further to the left and the other is a little too further to the right. So those are the only two things i can honestly say was the hardest part, but other than that i feel like you could do it. If you put your mind to it, if you practice, you could really do it yourself, um, but for me i would definitely still recommend a professional. I would definitely um go to a professional from here on out. I would not do this on my own again y'all. I'M just saying like like i'm literally you could tell. I was literally struggling like look at that. Like i don't know what i was doing baby i was just hoping that it would have got straightened, not straightened, but the parts was even like. I think part in the hair is what took a little longer for me, but this install process really did not take me no more than like two hours and since i was wearing it curly, you know it went by faster because imagine if i had to straighten My hair out style and all this other stuff, it would have took me longer so yeah work, work work. This is all right, so the tapes are in. I actually had a lot left over. This is already thick, so i didn't really want it too. Thick, like i just wanted a little more just a little bit more thickness and a little more volume to it all right. So now i'm going to show you guys the waiting, the hair process, so i'm going in and i'm going to drench the hair just so my hair can get back, wet and curly and just to see how the curl pattern of the hair looks when it's wet. So that's what y'all see me doing and y'all can see that the length has also stretched out, so this is 16 inches by the way. If i did not mention that in the beginning of the video, the hair is 16 inches. So yes, it probably didn't. Look like it at first, but y'all know curly hair. It has to get wet in order for it to really stretch and show it's truly. So i love it like literally, this looks like my freaking hair girl, like everything is blended in so well, like you really can't even tell which is my hair in the um taping extensions like it looks so good. It looks so natural, so i love it. So now i'm just going to go in and kind of just style the hair. So i did take some mousse and i just applied it all over the hair and i'm just going to take my detangle brush and just detangle the hair out, so that my hair can blend in evenly with the tape and extensions. I also did go in and cut and shape the hair up a bit because i didn't like how some pieces were a little long, and you know just long and looking weird in a certain area. So i did go in and kind of shape. The hair up and cut it some - and this is how it looked after i cut it, and i think it looks really good. The hair did shrink up once it dried up. So just fyi - and this is the final look. Alright y'all. This is a final look of the taping extension. I decided to go with like a natural look um. You know just regular hair down curls kind of like a wash and go type of vibe. So i like how it came out. I feel like it came out. Super cute super natural - i did go in and kind of cut it some just so it can look a little bit more with my hair, so well, yeah like if you're trying to save a corn, you want to do it yourself. You can um give it a try, but for me it was hard. I'M not gon na lie. It was really hard. It didn't really take me long to do. I think the only thing that was hard about doing it was like part in it and actually making sure the tapes are evenly together. It'S definitely giving my real hair, so somebody asked me yes, this is my real hair, my your business, but i like how it came out. I love the texture of the tape and so yeah. Let me know what y'all think don't forget check down below. In my description box to catch all the hair details on this company, the hair is definitely a 10 out of 10. It'S my first time trying a different texture from them, so it actually came out really really nice. So i love it. So thank y'all for watching. Don'T forget to like comment and subscribe and i will see y'all in my next video
Comments
CurlsQueenofficial: You really did a great job, thanks a lot.
Roaa Tony: ♥️ ❤️ Alles sehr schön. Aber zuerst zusammen die Nummern 10 und 1. Eine empru.ONLINE Brünette und eine andere Blondine. Es wäre unfairm, wenn ich 4 wählen würde