How To: Invisible Locs| Must Try
- Posted on 10 October, 2022
- Bangs
- By Anonymous
1 pack of hair used ( freetress popping twist color 350)
shine jam
crochet needle
Road to 500 subscribers
email: [email protected]
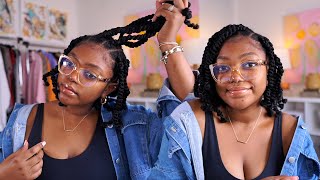
What'S up y'all, it's the quaila doll and I am back with another video. So in today's video I'm going to be trying this new trending look um, I think it's called The Invisible lock look. My daughter came to me and she was like look. I like this. Look, and can you try it, can you do this for me and I was like Hey girl, let me do my research and, let's see, if I can, you know, figure out how it's done. So I watched plenty of videos and I decided to record - and let you guys see me recreate this look in this clip. I am starting out with one of the small little bundles um, so there's three bundles and I'm using one piece out of one of the three bundles um and I use that one piece and I split it into three pieces. You'Ll see me do this. Quite a few times throughout the video um but yeah. So then I take the section split it down the middle, and I start with two small braids under each section and to me this part is very vital, like I tried to do it without adding the little braid under it and it just slipped out so for Security and that extra grip - and you know all that - you know that you need, I would recommend um adding the small braid. It does take a little bit of extra time. But to me it was vital um in creating this foreign starting out. I am using the Nate braid braiding gel. I think it's what it's called. Eventually, I am going to start using the shine Jam because I'm going to run out of the neat braid, I prefer the neat braid Over The Shining Jam because you just you know it helps with gripping, and you know keeping the tension that you need um, while Creating this look, and just a little side note before you go on throughout the video. My child does not like to hold her head still. So if you see me pushing her head forward, I will do that as many times as I need to to make her hold her head down. She gets off into their phone and clearly she ain't worried about what I me, what I'm trying to do. So, a little later on in the video I'll show and kind of explain the direction that I'm twisting in order to achieve. You know the twist, but right here is a better clip of how I create the barrel roll. So what I'm doing is starting measuring the lock according to the length of the other blocks and then I'll bring the barrel roll up and then I'll twist back down. Thank you. Thank you foreign dry, so I'm going in with my all-natural hair and body butter so that this protective style can actually work as a protection foreign. So what I'm doing is making sure that one lock lays in in the middle of two other Lots. So in the cosmetology World we'll call this bricklaying but yeah. So basically I want one lock to lay in between two other locks. It'Ll just give it a fuller look so that I won't have to put a million blocks on her head to get the fullness. So I'm taking this section, I'm going to split in half and then I'm going to put two small braids under each section. Then I'm going to take my crochet needle and I'm going to use the pre-stretched hair to leave it through each section, one strand on each side. Now I'm going to take my hair and body butter to moisturize her hair and then The Shining Jam to Sleek everything down, and then I want to twist to the right. I'M twisting both sides to the right. So after twisting both sides to the right, I'm also going to put the right strand over the left Strand and twist to the left. I want to twist halfway down and then add a piece to me. This is vital because it makes the strand of the lock will twist thicker so that once you do your barrel roll you have the you know the desired thickness that you need foreign. Thank you! So after I twist this next section, I wanted to point out that I am leaving a small Gap in between the two locks, as I'm twisting you'll see here in a second right here, I'm not pulling tightly, I am leaving a small Gap and then I'm starting To twist that's important, I feel like because this twist is going to get tighter as you twist down and if you're all, if you're starting off tight in the beginning, that's going to hurt and cause unnecessary tension. So just leave that small little Gap and everything should be good foreign, foreign, foreign foreign. Thank you, hmm foreign. So this is pretty much the final look. I am in love with this. Look, I'm so glad she asked me to do this for her uh, the color. I mean I'm, I love this color like she chose the style, the color, all that, and I I'm just in love with it, and she is too. I think this is the perfect Style for kids, because it is pretty much tension, free kind of like the knotless. I fell in love with the knotless when they first came out because of the tension. There'S no tension, so yeah I mean try to show y'all. You know what my way of doing things if y'all have any more questions, just leave them in the description below I mean well, no, I'm sorry the comments below and I will try my best to answer whatever I did not cover in this video. I thank y'all. So much for watching see y'all in the next one bye foreign. Thank you. Hmm foreign


![1 Week Donut Hairstyle Tutorial (Monday) Soft Twist 1Zhou Jian Heaarenzi[(Updo Lover)] #Shorts](https://static.hairurl.com/p/2022/10-22/5e03dc122512869de6eab1ee95fd0e9e.jpg)
Comments
Ladylocs Asia: Imma have to try this on the back of my head. I have natural locs but I had an undercut and I'm letting it grow out. I miss doing high ponytails/buns and I can't because it's a struggle back there right now lol. This is cute.
Brittany Allen B.A.B.S 💕💕: Love it ❤❤
ameriamason: I definitely said she gone have to keep pushing her head down