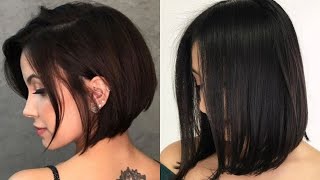
Easy & Simple Medium Shaggy Bob Haircut Tutorial | Bangs, Layers Cutting
- Posted on 17 April, 2022
- Bob Hairstyles
- By Anonymous
Easy & Simple Medium Shaggy Bob Tutorial Step by step
Bangs Haircut & Layers Cutting Techniques & Tips
"I Love Haircut - I Love Hairstylist"
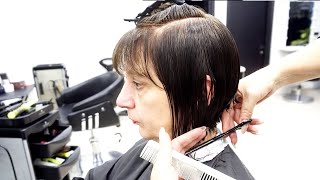
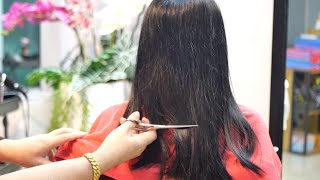
Hey everybody and welcome to my hair brain live takeover. I'M dusty, rhodey i'll, be your host for like the next hour or so um. We'Re going to show you a a simple sexy shag um in this we're doing this through um aveda's got a lot of new classes coming out and uh one one way: you'll be able to really get an in-depth dive into this shape that i'm creating. Like kind of the simple version of is with uh my new reignite class, that's coming up through aveda, but for everybody. That'S on there now feel free to ring in ask any questions that you might have i'm going to try to show you something. That'S very salon. Wearable easy to do in a few simple steps and then uh something you can take back to your guests now, just because something that is simple doesn't mean it's not going to take commitment. You know so some of these shapes, especially when you're cutting a shag. You really have to commit, because a lot of the time what you're doing is you're doing you're, creating something that is almost anti. What we've been doing in the past so a lot of times what you're building shape in previous trends and styles you're, starting at the bottom you're? Building your shape and you're working your way to the top. Now, with the shag and you're, essentially cutting almost like a mullet, so it will take some commitment. I'Ll show you some easy steps to get there, but it will take a bit of commitment in the approach. So the first thing i'm going to do - and i want to show you guys - is i'm going to tackle the fringe section. First, let me show you the sectioning, that we have here just a simple section through the fringe, these two bottom half of the head. I just split in half and then the top half of the head has been split into as well. Now, what i'm going to do? First, is i'm going to start with the fringe, and one thing that you'll notice about the fringe is that i didn't do like a traditional triangle that there's nothing wrong with that and that's that's a way to create fringe, but a lot of times what i find When creating my fringe is, i want more of an even distribution of weight in through this front hairline area. So if i'm doing and building off of a triangle, i end up getting a bunch of excess weight in through this mid section, and sometimes it's not necessary and all it does is create extra work for me. So with these they're going to be longer curtain fringe. So i want more of an even distribution of weight from one side to the next, so i'm not going to have to go back and remove a bunch of additional weight that i may have left in by doing more of a triangular section. So the first things. First, i'm going to take from my fringe section here: i'm just going to grab a little piece down the center, and this is where you're going to establish your guide so wherever you feel comfortable with your shortest piece. Being that's really up to you uh one question that i get asked quite a bit is: if somebody wants curtain fringe, can they part it off to a side? And generally, i would say the answer is not the best idea. You definitely can do more of a side part, but then what ends up looking like is you have like this nice full curtain on one side and then just like a few little wispy hairs on the other. So what i'm going to do now is that i've established my little guide here. I'M gon na drop this a little bit, and i got my beautiful wife here with me too. So if any questions come through, um she'll be here to answer for or to ask him for me, so feel free to ask away. So we're going to take this section now after i've established that center piece and that guide i'm going to pull the hair straight out from the head, and so it's parallel to the floor. Now. What i'm not going to do is i'm not going to elevate this section um higher than parallel to the floor, and i'm not going to drop my elevation lower than parallel to the floor. Parallel to the floor is kind of a really good indicator. It'S a good spot that you know when you have to kind of repeat it on the opposite side, you know, parallel to the floor is parallel to the floor, but if you have your elevation dropped a little bit say it's here on this side, the chances of You matching it exactly on that side become a little less likely and then, on top of that notice. What i said is i'm going to pull these straight forward, so i'm not going to over direct towards the center at all and i'm not going to over direct away from the face at all so same thing when it comes to gauging your elevation or engaging your Um elevation you're, also not having to guess, engage your over direction because we're going straight towards you and then parallel to the floor on both sides. So then, what that leaves us with is all we have to now. All we have to do when cutting to match to the next side is make sure that, whatever angle we choose to cut here, we just have to match that mirror that on this side, so i'll make my first cut not doing a super aggressive angle or anything. Just something that's going to flow and kind of swoop down real nice. So now i'm going to come over here, i'm going to do the exact same thing to this side, we'll grab just a little piece make sure we find just our shortest piece and we're going to pull this straight towards us and then also parallel to the floor. So, like i said that leaves us the only the only guesswork that we are actually left with is making sure that our finger angle is mirroring the angle that we created on the other side. So then, as far as the fringe go, it should be as simple as that to create your curtain fringe um. That'S there's many different ways you can create curtain fringe. This is one way that i have found has taken a lot of guesswork out of finding the best way to create balance in symmetry from one side to the next. Because if your elevations in different spots and you're over directing dramatically in different spots, there's nothing wrong with that, but it can be a challenge when you go to mirror and then match it on the other side. So we're going to leave these two top sections plugged in for now, i'm going to move to this side section, there's no questions yet huh, no everyone's, just saying hello, and so, when um i found out that i had the opportunity to do this with this. Is my first hair brain live takeover and i've i've been around long enough to um. Go. Has a question. Who'S got a question opal person, she says what shears are you using um i do have shears are such a personal preference and it really comes down to. What'S comfortable in your hand, my wife and i we have created a a sheer company, but this platform in particular is not one for me to be promoting it at the moment. So if you ever want to dm me any questions, that's totally fine um, but you can check out hair brand. It even has a really good collection of scissors. I'Ve used a lot of them. They'Re super good um. Like i said you know you just one thing. I would just be cautious of is, if you're going to spend a ton of money on scissors like a thousand plus just really do your research. That'S all i have to say um and then patrick has a question for you um. Could you use this template on curly hair as well great question? Yes, you absolutely, you absolutely could um. If you didn't hear my wife, the question was: can you use this template on curly hair as well, and the answer is absolutely yes. Now, depending on the different curl and coil patterns that you might be facing within the hair texture that you're working with you might want to be cautious of the tension that you're using so to move forward. I'M going to take my first section here: we're going to pull this straight forward and now, if you wanted to, you, could use this little piece of hair the longest part of your curtain fringe, and you could use that as your connect piece, because we're going to Go from short to long as we uh cut this section now you don't have to you know, depending on how long you left your cart in fringe. So let's just say you cut like some shorter fringe. You may not want to use this uh longest piece as your connect piece, because it might be too aggressive of an angle in the front. I found that i left my curtain fringe is pretty long, so i'm actually going to connect to it. So we're going to comb this all the way forward find my little piece there and then i am going to angle from short to long. But what i'm not doing is i'm not uh, i'm not really trying to exaggerate it. So, like i'm pulling my section forward after i've determined and decided the angle that i wanted to use, i'm not like sliding and trying to really it. You know elongate. My angle here just want to pull it straight to you, choose your angle and then make your cuts and finish it out through the section that you're holding um. There is another question about the client: if a client has recessed hairline, would you suck your neck differently? Yeah the the challenge that you're going to find with any type of recession, um in doing a shape that has curtain fringe my whole philosophy on on fringe, whether it's short long curtain swept or whatever is you got ta commit like because if you don't commit and Do the appropriate amount of weight that they're gon na need to pull the look off? It just looks kind of stringy and like just little pieces floating around, and you know i think it's it's just you're gon na you're gon na over promise and under deliver. If you don't be completely upfront and honest with your guest and if they got a receding hairline and they want full curtain fringe, you might have to tell them hey we're going to have to take this section here and make it this big. You know and then at that point they're going to have to decide you know whether they feel comfortable with committing that much or not. This will piggyback off that question, which is how thick she's signed on late. How thick could you or should you make the bangs? How far back do you have to go so um once again, that kind of goes to personal preference? You really just get to decide um how much drama you want to bring into that fringe section, and i and i honestly always say like just if you're going to do it right. Just take enough hair. You just don't want little stringy wispy pieces um but, like i said before, there's nothing wrong with being completely open and honest and upfront with your guests and saying: hey your hair is finer up here. You don't have to say it's receding, but like say you know this. This fringe area here is a little weaker. So if you want whatever particular look they're bringing in especially if they're, bringing in a look with like a full fringe, just be honest, like hey, we're, gon na, have to take this much of a section um. So a whole portion of the front of their heads going to be their fringe section, which would be super cute, but at that point they'll have to decide. Are they willing to do it or not? So then, what i did with that this um last section is the exact same thing i did with the previous section. I pulled it all the way, all the way forward. So basically, we are directing these next subsections all the way forward, bringing it to my previously cut section. So essentially, we have a stationary guide here that all of these are reaching to so i'll. Take another little subsection. Do you know when you're gon na be going to oregon next? I do not know when i will be that way. I'M guessing that i have something on the calendar. Um i'd have to check you. Can you can direct message me? My instagram handle is just at dustyroady; no s just does um, and then i will try to do my best to let you know um when i'll be in that area. But, like i said at the beginning of this um, this particular shape or a version of this shape will be in aveda's brand new reignite class that i'll be hosting there's going to be a lot of calendar classes around the nation and i think i'm pretty booked All the way, through the end of the year already and into next year, but some of those classes that doesn't mean the classes are booked, but so there are available. So i would just try to find if there's some can't avail aveda calendar classes in your area to jump on it now, because i'm pretty sure that they're limited to about 15 people so really all we're doing is we are continuing that exact approach, all the way To the front pulling it to our stationary guide, can i see here uh-huh next section now with most people's um, you know length or if they have a bunch of layering in their hair. This is the point where you're going to really start to run out of hair quickly, i'm going to start to realize that the hair is not no longer reaching. So you can see. I just have like a few strands of hair that are making it. So just barely anything left here so then, essentially this bottom half of the head, as far as the actual layering technique is concerned, is done. I'M going to come to this side we're going to repeat that process on this side and then before i get to the top, i'm actually going to do some different internal layering techniques. Before i move to the top well but like i was saying before before, one of the questions came in um when i was when they asked me to do this. Live, it's actually been a big honor to do a hair brain live um, because i've been around long enough to have known gerard and randy um for years, and gerard in particular, has always been a major hair. Hero of mine he's really really helped me along the years whether he knows it or not. Thanks gerard i'm opening my eyes to how to look at shape different, how to see things different, how to be okay with you know, creating a lot of feeling and not just um, not just building like legos, but also being able to cut on feeling a lot Too so thanks gerard, so um, there's a question: is this haircut part of the aveda education? So this is a simplified version of what we will be doing in the in the new uh reignite class, that i'll be teaching um and then what you'll also find is. I think through a lot of the other evade education is because shags are are so big or like these kind of looser, extremely layered shapes, whether you want to label them a shag or just aggressive, mid texture, you're gon na no matter what class you take. I think you'll end up finding a lot of different options and really different cool ways to cut your to cut your mid. Your your aggressive, mid length shapes all right so when we get to this side now, because we are using our longest part of our fringe as our connect piece just got to pull the hair straight forward, find our longest part of the fringe and then start cutting Next, subsection pull it straight forward and if you'll notice, when i'm pulling these straight forward, they're, obviously all going to the one stationary guide and i'm also doing my best um to not drop, drag my elevation low or drag my elevation high. So once again, we are using parallel to the floor as kind of a ground zero for where to hold up where to hold our uh stationary guide. How big are your sub sections, so the sub sections, i would say, keep subsections. You know from a half inch to an inch, depending on uh what you're doing for your hair coated for your shape and then how much density the the guest has in their hair. You know, and you just kind of have to ask yourself too or what's the shape that i'm trying to create. You know if, if you're going for a super crisp, just beautiful perfect uh graduated bob you're going to want to lean more towards obviously taking the smaller, cleaner, more precise sections you take when building a shape like that from the bottom up, you're gon na you're gon Na stand a better chance of creating that nice clean foundation. Now, if you're doing something like this, that's going to be more aggressive, it's almost kind of falling from the top down. There'S going to be a lot of texture, a lot of movement in it. I don't know that it's super beneficial. Well, actually, no, it's not super beneficial if you were to go through and take tiny micro sections um, while doing exactly what i'm doing here, um feel free though, if there's a general rule that i you know land on, it's only handle enough hair as you're comfortable With holding uh, so yes, i mean some of you guys may have seen it or already or not um my aveda, i'm back video. It was. It was a lot of fun to make. Obviously the jacket that i wore in it just caused a huge stir, um. So, just to touch on that a little bit too. Obviously aveda has been a huge part of my career ever since i was little so, and i mean little because i went to the aveda institute when i was 17 years old. So for some of you that don't know my story, i actually decided i was finished with high school at about 15 16 made, the executive decision and uh ended up going to hair school, so i spent what would have been my senior year of high school at The aveda institute, and so literally it's a aveda, has been a part of me since i was little um, and so it's not just. I always feel so good to be back within the network with you know, people that just really care about education that really care about. You know the craft, their artistry and they're, just all around good people. So take one more section from back here. I don't think any of it's going to reach did not so now we still have these top two sections to cut, but i'm going to give you a quick tour of how the shape has began to unfold, not crazy aggressive, but it did just build that nice Short to long flow in the back now, if, if the customer had like, i would say, super fine hair, you might find just by pulling the hair forward and then just letting it you know naturally fall back like this. You might be good, like you might be done, and you might not have to do a ton more into this, but i'm actually going to take it a step further and do a technique that i've just dubbed cylinder breaking it's nothing that i i didn't make it Up, i'm sure, there's other different names for it. That'S fine call it whatever you want, but i actually first watched somebody do this particular technique. It was at a nevada congress. I think it was like a 98 or somewhere. It was a long time ago and i think they did it on dry hair with a clipper and obviously it was like very, very hair showy. But you know you should be able to take inspiration from even crazy wacky stuff and then figure out all right. How can i, how could i actually incorporate that into my daily clients, and should i incorporate it into my daily clients, and would it make any sense if i incorporate it into my daily client work and i think a lot of the times? What you'll find is anything that you see that somebody that somebody does that that seems creative, there's, usually going to be little bits and elements of things that you can use within it. So what i wanted to do is i wanted to be able to take the really cool technique that i saw and learned as a you know, more of a stage technique and then be able to duplicate it when it comes to actually doing clients. So what i'm going to go through is i'm going to do i'm going to take a section, i'm just going to twist it into a cylinder. Once we've got a nice cylinder, we don't want it super tight, but you do want it clean. I'M just going to go through and i'm going to break it up, cylinder breaking and that way you know you're. Obviously you're taking sections you are going um. You know in precise motions you're not just going through picking up twisting hair and hacking at it. There'S a method to the madness and what that is doing is creating all of these little internal layers within the hair, um layers kind of a funny word because, like what is you know, what's a layer, it can be so many different things. So basically, in my opinion, it's if there's a shorter piece, not touching the piece next to it or around it, no matter how it got shorter or what you did you've created. You'Ve essentially created a layer within the hair. So then, every one of these little breaks is another little layer within that particular section. Would you ever do that with um thinning, shears yep? You could do this with thinning shears too i'll, actually demo, that on this one, it's not my favorite approach, because there's a lot of variables that come into play when doing when twisting hair in these cylinders and i'm trying to remove as many of those variables out Of out of the equation, so when doing with thinning scissors, i'm going to do it just to the end here, you could go through and you can make your cut and a lot of times. People will cut and they'll cut all the way through and then, depending on what scissor you're using or how, how the teeth are separated and how much the weight they remove. You are going to. You know, do that. Basically, throughout that section i actually like to when twisting the cylinders, because you know as you're twisting something it's going to be thicker and through here and the closer you get to the end just by default, the hair is going to get thinner and thinner. So i want to, if necessary, be able to do more breaking and weight removal up here and then maybe even a little less as i work my way out now with these, i would say that the subsections are about about a good inch, and that really is Up to you how much density you want to remove, i will do this on some questions that may come through is: do you do it on fine here? Absolutely i just do it way more uh with way more finesse. Another question that comes through a lot is: will you do this on curly hair? This is actually one of my favorite curly, hair go-to methods when working and trying to create internal wave in somebody's hair texture, one of the bigger challenges with curly wavy textured hair is getting rid of the big, the big triangle, the big you know, liberty, bell shape And so by doing cylinder breaking through curly wavy, hair you're able to put those little layer little layer pieces within your shape, where you see fit in in a much more organic. You know basically setting you're, not you're, not creating a shape at the bottom and then of a foundation and work your way up, you're kind of creating an organic vibe throughout the entire head. So so then, here when you go to comb it out, you end up with a fair amount of weight removal, but it's not crazy and it's not excessive unless you actually want it to be. Whenever i've taught something like this in class and we go through um people will always be wish that they did more when they had the opportunity to do it. So, although it might seem scary, it's a good chance, you're gon na you wish you would done more. Would you um patrick, was asking on the shape being caught would have had a razor bead. Would you recommend that absolutely could be used um? I don't particularly use a razor for the cylinder breaking portion of this, but for everything else you absolutely could and you could use a razor for for cylinder. Breaking though too. Let me twist a piece and i'll kind of show. You one way that you could approach doing that so we'll twist the hair here and then, if you wanted to use a razor which put me on the spot - and i don't have one - let's see all right so here we go so sue is just asking. Would you do this twist on thinner, hair but yeah yep so go through you take a razor. You know any stick razor um. I think you could go through with. I just think you might find yourself kind of chewing and hacking at it more than you'd want to so and quite honestly, i really feel like a scissor would work better in this situation, but to answer the other part of your question is um. What razor would would i recommend now there's there's two main kinds of razors as, as most of all of you know, there's the you know the the stick razor, which is the one that just kind of looks like this any version or something similar to this, where It'S got the blade in there and there's usually a guard disposable blades attached with a guard right built onto them, and then there is more of the the feather plie razor, which is more of the straight blade razor. Now, just a little bit of my experience with razors - and this is, where gerard actually really helped me too, i wouldn't even considered touching a feather plie razor until i was able to sit through and really learn from him how to use it, how the benefits of It and after i learned how to use a straight razor, i kind of became a straight razor, snob and anytime that you like, find yourself being super arrogant or snobby about a particular approach or a particular technique, or a particular tool. You'Re really closing the door on yourself for any for learning, much new things like what if a new tool came out or what. If there was something about the other razors that you didn't know but you've just all of a sudden shut the door, because you only use a straight razor now so and that's kind of where i landed and then after i kind of went through my straight blade Phase, i decided you know what i'm gon na go back and i'm gon na see if there's anything that i was missing with with with the stick razor and there was there's a lot of different techniques that you can do with both of them. So i would just really recommend you guys taking if you can find any good razor cutting classes, learning learning the straight razor. It really helps you hone in your your your precision and teaches you either the easy way or the hard way to be cautious with the tool you're working with um and then get really good and learn all the functions of the stick razor. So i'm still just working through my sections, one question that comes up a lot of the time when doing this is: which way? Are you twisting them just for argument's sake? Whenever teaching this? I just tell people just twist them away from the face. So then, everything on this side - i twist it this way, everything on this side, i'm twisting that way because of what we're doing and we're kind of making the cylinder we're kind of just breaking it. It'S not necessarily creating any directional flow or directional encouragement. Like say, a slide cutting would because we're not cutting from short to long trying to encourage the hair to go one direction or the other we're literally just putting little breaks into it. To add some interior organic life. So i mean i don't honestly think it matters, but if you want to feel better and more comfortable about your um symmetry when doing this twist away from the face, another question: that'll come up quite a bit with this is okay. So how do you duplicate that? So, let's just say: somebody comes back in in six weeks and you did some crazy cylinder breaking. How do you go back and do that again? You know, what's your approach, and i say it's just as simple as this: if you get to the you, get them in your chair and you're doing a consultation and the amount of weight that was removed in through here last time and the amount of texture that's Visible that was cut through last time, you're good and you're. Happy with it. When you go to do your cylinder breaking this time, you're going to pick the hair up you're going to twist it just like you did before, and you're only going to do. Six weeks of cylinder breaking, so what does that probably mean one two done move on to the next, because you're not going to need to go through and break up all of the entire cylinder because visually it's already looking good. So then, you really start to see the shape unfold there. So before i move to the top just going to comb this, get it wet comb these down, i'm just going to gently clip them out of the way, so they just kind of stay in position. While i cut the top section here all right, so this is what we're left with we're left with these top two sections here and now we have to decide how much length we want to remove off of those um. What'S with the approach of some of these haircuts, these shag aggressive mid lengths, ah because they are a little backwards to what we are typically accustomed to doing is cutting the perimeter and then building our shape from there i mean what you'll notice is we cut the Fringe first, so it's like, why did? Why did i choose to cut the fringe first because, probably like many of you, i spent too many years, leaving the fringe until the very end of the haircut and by the time, you're you're at the end of your service, wheel, you're, probably running short on time. Anyway, so what you're doing is you end up cutting you're you're, leaving the most important part of the shape for last and not enough time to actually do it? So, ultimately, it's like do the scary stuff, first, get it out of the way. So, that's why i decided to approach the the curtain fringe. First now we were able to just determine you know where we wanted a shortest piece and then angle away from there. Now, when it comes to the actual these two sections that i just cut, i didn't cut the perimeter at all. You know you didn't see me cut the perimeter once we're going to get to that, but i didn't do it one time and that can be kind of a mind tweak for a lot of people that can be a challenge for them. But well i didn't cut the perimeter yet i can't do any layering, but you can so what did we base our our layer length off of you know we pulled the hair out to here and then we decided we were going to use our longest part of Our fringe, but we didn't have to if our fringe was shorter, we still could have pulled it out further. The fringe does not have to connect with the side layers they just don't in this case they just ended up being that way. So how did i decide you know what lengths i wanted to cut here? Well, really it comes down to when you're gon na your start, your your layer, your cut on this this angle. Here, how short do you want that shortest layer to fall here and then so that's when i decided, then you have to decide all right. How much angle do i want to put on that, because the more angle that you put on this here, the longer you're going to go and then the longer the the back is going to remain because of over direction, you're all pulling into that stationary guide. So, like i said, we didn't cut the perimeter yet we just went through we caught our fringe. Then we started cut our interior. Then we did even more interior work with the cylinder breaking and now we're going to move to the top. So once again, for you guys that are just joining i'm dusty rhodey, this is of the hair. Brain live takeover. Definitely an honor for me to be able to do this, like i said before, and i just genuinely really appreciate everybody. That'S behind her brain and aveda. Really stepped up, and really you know, put this opportunity forth for me um to be able to be a part of this, and i just want to encourage anybody to find some of the new aveda education. That'S out there because we're going for it this year. You know this this this year and the next for education is going to be aveda's biggest education years um. As far as the content, the quality, the all of the the opportunities so make sure that you go and you sign up for whatever you can in your area, because they're going to be great, it's going to be really good education. So i'm going to start with this side here i'm going to take my section now. Once again, we don't have anything to to connect this to. We don't have anything to gauge where this length should end up being cut. So i mean really: it comes down to you. How short do you want to take this top layer in through here, and that can be scary until you do it a couple times after you do it a few times you realize that the world keeps spinning the more and more you get comfortable establishing new guides Throughout different areas of the hair, however, you see fit so i'm going to take this section, i'm going to take a little like a one inch section here, i'm going to comb this all forward. If you wanted to, you, could also connect this to the fringe area. If your fringe was shorter and you wanted to pull it past here and then start cutting, you could totally do that too, with the length that i left the curtain fringe, i'm actually going to use that curtain fringe as my guide. But what i'm going to do? That'S a little bit different. Is i'm going to drop my elevation slightly because by dropping my elevation slightly, what it's going to do is every section that i take after this one. This will be our stationary guide and by my elevation being lower. It'S going to cause this hair to travel further and then leave a little bit more length as we work towards the back, so using my fringe as my guide, but with a lower elevation than when i actually cut the fringe. Because then i was holding it parallel to the floor this time, i'm dropping it lower, so you can find your guy there next subsection from the top. You do want to be gentle and make sure that when you're moving your subsections around that you're not combing into this you're, not disrupting the the hair that you clipped out of the way next subsection last subsection. So i'm going to turn this to the side and kind of give you a side view of what we were doing every one of these was getting pulled all the way forward to that stationary guide. So i'm going to repeat the same process over here on this side. So what if they have a side part? They don't that's my question. This is only looks good for, like a middle part yeah, and that goes back to kind of what i'm saying early on um. My wife asked what, if they have a side part and that's when i just feel like the compromising begins, you start to do. A lot of these shapes one middle part is kind of the vibe of the whole shag aggressive mid length anyway, as far as my opinion is concerned, um and then, when you're trying to do curtain fringe um. If you try to cut you know, compromise with the side part like i said, you're going to have a real nice heavy side. You know flowing to one area and then weird little pieces over here and then the same thing when it goes to your layering. It just gets kind of um off balanced visually. I mean you can make it you can make it make sense, but i just feel like the overall look is: is really compromised when trying to do side parts with these aggressive mid lengths not like it's not possible. I'Ve seen some cute ones um, but it can be more of a challenge and aesthetically. It'S just it's not my favorite. So we'll find our guide elevation drop, lower next subsection. So do you, everyone have product in their hair, and do you like this like totally clean? Is that your question too? Yes, my wife's filling in for you guys, so thanks for watching sitting here in class, so my wife asked basically. Is there anything that you put in the hair while cutting - and i would say usually i do not, i think, moisture content in the hair is very critical when creating your shapes, but i usually just rely on my water bottle more than anything. But that being said, the leave-in conditioner, the french leave-in, is awesome, and so that actually helps really retain moisture throughout the hair longer, so you don't have to use water as much, which can also be very beneficial when doing any of your razor work. Like i said, moisture content can be crucial when creating your shapes, so whether it's water or product just make sure that it's the correct, moisture content for whatever you're doing at the time. That'S actually moisture content in the hair, while cutting and creating different shapes is actually a pretty big discussion. So i wish i could break it all down for you in a short period of time, but it's crucial and it matters, but it just really depends on density and the shape that you're trying to create and the technique that you're actually trying to do. At the time so, like cylinder, breaking can be done on dry hair, but i find while the hair is wet, the the cylinders lock a little better, so that'd be one one example: i'm trying to do a lot of slide, cutting or encourage directional flow. You know i typically would want to do that on drier hair, because when the hair is wet you're trying to slide through you know, the hair is in locks and you might not get the exact area that you're shooting for so now, i'm going to go through Still have not cut the perimeter, yet we're going to go through this top section and do some cylinder breaking now. These ones um you'll, see that my elevation is much higher when working on the top of the head for your cylinder breaking and the higher your elevation is with the cylinder breaking by default. The closer you're going to be able to get to the scalp when doing it so just get that section out of the way and i'll show you what i'm talking about. So if i'm taking my subsection and i'm going to create another cylinder break and i'm pulling this cylinder out, so it's parallel to the floor. The closest that i can get to the scalp is right here when the cylinder actually starts up here now that doesn't make it right or wrong, but if you want to create more drama with your cylinder breaking closer to the scalp, raise your elevation. So then, your first breaks can be a lot closer to the head. I'M donna asked when you dropped the elevation for the top. Did you use her eye or nose to determine where the guide would be? For the second side, i just use for the second side. I basically repeat the question again: sorry, when you drop to the elevation for the top, did you use her eye or nose to determine where the guide would be for the second side, so i use the fringe. I think that answers, i think, that's what you're asking um. I use the fringe for both sides so like no, we obviously had our fringe cut on both sides. So when i over directed and dropped the elevation down, i was able to see and use the fringe on both sides. I hope that answers what you're asking so another little um tip on this cylinder breaking technique. Although it can, you know, be a little scary. Don'T let it be when you twist your cylinders, i said early on make sure that they're not super tight or twisted too tight, because if you twist the hair, while it's wet, really really tight, it's hard for the scissor to actually cut through. So you might not be able to have that finesse to it, so you just want it clean, but doesn't have to necessarily be super tight. Another way that i find to get a good, consistent, clean cut out of it is you actually want to use the back of the blade, so you want to be actually open that scissor all the way and be using the back of the blade here to cut. Although it might seem scary, like you're, going to end up cutting the whole piece off, but i can promise you this - that the power of the blade is closer to the pivot, to the pivot point of the blade. So when you're back here, you're actually able to make slight movements and have a lot of power working in that blade to. Whereas, if you're trying to use the tip of the blade and by the time you get enough power to the tip of the blade, you might end up, actually it might end up snapping through the entire chunk of hair, so use the the very back of the Blade and then i find too this little rocking approach really helps break into it smoothly. So i'm just working around the shape, um sue's asking. How do you know the second elevation is correct? Matching the first like from section to section: i'm wondering you don't so if, if you mean from one section to the next um you really, it's really just gon na go on feeling and you're gauging um, how close? How close do you actually want to be to the scalp? Now you could you could change that answer with every section of hair that you pick up, you could decide. Okay, i'm working in this section here, i'm getting closer to the front of the face. Maybe i don't need to get as close to the scalp, because i don't want to create as much drama. So then, you might do your elevation here as opposed to pulling the hair where the elevation is up much higher and back to what i was saying earlier about. You know gerard really helped me along the way, with kind of be able to feel haircuts more um and that that kind of translate into even section by section being confident enough in knowing what matters. At the end of your shape and at the end of your haircut is that it looks good, and so sometimes we have to do one thing slightly different in this section over here than we do in this section. That mirrors it to get it to look right and to get it to look good and so essentially as hairdressers, we we have a pretty simple task. It'S make sure that our shapes look good and are fairly easy for this. For the customers to duplicate you do those two things i mean you're right there you know. Sometimes technicality can be tossed out the window because you can do the most perfect haircut and if it doesn't look good or if it's a super difficult for your customer to style um, it's it's a loss, no matter how technically perfect the haircut was um, there's just A question about um, indian hair texture, it would just be the same right, i would say you might have to get more aggressive um. If so, if you're talking about like straight thick, dark real heavy hair, i would say you know absolutely, but if you want to get the most drama out of really thick dark straight hair, sealant breaking's, actually a really good way to do it. And i would probably uh get a little bit more technical and mathematical with my sections. So if i was going to do something like that in super thick dark hair, that was pretty straight, but i wanted it to have more life into it. I might break the hair into more subsections and when doing a cylinder breaking actually be in, you know i'll be doing a lot more cylinders throughout the head as opposed to what we just did on this particular shade. I'M gon na wet this here, i'm gon na comb this all forward comb back down all right. So i remember i have to not cut the perimeter yet so then that's the last thing for for us to do now. How you go about cutting the perimeter is absolutely crucial to finishing your shape off appropriately. We just spent the last hour this whole haircut, trying to create a super organic. A super lived in look. So if we get to our perimeter, we start holding our sections down and we start cutting a blunt perimeter in well. Then, all of a sudden, we just kind of destroyed every bit of organic that we that we just spent all that time creating. So when it comes to actually cutting the perimeter, you want to think more organically with your approach as well. So what i end up doing for this is your shape should already be in there for the most part, so i'm just like going through and doing a little slide, cutting removing any excess or just bringing up say if the back was super long. This is when i would bring the back up, but i'm bringing the back up and bringing the length up by grabbing little pieces of hair moving them around, seeing where they fall and then kind of sliding, through, as i bring cut and cut the perimeter up and Whether you use you know this approach or some other different kind of sliding or organic approach, it's whatever you're comfortable with, but one thing that i will say when doing a particular shape like this is don't kid yourself and be like okay, i'm gon na leave and Think you're gon na leave the perimeter. You know real broken and organic by combing. The hair down and doing deep point cuts, because usually what ends up happening is with some deep point cuts. Just your eye alone will start to create, and that line is going to get more and more blunt and not to mention you know deep point: cuts can only be as deep as the scissor will allow it or as deep as the hair will allow before the Hair folds over and you're not able to actually get through there and do as deep point cuts as you want all right. So with this shape, i'm not going to make you guys endure a blow dry, so i actually pre did two um before this sorry. So i show you what the different shapes look like when they are done. This one was um air, dried, completely air, dried with the nutrapunish gelate, and then we ended up putting in some texture tonic as well a little bit shorter. The fringe is a little bit shorter, real, similar approach. We went and did with this one and, like i said it's air dried, so to bring out the most organic texture in it. This one more of a mid-length and this one is actually styled with kind of a back and forth flat iron wrap. So one's more super lived in one is much more organic fringe or a little bit longer on this one about mid length on this one and then shorter on this one. So you can, hopefully you guys can see the the different vibes you can get. You know in three three different shapes

Comments
Salonsloan: What scissors are you using?
Kim Doan: Good job