Long Layered Bob Haircut For Women Full Tutorial Step By Step | How To Cut Layers
- Posted on 16 May, 2022
- Bob Hairstyles
- By Anonymous
Long Layered Bob Haircut Tutorial for women Step by step
Cutting techniques for Long Hair. Learn how to cut best hair. The best haircut tutorial
"I Love Haircut - I Love Hairstylist"
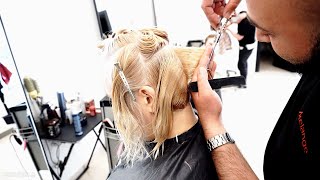
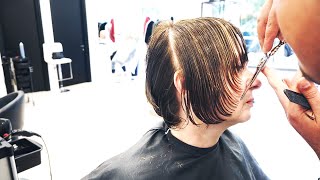
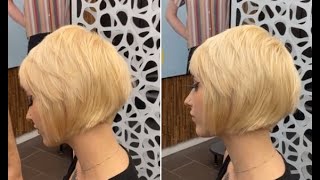
And i call it modern layered bob, and if you come in this side, i want to show you something that we're going to do today. As you see, we have a long hair here and we want to transform this long hair into something that is really cool, and i call it like a modern layer bob i put some sections over here for you guys to check. I did a main section from the middle over here and now i'm gon na work on the left side first, but my first concentration will be on this area on both sides, because i want to do the layers and i'm going to explain why, in the whole Situation so we're going to start here from this side and put a section our first section of division, for today we put some clips over here so just to put it on the side. So it doesn't bother us i'm going to start from the top actually, because the idea here is for this modern layered bob to be something that is very useful for for our clients and, as you see, anna here doesn't like to really do makeup or do too Much color or hair, but she decided to go on her favorite rock band concert and then we we want to do something to accommodate her style. So we want to create a bob that is going to work for us in a way that can transform her idea about what modern vlog is, as we all know, bugs are coming with all kinds of lines, shapes and everything else that goes with it, but we Want to create a bob that is going well with her attitude of like yeah i'm going to the concert. I want to do something else. I have this long haircut and i want to transform something in this case. I want to transfer my hair and, as you see i'm doing round layers over here or convex shape at the very top i'm following my guidelines and at this moment i'm over directing everything to the stationary guide at the top. As you see, i'm not cutting the bottom part, yet i'm just doing the layers right away. So when creating a bob, you can start from the bottom. Obviously, as we all start, but i decided to start from the internal shape first, because i want to create that free feeling, free falling, but also with a lot a lot of structure. So i decided to do internal shape first, instead of just doing graduation at the back and then going into contact shape at the bottom at the top. Sorry, so that's why i started with layers right away because that's going to set the tone afterwards when the hair falls at the back or goes longer at the front. So right now you see how long is your hair. So i think it's an ideal combination for the great transformation that we're going to do today. So, as you see, i'm combing everything towards the middle over here - hey milo waiter, for a second everything here say hello from poland statement, milo, miss pakistan, new york, los angeles and many people, say hello and hi. Folks, looking forward to to see you long time no see last time, i was doing something cool with steven in new jersey steven stafford. He did an awesome hair color for me. Thank you, steven bro. Thank you one more time and, as you see, i'm going to continue working on my shape. So sometimes we think oh, if we do some modern shapes, let's skip the precision cutting. Let'S just do right away for point cutting or something like that. Of course you can do it like that, but let's create with a good precision technique. Let'S create a shape, that's going to work for us so to create a modern shape, which is a bit loose and stuff like that. You do not really need to do point. Cutting straight forward from the get-go, you can start with a very much beautiful precision technique as i'm doing right now, because it's going to help at the very end tremendously to the shape that you want to look. So what i'm doing over here is combing everything to the guideline stationary guys the guideline over here and, as you see, i'm cutting a shape over here sides a little bit longer, as you see already falling on the side, and we have the shortest point over here. So let me show you shortest point over here and longer towards the ear, because i want to create this shape. That goes at the bottom over here. That'S why we're creating internal shape first, instead of building from one line and then creating layers. So i finished my section over here, so what i'm going to do is leave it on this side. Just take the clip out out. Basically, it doesn't necessarily need to be right away here, so i'm going to connect them to see how they feel and, as you already start to see the shape that we're creating starts to show. You can already see that the layers are starting to pop out a little bit over here. So now we're going to work on the bottom part of this side. So, since we're creating a convex shape, so we're now doing those concave layers that will go short to long, just kind of follow the round shape of your head. This shape needs to be in the same manner, on the back as well. So now we're going to in a in the place of graduation. So first we did layers now we're going to do a little bit more layers and graduation at the back, because we want to follow the shape that we created. And since we have a guideline here in the middle, we're going to do the same thing over here, we're going to pull the section over here again just to feel. Where was our previous guideline. So we're going to remove this part over here, because we don't really need it at this point. And what we need here now is a connection pull our hand on the side and pulling this we're gon na simulate the first part of our starting of the cutting. So we're gon na pull everything on the middle section over here. Okay, a second for one question of course, of course, later david very, how do you know the perimeter length you're pulling up directly behind the ear will be at the correct length, you're waiting to actually too cheap, okay. So, basically beforehand i was feeling the short layer over here where it's going to fall. So if it's, if this short layer is, is here so if you pull it down, this is approximately the length that we want to go at the root at the shoulder level. If i went shorter, of course, that's going to end up falling somewhere over here, so basically this is the first part where you decide how low it's going to fall. That is the side of your length. So now i have a guideline over here because i started with internal shape. As you see, i'm going to position myself from the right side as well and try to cut that middle over here, just to connect it to positive hello. How are you doing today? That is very cool. Thank you. So, as you see, i'm concentrating just to connect the pieces over here right now, i'm not working on the bottom part. As you see, i'm just connecting the piece over here. Her head is tilted forward. So right now we're still layering because guys, if you remember everything over 90 degrees is layered, so i'm still cutting 90 degrees to the head. As you see so this is a technically a layer as well. So right now, i'm still connecting everything to the middle and then we're going to deal at the at the very bottom of this side. Everything over direct to the middle coming back here then holding everything down that i don't need. I just need to connect this two. More sections because, as we approach the fine line, the hair here, the hair is very fine, so you don't really need to do like too many little sections. You can kind of do slightly wider, but that's only if you're approaching the hairline over here. As you see i'm connecting over here and creating those layers further on we're going from the very bottom here and doing the very last piece of the puzzle, so we have finished the layer part now we have the length over here which we're going to finish. So if you remember this was the idea of the angle, so we follow the head shape because it's a convex layers, they kind of follow the head shape. They ended up over here and now what's happening, we got ta finish the circle which goes down so basically all shape all over. So sometimes when we cut shapes, we do overall shape over here and then suddenly it's a flat line or like a square shape or like a straight line. But in this case we decided to finish the shape. So we're going from the layers to the bottom, and now it becomes graduation and comes over here, so we're actually blending two different techniques, which is layering and graduation. Now we're coming back again over here we're going to do some graduation here inside to connect the sites and, as you see this is my guideline here. This one keep cutting over here. As you see now, you basically see that the hair is following her shoulders. This is her shoulder leg. You just follow you, basically, with the first section that you did over here. You decide the fate of your guideline at the bottom. So actually this was your guide. So it's like a little bit of playful playful cutting to the to the classical shape continue over here and the whole time. I'M doing very precise movements over here. I'M not doing point cutting i'm just doing straight cutting over here and, as you see i'm getting this softer line at the bottom, and you can already see that the layer is starting to form with graduation beautifully in this symbiotic relationship. Continuing over here connecting right, and then we have the last one over here - that we need to connect and the whole time you're. Just following the guide that you established earlier because i like to call this a mindful cutting approach as well, because i don't get lost when cutting you know, because when you get lost, you tend to kind of freak out and see. Oh, my god. What i'm going to do next, and this way i started my cutting over here finishing down so layers layers and then graduation at the back. So you see we already have that soft shape and started to form over here. So if we comb this section all the way down, we basically finished this whole part of the cut with layers and graduation. So we're going to do the same thing on the opposite side, we're going to start from the crown. As you see, our first guideline was here: all right goes here and separate those two pieces of hair, because at this very moment we don't really need this piece to cut. I'M just going to concentrate at the back. Ask: are you ready for belgrade get caring? Oh yeah, i'm ready thank you for asking that. We have a festival here in this part of europe, which i'm also invited to do with my friend, marco, we're doing a belgrade hair gathering festival next weekend over here, and this is like a little teaser for for the event that we want to do so here. I'M going to take this main section here temporarily, i'm going to just put it inside comb everything down, because i don't really need this part and then i'm going to concentrate back of this midsection. But if you remember, we started from the middle and we pulled every section from the middle. We pulled it to the guideline over here now we're starting the guideline from the other side and pulling everything up also coming from the similar position where we started, because we want to follow that shape, i'm right-handed, so i need to follow where my right hand goes. I could technically stand on this side, but then look. I need to really work hard here and then, if i go lower, it's even harder and harder - it's almost impossible to do it over here. So, that's why i need to follow the shape if you're right handed, you always think where your scissors are. If you're left-handed, it's just a reverse, so basically standing on this side, i see my guideline here and doing the same section in the very middle loop here. How do you like it so far here give me some feedback is right now i'm going to be concentrating more on cutting over here. Anyways continuing sectioning here grabbing the previous point over direction, our friend from london, and he works with trevor sorby education over there. So i'm continuing with my cutting over here, so everything is basically pulled to the middle section. Let me grab it again. The whole key over here is consistency, meaning if you feel that the hair is bothering you, if you lose the thread, a little bit come back again, come back again and find it no shame in that, just find it where you need it in this case, i Want it slightly behind in the middle of the ear i'm going to go towards the middle and we're going to stop hold it all the way down. Just one clip to help distinguish the section over here anyways, so we're continuing pulling the section towards the middle, pulling everything up. Remember, convex, shape that we're creating is a guideline here. This is our garland camera keep cutting now. Sometimes, when we do certain haircuts, we feel. Oh, maybe this technique is easier or lighter. I would say every technique can be very easy or very difficult, depending on you how you present it and how you want to cut all right everything to the middle. As you see right and then just picking the last section over here, pulling everything to the middle, the section is down we're just combing this middle part, creating this shape over direction to the middle, all right. So, as on the left side, we're going to concentrate on the middle part at the bottom because remember we created the top part of this, of the shape, we're still doing layering just in this side and then we're going to end it up end up with the Graduation at the back so you're going to return back to our middle over here on the left side, which is already cut, i'm doing some layering again starting over here everything back to the middle as well, and then we have a guideline from the top. Where is our guideline there? It is all right everything falls down we're going to continue here, so we're just concentrating on this middle part. We'Re not cutting the bottom. All right pull everything in the middle over here, just to see the spot good morning from florida good morning, just the middle part, all right now, we're finishing this whole shape. We need to finish by adding the very bottom of that graduated shape. So as we started over here, we did the middle part and now we're going to finish with the graduation just on the right side. Here then again we're going to find our guideline here, the middle then we're going to start from graduation at the very bottom. Just to finish this shape that we start - and this is going to give us basically that softer feeling at the very end, because in this way we're planning ahead. So when we finish our whole cut, my our modern layered bob we're going to have a softer feeling at the very end, but that is achieved with a strong, strong technique. As you see all right so we're finishing over here and as you see, she has a very long hair. So it's like a really nice for cutting the shape that we need over here all right. We finished both sides layers and everything and, as you see visually we're still not doing the line or anything we first work on the internal shapes of the haircut. This is going to be the very bottom, the very last all right. We'Re going to go on the side here, since we want to do a really cool approach. We worked on the whole back part of the haircut now. We need to connect the sides and keep the layer, but since we need to do joanna, say good morning from california all right good morning, donna watching from toronto whoa natty thanks for education from texas. Thank you guys now we're going to connect the sides over here, as you see, i'm still working on this whole section, but i'm just going to take the whole panel because her usually on the sides here, if you see almost everybody, has really fine hair on the Ears, so in this case we don't really need to go like you know, half an inch by half an inch but hyphen half an inch. We can take basically the whole panel because the hair allows us to do that stuff. So we're going to move move inside over here. So what are we doing now? We'Re going to over direct things towards the back? The whole section is taken over directed to the back and cut it at at the very end over here. So this way we are achieving that the front length is going to be longer now you're going to continue with the top section, but we're going to continue layering immediately. So, instead of disconnecting the line at the back, we are continuing the layer. So we're going to do over direction again, taking the section over here pulling it back to the middle section that we had previously, so basically we're pulling everything back to here. So, let's start, this top part connect everything to the middle section there. It is all right, then, we have the lower part, as you see nothing, but still we're going to finish it over here pull the hair from the face, and we like to say dj maloon started to say that a long time we're going to really like that. This phrase that he likes to say pull away from what you want to keep so we're pulling away from the face. We want to keep the length over there just connect the layers at the back, and if you see we already decided to get like really cool layers connecting to the front. So in this way, what i'm trying to do? There are many ways to create beautiful layers. In beautiful layer and bob, i decided to do something like maybe ordinary, but with a twist, so we can get the best shapes that we can alright do the same procedure on the other side and as you see, anna doesn't have too much color on her hair And we wanted to do really something cool because very often with the color you just pop in the whole thing. But if somebody doesn't want to do a lot of color, then you got to do something to cut. So i think this is going to be the cutting part - all right so again section over here and over directing everything towards the back everything towards the back, because this is our guideline here in the middle. This way we're doing the layers, respecting the shape that we want to create and also adding to that softness at the very very end, because in this way we we keep the length we're getting secured that we're not going to cut too much on the sides right. All right, then, i'm just going to do the face one. Her hair is very fine here. She has like more metallics and shapes over here. So basically, everything here is super super fine here is very thick, but the whole face framing is super fine. So that's why i need to take bigger sections, because otherwise i could actually make a mistake. So my goal is just to create something really cool all right. So let's do it here. Any questions. Uh michelle says good morning from washington state. Where are you? Where are you see, i'm based in boston and u.s and east coast, but right now, i'm in europe and visiting france over here and getting a prep for the big festival that is going to happen 22nd of may in belgrade, serbia, southeast europe, so based in east Coast currently in europe, i'm doing hair brain life for you guys for the help of our local friends over here in our beautiful model, anna and peter, that is behind the camera over here all right. So we have the shape that we want to create. So without adding too much of a hassle we're going to blow dry this, but before we do the blow dry, we need to see what's going on on the face over here, because she already had something so we're going to just do a slight control. A diagonal section behind the ear leave this hair here and just we want to see. Maybe we don't cut anything, but we just want to see what's happening around the face because she already had some kind of layers something over here. Let'S see all right, so they will clean up here, one more section here, because we already reaching with our sections towards the crown. So we want to go too far, just maybe two sections if the fine hair allows us to do that, and hers is so, let's see what's going on here, little trim over here at the face. This will be framing and that's why i call this a haircut. A modern layered bob. I feel that there's going to be a little bit of changing in a fashion because long-haired balayages are present for a long long time and i think our clients and women in general a little bit done with that shape already because it's been like 10 years. So this is a chance to give them something without cutting their hair, too short right, so they're going to still have something, but a little bit more modern, because there are many types of bobs. That'S a very thankful hair cutting shape that you can do from super short to longer still call it a ball. It'S really cool cool. So that's why i find it as a timeless shape for good inspiration or awesome styles. It'S just like never dies out. It just changes the form, iteration, details and stuff. So that's why i wanted to create a modern layer bob in this case, from a long haircut without cutting her hair completely all right. So we have a basic shape over here, so we're going to do a little bit of blow drying and then some detailing later so we're going to use a dye set over here do a very easy blow drying with a fuss, because her hair is uh mostly Straight so we don't need like a round brushes or things like that. Just want to do a little rub. Dry. Of course. One question i mean uh. I never seen this cut done this way. Is there less texturing when it's dry uh? That depends that's a good question that depends on on a hair, hair type of your client. So she has a lot of hair, it's mostly straight, but a lot of hair. So we want to do some layers, some shaping, but it's always a question. What what exactly do you want to do? Do you need to do because, obviously, if i do the same technique on a wavy here or curly, the outcome is way different, but that's the beauty of the techniques in cutting, so you can just apply it differently. So if we wanted to do the same approach to the curly hair, it could really work, but just the gravity with puller will not allow it to sit low and kind of go a little bit up and the shape would be very visible. But with the straight hair, you can actually do a little bit more than that. So basically, the same technique applied to different types of hair gives you completely two different outcomes. Does that really help - and you know replying to your question thanks from corey in california - says no problem. Thank you guys if you thinking about classes or 101 or anything like that, you can direct message me on instagram and we're going to talk about that, because i want to devote some really good time on education, educating people, one-on-one or your salon or whatever you guys Need because times are changing, i'm just going through the worst to this awful pandemic all around the world and people need some inspiration to get back on track. You know some countries are free without the masks or whatever the you know, pandemic is done. Some countries are not so it's really hard times for all of us, especially hairdressers, to get out of this stress. You know we just want to create. We don't want to deal with the medicine and things like that, so, hopefully everything is going to slowly become a little bit better. So i think changes in this sense are really good because a lot of our clients they want something else. They want something new. You want some kind of inspiration anyway, so i'm not trying to do polishing here, i'm just trying to dry her hair naturally and then do some texturizing at the very end. Because if you remember it's a modern layered ball, it's not a straight line that is cut. So it's wrap dry technique and just giving a little more shine. Naturally, i like to use the best brush. It'S really cool gives me liz. It'S a lot of a lot of freedom. Elania says: oh, my gosh, that is beautiful. You did a very good job on it here. Thank you. Thank you. Well, it's not done yet. So. Thank you. Thank you for your square compliment. So my point is really how to twist something, because if we can do many different approaches to this particular hair or a haircut, but it's just something different. That'S why i turn this to me: i'm going to do a little bit more texturizing when i'm done and since anna is a rock and roll chick. She likes something different. She doesn't like those bobs they're like super structured. It doesn't go with her personality. You know. That'S why you know she wanted something else and she's the person who doesn't do blow dryers at home. She basically wants a cut. That'S done in five minutes when you wash it and put some product, maybe dry a little bit and go out in the street, so she doesn't want any basically hair. So that was also my my opinion in my thought process. What to do with that kind of stuff, if i just do a regular bob on her a lot of precisions and lines and some layers she may be saying like i need to blow dry this this hairstyle every day. It doesn't really work for me. So give me something modern, something that is bought, that i don't have to work with. So this would be something that i was thinking of because she has some highlights and low lights over here. So, let's see what this can work for us. Mina says hi, i'm watching from prison you're the best anything to make people happy right. All right, corey say what brush you are you using i'm using the west brush pen bro ceramic brush? I got a long time ago when i was working with my friends in vidal student academy a long time ago, so we still have the logo over there. It doesn't matter. I really love the brush. It'S been like 11 years already still works like a day. One 11 years old, perfect. I think you can buy those brushes online, it's called vests. I think this is a 10 row. I think from correct. You can choose whatever you like to do so. Basically, as you see the blow, dryer is very light. I don't want to create too much of stuff, because we still need to finish it up. We did a lot of texture, but we're going to do more to kind of clean it up and do a little bit more like more movement and things like that, because we want to create this modern shape quality already. So the goal is not to polish it. At this moment we just need to dry it, so we can continue texture, texturizing and working a little bit more on all right, so we're going to continue now. So i like to change scissors when i do texturizing like a longer blade in a wider cone. So as this is the shortest point of our whole haircut, let's pay attention to that. So let's go at the back of her head here from the crown lower part of the crown just comb everything up forward and let's concentrate on texturizing detailing this part over here, because this is a very crucial part of the whole haircut. As you all know, because this is going to give you the final touch all right, so we have a shape over here. So, let's, let's start with those layers, a little bit point cutting to give them some ingredients and, as you see, they're very thick and straight right right now. So now we're going to give them some movement over here, because my goal is for her to have like a seamless blend of layers at the back. You can already see how it starts to fall better see now we're going to pay attention to the bottom. So right now, let's start from the layers that we did before and if you pay attention when i'm doing texturizing, i'm still following the idea of original cut, so i'm not doing different angles, i'm just following the original original cut, because i want to see how it's Going to fall so i'm not taking like this or like that, i'm just following the shape that i started with i'm going to ease up this line a little bit to allow her to free fall, and it's really important when you do texturizing to have the idea Of what you want in the very beginning, because if you start cutting and texturizing without the clear idea, what you're achieving you may the style or just do something else that you didn't really that's the i i started this whole cut with the idea in the beginning And i knew what kind of texturizing i'm going to do to finish everything up and if you see over here a little bit slower. So you can see. This is the way i'm texturizing deeper point cuts almost parallel, so i want to just get rid of the some of the weights over here and still following the parallel pattern that i set up over here, because i want to achieve this blend to really work. For me, and if you see i'm just using chrome, you see how it's already blending without me doing anything remember when we started this a little bit chunkier looking and it's all blended in and mind you didn't do any anything to this hair so basically very light Blow dry, didn't polish didn't do anything the layers already blending. So this was my goal, my idea, because she doesn't want to do too much with her hair afterwards. So this is gon na allow her to to do exactly that. Do nothing to just wash hair comb. It that's it so what brand of scissors is your favorite to use? Well, bret! That'S a good question, because i have really different brands of scissors that i like to use. Currently, i'm using the zutani six inch length material, quick, silver model. If you see it, but over, there have a lot of different ones. So, for example, the ones that i used for wet cutting phase is naruto, it's a japanese model and i would definitely call them like phenomenal craft made scissors. Personally, i like to go to bentley of the scissors, and i like to use naruto i like to use mizutani a lot. I use some other brands, but these are my two choices, mainly mizutani and number twos. This is this: is this work already? You see the layers are popping out here without any product, nothing. This is just a pure hair. Now i'm going to do the length over here to see what is happening over here to give us. The final final boost all right. This is the length that we want to keep now, i'm going to do point cutting all right. Everything goes back to here and then this side here too, and of course, when i'm done with this, we're going to do a little bit more blow drying and polishing. Putting some product and she's ready to go for a concert afterwards have like a modern, layered bob modern, because the shaping is different and the styling is different, but in essence it's still a layered bulb that they didn't, i would say, classically red classical all right. So i finished that part over here now, i'm going to work from the on the left side of her head, pulling everything towards the back and still maintaining the shape, but texturizing see. This is the shape that i want to work with. So, in a way this is the beautiful synthetic synthesis of round techniques, square techniques and triangular techniques, because you get the best out of them everywhere. So this is like a technically a square line if you, if you look at it, but i didn't cut square one at all. I just kind of square. I just got a convex shape round shape round layers, but i combine triangular shapes over direction and other things to get this beautiful approach. I have this length here. We want to keep but have layers that kind of seamlessly blend at the back all right. A little bit more over direction here, all right, this hair, for example - you could do the whole thing with the razor. It will still have a similar effect, but in this case i decided not to work with razer, because i wanted to achieve the shape with the scissors exclusively at this point. But all of you razor cut lovers, you guys can do the similar thing and razor blobs are really beautiful, shapes as well, and this is the point to show you see how it's blending in when you kind of when you do blending it, you see how the Hair color is showing you you need to blend more and they're really seamlessly blend. This is the idea see how the layer is a beautiful falling over here and blending into my choice, all right a little bit more the front here, any questions more. Michelle have questions for anna. Does she a singer or play an instrument because uh his hair is so healthy and shiny, but she likes rock and roll, so she likes that style of music and basically um the whole study behind like rock and roll and punk music and all that stuff. So you will see when we finish the hairstyle she put like really cool outfit. This whole thing, along with the makeup, it goes really well, and you see this - this is what i want to achieve. So this is a beautiful example. Take a look at this right side, which i didn't really touch. I still need to work on this right side. It'S kind of blending in it's nice, but this one is blending much better see when i move my fingers when i move her hair. This is starting to fall beautifully like a softer but with a strong shade because of that original technique and then blending in with the with the dry haircut. So you see the difference of the two sides, just that and that's the point when we do dry cutting when we do techniques of dry cutting, we definitely want to give our mark at the very end. Does she like soft, rock and roll question valley? Ball? Is soft yeah, i would say guns and roses is as soft as it gets yeah, but you know um. This is this is fashion. This is what we do. Our hair. We use hairstylist different music, different haircuts, different different outfits. Everything is different. We we kind of tailor, tailor our experience in our clients experience we just shape whatever they want, so you see like a rock and roll chicken, but she doesn't like maintenance or whatever she's, not, for example, punk chick, so panchik would have like a strong color or More more like an undercut here or some other shape, but she's not more into that she's more into this kind of you know hot rock metals things like that, and then she needs something that she can work with. So this is this is our basically reminder when we do create shapes for people? What do they actually want? Because one thing is what i would like, but it could be completely different. What a client would like. So that's why those techniques are very applicable to different styles, different haircuts, different needs and desires. So one of my biggest realization in my quarter of the century, career 2016 or now in here - and i realized that early realized, that early on in my career, that's really opened my eyes. It'S like you, could you can know any technique to cut beautiful shapes, but if you're a slave to pink, it's not going to look pretty on your client's head, so you need to know all of them and you need to know where to place them and how To utilize them, so the styles are actually working well for the clients, because again, if i just cut cut super short bob on her with a lot of lines which is perfect haircut, i don't think she likes it because we talked about it. She said no, let's not go too short. We want to save something. I want to have some length pick up my hair, if i need to, but i still want to work with something you know all right, still pulling the shape over here going at the back. Any more comments or questions i appreciate all of it. Thank you guys. No, all right! Oh my god, all right. So, let's see how it's falling on this side all right, even this side is hard to listen a little bit more. You see, we need to tackle it a little bit more, it's a little bit longer than the other, but this is intentional because we want to see how it's going to fall right. Maybe it's not longer. So that's the point to see how it's going to work for you corey here question: do i use texturing shares to blend, sometimes uh texturizer. That'S a really good question, because the other day we were talking colleagues and i about that. Texturizing scissors is a perfect tool, but you need to really decide when to use it. In this case she has a very fine hair, but a lot of it and everything is kind of easily visible. So that means, if you do too much of texturizing scissors, to really damage your hair or achieve the result that you really do not want, so i'm all for texturizing shears for scissors, where applicable. So if you can use it, do it if you, if you're afraid that you're not going to achieve the result that you do want and skip it, but they're a great tool if you know what you're doing so, that's the same with razor. Oh, my god! If you don't know what you're doing with the razor, you better touch, leave that tool and stay away. But if you know what you're doing with the razor it's a beautiful tool. So basically, what makes a difference is the education, because, with the education we know when to use certain scissors or tools or not, so i'm going to just quickly demonstrate that's a good question for what she was asking. So if i use, if i use texturizing sleeves as you see so i'm achieving everything with the other scissors, but if i want to use these ones, i'm kind of limited with what i can achieve right. So then, because this is cutting these are very. They have a very small ratio, cutting maybe like 12 percent. So that's perfect, you don't want like 20 or 30 you've got forbidden 50.. You just want a very low ratio. So then, in this case you can maybe do this in a certain areas. For this particular haircut, because i don't want any markings on on the shape, but for me it would be like with the waste of time to use it. So that's why i use the regular scissors. If you know what i mean, but if you feel that hair can take it, why not we're almost done with it with the results here, let's check it up a little bit more at this point, when you cut it's just a feeling, because you achieve your main Goal and now you're just blending in tailoring trying to achieve what you what you need all right a little bit more here. You want to see how it's going to fall and there you go we're just hunting the the extra pieces we need to get rid of without cutting too much. So what is a modern layered bob to recapitulate recapture the moment from from when we started? I call it a modern layered bob adapted to the client, but also following current fashion ideas. A lot of bobs are coming back now, but they're, not short, they're, usually around the shoulder lengths. What we see in the in the fashion industry now and, let's be honest, we are the ones who we who need to create those shapes, not a vogue photographer or somebody else behind us. We, the headrests. We need to create them. So we need to think what we can do, the best for our clients for ourselves. That'S why i wanted to create a smaller modern bulb, with a lot of layers, a lot of movements to work with that idea that i have anything else more questions almost done here, feedback. How do you like it guys victoria say i love it. Thank you far. Flaired crunch peter has some issues with english, but it's fine, it's good. We understand everything. Thank you so much for your questions and comments, but you know that's the point: sharing education sharing knowledge showing something all right so before we're done we're going to use the blow dryer lightly. So this is this is what i wanted to achieve. As you see the hair flowing freely, but in order there is an idea. There is a method to the madness. If you will why the hair is flowing freely, because we made it to be like that, we didn't just point: cut everything right away and just hoping it's going to look cool. We did everything with the idea to create that beautiful shape. And if you see here it's already starting to form a beautiful, you know complete complimentary color that she already has. It starts to move nicely. It starts to work really cool all right. So we're going to finish here we're going to liberate on up from this thing here. We'Ve got a hot over here, just a second stand up and we're going to do some nice, some nice shaping and hairspray. So, anna, if you could stand over here briefly all right, so i'm not going to do too much of any product, i'm just going to use a little bit of the swell of hairspray and mostly worked with my fingers to kind of work for this texture that We created when she goes tonight somewhere. The band is going to notice all right. How do you like it anna, i like it all right guys? How do you like it? I hope you guys like it if you see over here, come here on this side turn around. I think it looks really cool if you put something behind the ear. This side gets that, like a nice bounce from the layers and with this kind of style, you don't need too much product, as you saw just put a little bit of hairspray a little bit of something. So if you start to a bit, staticy could happen because it's fine here, let's add a little bit of hairspray, that's it not too much stuff, not too many products. It works, really cool like it. Thank you all right. Thank you guys. You
Comments
TJ: Very nice! Hope you'll do more like it
ivonne vaca: Hello from Miami . Love to learn new techniques, THANKS ❤️❤️❤️
Min Pin: Where in Boston? I’d love to get this cut, thanks❤
HeadHome: Great video but please mention the source of where this video came from/who the stylist is.
Gloria Maimon: I like the technique but , I didn’t like the finishing
Kekuahiwi: stop fiddling with it so we can look at it
Linda Thompson: Nah....