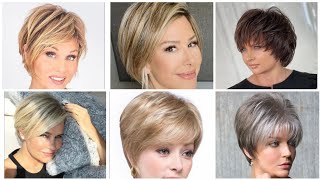
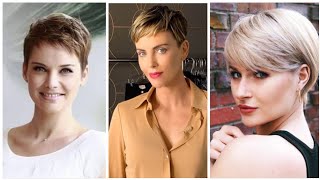
Short Layered Bob Haircut & Hairstyles For Women | Short Pixie Cut | Craft Hair Cutting Techniques
- Posted on 23 April, 2022
- Bob Hairstyles
- By Anonymous
Craft Hair cutting Techniques:
How to cut a Short Layered Bob Haircut & Hairstyles
Short Pixie cut & Style for women
"I Love Haircut - I Love Hairstylist"
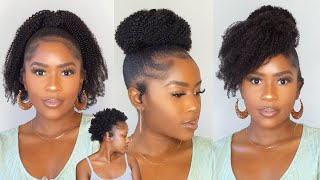
With me today so uh, let's just jump right into the technique. Here is my lovely model: sid uh, lilly. Sorry, you guys been having so much fun with me. I'M all confused! So uh lily is a student here. She'S super cool uh. She kind of does a lot with her hair, especially with color and i've been cutting my hair for a little while and we've got uh kind of like a little layered bob kind of happening, we'll finish it off with a really strong fringe. A little disconnection happening through the top, so i've just got a little triangular section. That'S just going to help with keeping that top area just a little separate so that i can kind of layer it and create some different kind of movement. I'M actually just started through the back and i'm actually using a really sort of classic uh graduation technique. I'M just working up the center back right. Now, i'm keeping my sections diagonal. You know allowing the hair to be slightly shorter towards the bottom, which is just really great for creating a profile and um to sort of keep the sort of stack effect down, which i think is not necessarily as trendy i'm kind of using the graduation. In a way to sort of flatten out the profile of lily a little bit more, rather than trying to build up a lot of bulk, so you actually see my sections coming up quite high and actually being almost closer to her vertical, which is just helping to Flatten out some of the weight and then just as i start to uh approach her hairline here, what i'm going to do is just to sort of make sure that i'm keeping some length there and sort of not dictated by the natural growth pattern in our hairline. What i'm doing is i'm just lifting it up just a little bit more through the bottom outline, and what that allow me to do is still work with some graduation. But now, as i start to get into the sides, i can start to incorporate a little bit of layering. So in one sense i'm kind of building a little weight through the back and then through the sides. I'M sorry to incorporate a little bit more of a layer. It'S going to help to soften the edges of the hair. I think it's just going to look a lot cuter and trender on lily's hair. So if you guys have just joined us, i know that you know we have people coming in and out. My name is ricardo dennis i'm the global artist director for hair cutting we're here in new york, we're celebrating earth day we're trying to bring awareness to the 771 people who don't have clean water and i'm joined by two fantastic people. I'Ve got lily here in my chair who's, my model and i've got sydney actually behind the camera, who's who's, helping us film. So you know what i've just done. I'Ve just started with diagonal sections. I'Ve allowed this section to slowly start to move and become a little bit more vertical and at this point of the haircut - and i really want to keep some of that length through the front, so just very naturally, i'm just going to tilt this over just so. You guys can see i'm just starting to incorporate much more over direction than i have in the previous sections. In fact, just at this point where the head starts to round, i'm just going to really start to bring those sections back and blend that layer and that graduation right behind your ear here. So it's kind of just almost like using you know your elevation in a way that kind of naturally builds up more weight and length, as you start to approach just behind the ear here. Okay, so, as we start working towards our front sections, okay, one of my favorite things to do is just to lift the hair just a little bit higher and again, then just start to follow back down and connect with our graduation and just sort of complete. How that's going to flow into the back part and then also just behind your ear, and you can just see how lovely that's looking already. You know i love when you take. You know graduation and sections this way. You can really feel like you can create direction and a flow in the haircut okay. So just over directing these sections back and at this point i almost have nothing to cut which will allow me to start to work onto the other side. But before i do that, i'm just going to carefully comb that over so you guys can just see how nicely and flat let's just blend it through and then sometimes what happens when you're over directing things so far back is we can tend to get a sort Of lack of movement or layering happening in this area - and you don't want to you - know, forsake the outline and lose that so a great way of just doing. That is we're going to almost use this way of cross-checking to sort of carry some of those shorter lengths, especially through the parietal ridge, which will just help with that disconnection. So we're just going to go from that back area and it naturally just works from short to long, but we're just going to come through and just help to keep that area from getting too long or building too much weight and we're not taking a lot off. But even just that little bit will actually help out. So i'm just going to take these sections up, and this could almost be looked at as another way of cutting this shape. Just being careful just around some of the gear around the ears. Okay and i'm just taking my sections horizontal and i'm just pulling them straight up and just flattening this out, and it's just going to add a little layer and we'll definitely see that come out more once that hair is dry. You know, and if we're thinking about doing something a little different through the top area, you know. Sometimes, what happens is the weight can kind of accumulate, along with the parietal rage, so just having a slightly short, shorter channel or a little bit more weight pulled out of that area is just going to help, especially with making the top feel more convertible or making It move, let's start on the opposite side, so i'm just gon na push lily's head down and just off to the side. I am switching my hand position. So just get sydney to come over okay and then you know normally in a salon. I'D probably be working. Both sides at the same time, but it doesn't mean that you can't just sort of pre-section a little bit just as we go so really just starting off that bottom outline keeping my sections diagonal and then it's i'm really like with my fingers and my knuckles. I'M really just trying to keep a very sort of narrow sort of over direction where i'm pulling my sections and how i'm controlling my shape - and we want to do that. Just so. The very first panel of the cut really sort of integrates itself into the hairline it'll just make uh creating the hairline a little bit more interesting because they'll be kind of right up against that the sort of fence there - okay, so it's earth month, uh! You know we're talking about the importance of clean water and things that you can do. If you don't know, you know, aveda has this fantastic, shampoo bar and today, if you go on aveda.com and purchase that shampoo bar we're actually donating 100 of the money to charity for water, which is a non-profit organization that really helps in bringing water and access to Clean water to those that need it, and i think sometimes you know we take advent. We take that that thing that we have for granted, especially because we have you know incredible access to it and that we forget our day-to-day lives and how impacted we would be. If we didn't have that clean water and how people literally walk for miles on and families students, kids, you know in order to get clean water, so um check out charity for water check out our shampure bar and again. A hundred percent of the proceeds today will go to cherry for water, green, bring clean water to those that need it, which is very, very important. Okay, so we've just completed just that second side through the back and always the sort of the most important thing. For me is really just looking to see. You know where that hairline tends to end, and i know that's really kind of like the start for where i can start to now, just get away with over directing my sections back, because i know that's kind of like the anchoring point. That'S where your length is, and that really signals the place you know where you can start to lift. We know that by lifting the hair you know we're able to allow more of that length to drop towards the bottom, keeping more weight, making sure that we can create an outline after okay sydney. Do we have any questions? I'M not not this far, so i'm just going to work through our second side here and just as i'm doing it, i'm just going to start to just lift my sections up just a little bit higher again to incorporate a little bit more weight removal through the Top area and then we'll start to blend with our graduation okay. So, let's just come through not a lot to cut on the edges here. When did you just color your hair lily last night lily just colored her hair last night, because that's what you do, especially before my hair brains live right. Boys, that's gon na. Have those fresh roots so, let's just come through and just give it a little cross check and help again, like i said just to shorten up that length there. You know it's it's, it's you're kind of breaking the rules a little bit here, kind of taking something away, it's intentionally there, but we don't need it and it's going to help to soften those bottom edges. So for those of you who have just joined my name is ricardo dennis and i'm the global artistic director for hair cutting and here based in new york, we're at the aveda institute right now and we're celebrating earth day today we're talking about the importance of clean Water and i'm joined by two of my lovely friends and students here at the aveda institute. I'Ve got lily here who i'm cutting and i've got a good friend and student as well. Sydney who's actually helping us and sydney has a really cool haircut too, but she's actually has grown out a little bit right now, okay, so let's get into the top and it's a beautiful day outside. So i'm sure you guys want to get out and enjoy earth day right. So i love working this way because you know we've removed that weight through there. We'Ve built up some graduation through the back and, like i said earlier, if you're just tuning in right now, the graduation was really done not as a way you can actually see. She'S got a really beautiful head shape. I i wasn't doing it to sort of stack more, i'm doing it more to really. You know enhance the the profile that she already has to also almost flatten it out a little bit. So i don't want that really heavy graduated effect, so i'm using a classic technique, but i'm using the sort of more diagonal vertical kind of sections to help to flatten that weight out. We'Re now going to work through the top area, and the plan is to kind of take that center section a little shorter over direct these guys in so that we get a lot more disconnection happening through the sides and lily does have a sort of curtain. Bang kind of fringe from her previous cut and she's hoping to go for something a little shorter, so i'll show you how we're going to do this we're going to start right in the crown area. You can just see what i've just done. I just sort of pre-sectioned that little section right through the center and you know if you, if you look at the way, we've pre-sectioned, that we've got a little point in the back area and i just love using that point. Because it'll, let us know exactly where that center is and exactly where we can actually pull our guide up from this point. Okay, so i'm going to start from that center back and we're coming up taking that length, and i really want to almost follow the head shape at this point. So i'm going to flatten out my fingers - and i'm really just going to do this through this center section here so coming all the way up and now starting to get into the fringe area. Okay, so we've got this one guide running all the way through the center, we're just taking it into the shoulder. These guys can't stop laughing. If you don't know, they've been having like a laugh fest, just as i was starting. So it took us a second to get into serious mode as we're doing this, which is why you heard me fumbling my words: okay, so we've taken that first section right right through the center, it's all about having fun, and so now what i'm going to do Is i'm just going to take my sections on a diagonal i'm going to have that center kind of sectioned off a little shorter, and now i'm just going to come in and just kind of scoop that out just so almost like i'm creating these uh horns for Uh the evil lily. No i'm just kidding. I think it's, it's quite cool just to have you know some disconnection through this area. It'S going to add a little bit more softness through the front, so we're just using that shorter section and coming up a little shorter. This will also play itself. Look quite nice into the fringe. Here. You guys got ta get serious. So here we go using those tips of our scissors coming up short to long it'll, be super cool and we'll kind of have this again shorter fringe in the center and then we'll have these sort of longer exterior edges coming through. And let's just get just that. Last one, this is just going to add some really nice sort of dimension to the front. So let's just comb that out, so you guys can have a look to see what that's going to do when it's as you can see, it's added more weight. You can see that length is now sitting on top of those previously cut sections, and then we have our one little sort of shorter guide, and then we have these sort of longer sort of kicking, almost curtain, bang kind of thing happening. Okay, let's go through to the opposite side, and so when i'm cutting the opposite side, i'm just going to stand in front. I take my sections pretty much the same way except on this side. Basically, comb my sections back away from me, so we're incorporating the same over direction on both sides. We get the same consistency just so important here, so you can see that shorter center guide or use the tips of the scissors and then just as i'm cutting. I kind of you know if i want to exaggerate the length a little bit i'll just move. My fingers, so they slide up a little bit as we do it and then just over directing our section slightly back as we do it cool all right. So at this stage, what i'm going to do is i'm just going to very quickly blow dry, her hair and i'm just going to do like a really quick wrap dry, loose hair takes like seconds to dry, really easy and then we'll do all the really fun Stuff which is really about you, know finishing that outline shortening up those bangs a little bit. You can really see how nice that effect really works, especially through the front. Okay, we're going to be using a little bit of our smooth infusion, which is just going to help keep the hair a little moisturized also prevents static, and it's probably my favorite kind of like blow-dry kind of motion, so we're just going to put that through. Let'S see even the textured versions be super nice uh great thing about lily, you know, being a student hairdresser, she's very capable of blow drying her own hair. You should give them your instagram at least they can come and follow you and check out all your stuff. Please does some incredible take talk, videos, i think i think you're famous right i'll. Take that um. I mean i'm too humble to say. So. How do you have what's your favorite? 106. 106. 000. That'S it! That'S a good number! It'S a good number check it out. What'S your what's your, what is your favorite? My instagram is at looks by dot lill, and then you can find my tick tock through the instagram as well check her out. Okay. So here we go we're just gon na quickly dry. This out, you know and uh the idea here you know when you've got a great head shape, we're just going to use her head, it's kind of like the molding surface and because the haircut that was really been planned out against her head, you should just have That shape sitting quite nicely pretty easily and just blow drying up this way, what it does, especially with cuts like this is it just allows the edges just to get a little rounded so that it it really helps with the beveling process, so the shape just goes In really nice, probably one of my favorite things to do, especially when working you know with color processed hair or just students who like to color it every other week, we're just going to add some shine, we'll add some nice movement and just by pushing the hair, You know at the root area, it just keeps it. You know one moveable the two: they won't have a sort of designated way of sitting, so it keeps the styling options, definitely more open and really when i'm cutting, you know when you're dry, cutting and finishing you can just see the way that that's just come out. Super nice, especially when you're, when you're doing some dry, cutting it's nice to have the hair uh in a way that's kind of one molded to the head, but also doesn't have this set parting or place to go in. So it's just going to make putting in my line, refining the edges doing some texturizing point cutting that much easier, hey guys if you're just joining us um, my name is ricardo. Dennis i'm the global artistic director for hair cutting. I want to say happy earth day for all of you guys and we're here in new york, i'm joined by my model, really a good friend sydney who are both students here at the data institute and uh. You know it's earth day today. We'Re talking about you know the importance of clean water, aveda partners with a non-profit caring organization called charity for water, and what charity for water does is they go to? You know some of the 771 million people. It'S an incredible number heard that how many people actually don't have access to clean water. You just think about the things that you do day to day. That just requires clean water. You know not only just being able to drink it being able to wash yourself clothing. Your hair, you know growing such an important partnered with them today. Actually we have our shampure bar and if you uh purchase this bar, you know we're giving a hundred percent of the proceeds to charity for water so that they can help out in giving people access. You know just the life right really and uh i've just kind of basically completed the wet version of my haircut here and i've just gone through and i'm just wrap drying lily's hair here, because i want to do some dry cutting to finish it off. So, just to sort of recap, the haircut we kind of use a really classic technique. As obvious you can see, it's got sort of like that bob length to it and what i did was. I started through the back area very classic pro graduation technique, but i did it more in a way to sort of flatten it out and allow some of the shorter layers of shorter pieces to be able to be cut through the top area so that it's disconnected. But it actually has a sort of feeling of being blended. That'S a good way of, i think, describing it. I'M just wrap drying through her hair and in just a second, maybe 30 seconds. I'M gon na start doing some some dry cutting a little texturizing some reclining and definitely stick around to check out lily's fringe. So we've used some graduation through the back through the sides. I incorporated a little bit of a layering technique. We'Ve got these sort of shorter pieces sitting along the parietal ridge and that's just helping to keep the top disconnected so we're able to take that top a little shorter. I use that center section really just as a guide and then what i did is i used a sort of concave technique to create these longer lengths. You can kind of look here, you look, you can actually see where the shorter fringe is, and then you can see this sort of longer disconnected pieces through the sides which you can kind of use as the beginnings of a curtain bag or if you want to Just keep things a little soft, i'm just going to add one of my favorite tricks is, i just take our smooth infusion and just as the hair is dry, i'm just going to add just a little bit more because the hair is really dry. It'S just gon na really absorb the product. At this point, i love the texture that she's getting already and then we're just gon na take our dryer back into the air, great texture and just see, especially on color-treated hair. If you don't know lilly pretty much colors it every day, i'm kidding uh they're, both i'm joined by lily here and sydney who's uh. That is the great favor of filming and um. You know these two guys are really good friends. They hang out at school and they do each other's hair all the time right. Oh yeah, all the time and if you guys remember, being in hair school and wanting to experiment and have fun that's uh kind of like the best part right. So friends, let's get into some cutting here, so just sort of comb that shape just around a little bit. We can see we want to lose some of these edges here, let's go on to the other side. This is where we're going to start a lot of times. It just will kind of comb. This shape out just a little bit to kind of more or less see where some of the weight is kind of sitting and what i can do to kind of help that out a little bit right. So, let's start right from the back area. Definitely my favorite part. This is coming in and i'm just going to go ahead and put in a really nice clean outline through the back here around here. I'M just going to use just this little sort of tip pointing technique just on the edges, and i think that just really helps to soften the hair, a little bit and just kind of as a trick. It does make the line you know feel uh like straighter and more connected. So let's just use that technique, i'm kind of like almost like you're you're, pointing or sketching your line through and sometimes when you try to come at the line. Super blunt: what happens is it's like you're, your scissors? Don'T have uh the density or the tension to be able to sort of cut through very thick sections of hair, and so when we just point into it, it's like it gives the sections a little elbow room in the line and so that the hair one sits Straighter when it's combed - and you know the other thing you can do - is you can kind of almost like use that just to sort of sketch in you know little shapes or designs or curve the line a little bit more, all right. Let'S go ahead and cut that other side. Let'S just give it a little a little scope there always a good time to put your glasses on all right. Let'S go get those getting older guys. I mean i wear glasses, you all wear glasses, i'm only 22.. I don't think it makes you old and then you can just see you know. Sometimes i just notice this really great kind of movement happening where we have that shorter section happening. You know i love almost like she's got these sort of wings kind of happening. Very nice all right, so let's go ahead and cut that other side, okay, and so just as we come in again we'll kind of just sketch in that line, and you know you can see that as i do it, i'm like pulling my blades slightly back each Time we're just going to take off just a little bit that hair on the skin. Please practice when you do this at home, nice, nice love that looks great okay, nice boat. I actually just did one of these recently on the weekend, so you can check out my instagram as well see that you can see she's got some of that color highlighting through the bottom good job guys, if it's intentional or not, we don't know nope. So if you guys are just joining us, my name is ricardo dennis and i'm the global artistic director for hair cutting and i'm joined by my model lily here and sydney who's actually doing the filming here and uh. We'Ve got a really cool little cute little haircut. Going on, and i'm just in kind of like the the finishing stages right now um, you know we're basically cutting a line. We'Ve been talking a little bit about earth month and clean water and how important it is and how aveda really partners with non-profit organizations like cherry for water and really you know it's about bringing awareness today to those of us who don't have clean water. Don'T have access to it and one how important that is. So you know i'm here hanging out with these two cool cool kids. You guys are like young adults really but um yeah we're we're doing a cool haircut here. I'Ve started through the back. We'Ve worked some graduation in the cut just kind of keeping things really flat, i'm just going to turn on my flat iron here, because i want to nail some of these edges down a little flatter and then i'm kind of just using you know the tips of My scissors to go ahead and really create a really beautiful line in louise hair here, okay, so i'm just gon na come through. I can just just point them just to those edges a little bit and just where this hair little flick check out. It was cool, ear tattoo. She just got it done like yesterday. Yesterday, a lot of happiness. You got a hair color, it's a better ears. Tattooed, you mean her ear tattooed and it's pretty much. It'S all happening today, all right. Let'S just do a little bit of that cool. Okay, super soft, great okay, so you can see what i'm what i'm doing here is. I really just want to work through a lot of these edges sydney. Are we getting any questions, nothing just saying stuff, yeah, just random people? Okay, let's go through um stella black said the camera. Lady looks so cool and the model is so pretty. We love stella block. Okay, let's just go through i'm just going to take the iron core yeah, i'm sorry just so dry. You know you do want to kind of treat hair, especially dry, cutting like it's fabric. You don't want to over iron the hair and make it like. You know sort of lifeless, but you definitely don't want to have inconsistencies, and so the wrap drying definitely helps. You know with the root area, making sure that it's moving all the right places and then sometimes you know if i haven't done such a great job. In my wrap drying, i'll just take just a flat iron just to some of those edges. Just give me a little bit more polish and make the whole thing look. So, let's pop into the front and we're going to do some shorter bangs, but when we do them, you know instead of just knocking them off on her hair. You know lily likes things cool, but she also likes it kind of softer and prettier right. So we're just going to come in and we do want them short we're going to kind of slice in a shorter bag. Okay and some of the first things that i look for you know when i'm going to do something shorter is, i want to know you know one got really great bone structure, great eyes to sort of carry it, and then you have to think about how wide You want something to be so: let's just carry this over just a little bit, keep working on those edges and we're going to kind of try to avoid not just yet allowing the line to get too rounded as it curves, and sometimes what happens is as we Come around we almost can almost get the shape too rounded too quickly, and then the cut can almost look a little little sad. So i love these guys, but we don't need this stuff in here. So, let's just take that away, i'm basically just taking my scissors and then closing down on the edges as they come around just every once in a while, just come through and just knock off anything that we feel might be too soft. But i love you know watching that coming kathy asks. Where are you located, i'm based here in new york? Yes, well for those of you guys who are just joining us, my voice is changing because i've got my presenter what's up so my name is ricardo dennis and the creative director for uh global artistic director for hair cutting here in veda, i'm based here in new York, we're at the aveda institute in soho here and uh we're celebrating earth day and we're doing a haircut for uh earth month and trying to bring awareness to clean water. So if you don't know already, you want to do something to support. You can want to check out charity for water they're, a non-profit organization. They bring clean water. To those i mean that looks super cute and um yeah, i'm doing a haircut. So it's it's all about doing what we can to bring awareness and we do that through the medium of hair, working on cool people like lily here who's a student upstairs at the at our institute, she's almost graduated to becoming a hairdresser but she's working in a Swamp already, so congratulations to you and then my other friend and colleague here and student here is uh sydney. Who'S, fantastic she's got a super cool haircut too. So maybe we'll cut her for the next airbrain live and uh yeah we're hanging out we're doing some hair and i've just cut this sort of graduated kind of bob uh with this disconnection through the top and then we're playing with this idea of, like sort of Short kind of micro bangs, with a little bit of like a curtain banks, we've got sort of two errors happening at the same time. We'Ve got a little sort of you know, 20 shortness happening here, and then we've got some 60s and 70s happening through the banks. I already just love the way: it's just really like popped up and we're just talking about how sometimes you know when we think short bangs. You know we immediately think. Oh micro bangs, i need to be really really short really hard and uh softness is the key to selling things you know. So sometimes we make things just a little softer, so it's going to make it easier to push those ideas and some of our guests, i'm just lifting and popping off just some of those edges all right and then just to keep some of these guys. I'M just going to bring them in and roll them off into my fingers here and then just use those tips and just allow those longer pieces to sort of sit off through the sides. Almost like a repeat of the same technique. We just did through the front or through the back. Sorry, okay, do that on the opposite side, here i'm just going to come back start a little point cutting and i don't want to you - can see. I'Ve got these really cool corners that i built up through here, so i just want to soften them as well as some of the weight through the top area. So i'm just coming through a little point cutting and i try to be pretty systematic with the way we're pointing so we kind of like take the section. Carry that section through you know and then just look and wait to see the results here. So now i'm just going to come in through the sides here we're going to drop that outline away and now start to work in through the top area. I'M just going to allow that section just to fall, and i know that's where that weight is and we just carry that up and then you can see when i get to the top area. It'S not so much about removing weight as much as it's just creating a little space in those sections, because the hair is quite short up here. So we just need a little space, i'll, just watch all that nice softness happening in the hair and then, if we just take that back and just allow those really nice little lines to give us a little bit of movement, just strengthen your shape. Just a bit more, and so you can kind of get you know that shape moving forward and then that shape moving backward as well. Okay, we have smiles from lulu, which is great, so love the way. That'S looking, but also just really see that sort of channel running through that top area. Let'S come through the opposite side and again we're going to just drop out. We can't control on our fingers, we're just going to lift that section up, go through just some tips. Just as you're texturizing, you know keep your palm faced away from you as you. Do it and then come in with your scissors open and then close as you leave and if you like, music, which i'm sure you do think of like your favorite song and just come up with a good rhythm as you do it? Okay. So, let's just break that part up, and you can already see that movement happening in our shape here, so we can see that nice little line there, but you can't sydney properly park before all right. So, let's just come through i'm trying here. Okay, i just gave you hell, i'm just gon na all right. So let's come through we're having a good time, if you guys are just joining us. Oh my god. I know you're gon na watch me saying it again. If you're just joining us, welcome guys it's an absolute pleasure to have you guys with us here today here in new york, my name is ricardo dennis and i'm the global artistic director for hair cutting. I practiced saying that a couple times today and we're here celebrating earth month and i'm joined by my two favorite people here in new york. This is lily who i'm cutting right now. She'S a student here she's got a really cool beautiful haircut so far and i'm also joined by sydney who's doing the film make. So just look at that cool. That looks super cool. At least i think so i was gon na say. I agree everyone's agreeing. Looking great but just come through right in this guy right here and let's take a bit of that away as well, so we're celebrating earth month. You know, we've been talking about how you know 771 people around the world. People do not have access to clean water, and it's a serious thing, and you know earth day should really be every single day. But today is the one day that we get to celebrate it and bring awareness to all the different causes and things that you could be doing and uh. If you don't already know you know, aveda has what's called our champion bar it's incredible sort of bath bar that you could use, even as a shampoo bar and we're basically donating 100 of the funds today, if you buy it on aveda.com and we're basically donating 100 Of the money to uh charity for water, so please check that out and in the meantime you know we'll just recap the haircut here. So this is lily. We'Re here in new york, uh lily is a student. She colors her hair like every other day um. She loves to have fun with it, but she also likes it kind of like super soft and kind of pretty, and you know cool and so um. I'Ve just started through the back, and i worked this very sort of classic graduated technique and now what i'm doing is through the top area. I created this sort of shorter channel, which really became the fringe, and then we concave the disconnected areas and right now, i'm just going through those disconnected panels. You know you can see it just anchors. It really nicely and allows those side movement to kind of come in super nice. I'M surprised myself. No, i'm just kidding, i'm kidding, i'm totally kidding. It looks super nice. I have to say one of the things i love. If you look at um, you know she's got these incredible, you know her eyelashes, and so i love this sort of short kind of fringe and then having these lengths. You know getting that really annoying place, which is right into her eyeballs, but it does look. Super cool and she does look a little bit like a bird speaking of nature. Okay, i'm just gon na come in and we're just doing a little bit of refining and softening right now, which is just bringing out the haircut. You know when you think about this connection, you kind of want to think about how you're going to marry. You know the disconnected area into the connected part, because really, i think this connection isn't just necessarily about doing something that you want to cover. It'S really about doing something that you want to kind of expose or enhance, so i think that's a good way of thinking about it as well. I just love these little sort of like bi-level bits on our fringe. I'M just gon na soften this up just a little bit more just through the center panel. You see the different ways that this can move. Let'S get a little dryer. Yes, let's just get, i think just i figured just taking you know a brush and just moving the hair around just to see different ways. It sort of styles out, which i think is super cool lots of people, are saying thanks for sharing great cut. Thank you. So much lots of comments so we're just using a little control paste just on the hair. I really love just the feel that we've got already, so we don't need to do too much just to bring out some of the texture in her hair. This is just like a matte kind of paste here. I'Ll show you guys in a second. This is our control. Paste super lovely. If you guys don't know, you know, aveda is a completely green, vegan brand and uh it's earth month today, so happy earth month and no better way of doing hair and doing your job in a way that you know, impacts the planet in a really positive way. Sherry says i love how professional your work is. I'Ve really learned a lot from this life so kind. That'S the nicest thing i've heard so far. Yeah, let's expose her cool tattoo. We love it. My favorite, let's get her favorite ear on camera. I think that's super cool and, let's just recap - and i just want to say thank you to all of you - guys - here's our our lovely haircut. We love it all right, cool cool cool, here's, the graduation and that nice little point and the nape here, okay, and so what i've just done is we started off with a little triangular section through the top area, and i started off with some really sort of Like quite tight graduation - and we just really use diagonal sections working off the hairline working all the way up, keeping those sections quite flat, then we started over directing those sections back in order to retain some of the weight. And then i made it just to sort of like a key point about removing weight along the parietal ridge. So you may be maybe wanting to keep that weight. But you don't want the heaviness that the outline is going to give you. You know sometimes a lot of people might refer to them as dog ears. So one of the things i love doing is you pull it back or you know you're going to be safe, you're going to keep that length, but then along the parietal ridge. Take your shortest little guide and as it works from short to long flatten, your fingers out square that line through take that weight away, then just elevate the whole outline up to that part where you would actually cross check that shape and what that will do. Is it would just layer the shape, take some more of that weight incorporate a layer into the outline so that when you do come through and you want to create something - that's a little softer a little flatter with a little bit more a little less density. It just makes it much easier okay, so we did that on both sides and then to get that effect that we're getting through the top. I just made a point about you know i love really short bangs right now. I also love hair. That'S tucked behind the ear, so i love the way. This is sitting here. Um and you know, just as i think, people love shorter layers from the top, because it really allows them sort of beef and punch their hair off and make it look super cool. But one of the things that sometimes can happen is that the whole top ends up shrinking. We feel like we've lost the shape, making the bottom part almost seem too heavy. So what we've just done is we've just taken a section right through the center we've cut. It actually so that it follows the shape of the head, and then we've used these longer disconnected panels. We'Ve created a little concave shape. We went back through shortened up that fringe pointed into the corners finished off, with a little control paste and a lovely smile from lily and sydney, and we just want to say happy earth day to all of you guys. Follow me on my aveda instagram, which is ricardo dennis, follow lilly at works by dot, lil and
Comments
Heather G: Perfection! Love your teaching method...thank you for sharing
T K: Excellent! Really nice cut and it looks great on her as well!
Kiki Alves: Show, curto demais seu trabalho!!!
Kiki Alves: Uma obra de arte!
Kiki Alves: Você se diverte enquanto trabalha!
Kati: Hi its perfect, want to know this hair cut will be good for dark hair or no? I wished you were in italy