20" Small Knotless Box Braids In 1 Hour!! Braided Lace Front Wig Install + Review Feat. Wequee
- Posted on 08 April, 2022
- Braids Hairstyles
- By Anonymous
⬇️ ⬇️ ⬇️ ⬇️ ⬇️ ⬇️
W A T C H •i n • 1 0 8 0 p 6 0
M O R E •I N F O • B E L O W
⬇️ ⬇️ ⬇️ ⬇️ ⬇️ ⬇️
Welcome to my channel beautiful people !
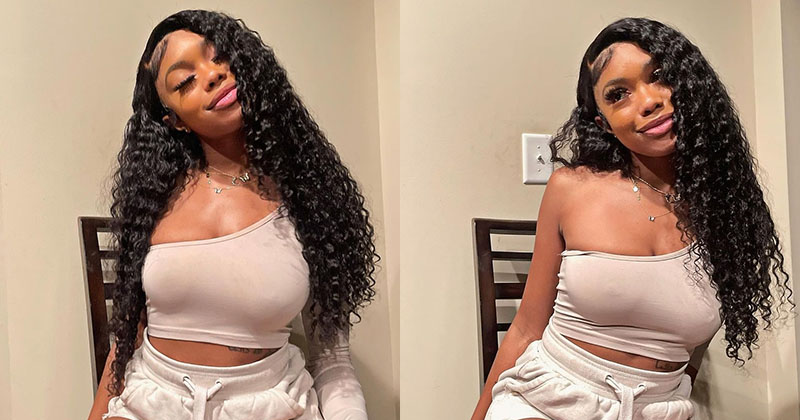
Today I will be reviewing and installing a braided lace front wig from #WeQueen I’ll be talking you through how I easily installed this 20” knotless box braided 13x5 lace front wig .. that’s a full head of braids in less than 1 hour
#KnotlessBoxBraids #BraidedWig
⬇️ ⬇️ ❤️ ⬇️ ⬇️ ⬇️ ⬇️
P R O D U C T I N F O ;
H A I R I N F O:
WEQUEEN Knotless Box Braided Lace Wig Medium Braids 100% Handmade .
Link to the wig: https://bit.ly/3I1x8Bg
Price: $154.99 (as of 4/22) .
Cap Construction: 13x5 Lace front wig .
Cap Size: Average (22.5 inch, come with adjustable straps).
Hair Color: 1B (Natural Black) .
Braids Type: Box Braided / 100% Hand-Braided .
Hair Length in video: 22 Inches.
Hair Material: Heat-resistance Kanekalon synthetic fiber .
Hairline: Pre-plucked with baby hair.
Weight: 200g .
DISCOUNT CODE: “JK18” to save more money
Link to the wig: https://bit.ly/3I1x8Bg
More Braid Wig:
Website: https://bit.ly/3hefLRV
M Y L A S T V I D E O ;
EASY 4x4 SWISS LACE CLOSURE WIG INSTALL 22” Curly Deep Wave Lace Wig feat. DOMISO HAIR AMAZON
M O R E V I D E O S ;
$40 BLONDE 13x6 Kinky Straight Synthetic Lace Wig Install OUTRE KATYA Review feat. SAMSBEAUTY
Large Distressed FAUX LOCS Full Lace WIG INSTALL | Butterfly Loc Wig feat. Janet Collection
I Got SCAMMED By A “Black Owned” IG “Company” STORYTIME + RECEIPTS feat. DOSSIER CO.
M O R E H O N E Y ?;
*shop natural butters, custom wigs + more*
ᴏɴʟɪɴᴇ sᴛᴏʀᴇ • https://www.stylesbyhoney.com
*subscribe so you don’t miss any new videos*
ʏᴏᴜᴛᴜʙᴇ • https://www.youtube.com/c/StylesByHONE...
*follow to keep up with mee*
ɪɴsᴛᴀɢʀᴀᴍ • https://www.instagram.com/StylesByHone...
*follow for exclusiveee content*
ᴘɪɴᴛᴇʀᴇsᴛ • https://www.pinterest.com/stylesbyhone...
P R + C O L L A B S ;
*email mee* [email protected]
M U S I C ;
Instrumental by Vlog No Copyright Music (Jarico - Island)
https://youtube.com/c/VlogNoCopyrightM...
✨✨✨✨✨✨
Thank you for watching ! Don’t forget to S U B S C R I B E to my channel ; NEW beauty related reviews, tutorials + more are posted every week ! See you later .. Stay safe and God bless .
Love y’all,
✨✨✨✨✨✨
T A G S / K E Y W O R D S ;
Knotless braids, box braids, braided wig, braids wig, lace front, lace front wig, black braids, black hair, synthetic wig, affordable wig, cheap wigs, Swiss lace, beginner friendly, beginner wig, lace wig, braid wig, wigs for black women, wigs for women of color, big chop, big chop hairstyles, hairstyles, braid styles, protective styles, faux locs, protective hairstyles, natural hair, 4c hair, 4c hairstyles, got2b, Sheisbombcollection, StylesByHoney, stylesbyhoneyy, hair tutorial, wig tutorial, bald cap, bald cap method, ghost bond glue, hair videos, beauty influencer, wig, wigs.
Hey y'all today, i'm going to be reviewing and installing this 20 inch knotless box, braid synthetic lace, front wig that i got from weak queen. So if you're interested in watching go ahead and stay tuned, hey y'all and welcome to styles by honey. If you're new here welcome to my channel, go ahead and hit that subscribe button and don't forget to tap that bell, so you don't miss any notifications and if you're a returning subscriber you already know you lit welcome back to my channel okay. So today i'm going to be reviewing and installing a knotless box spray wig that i got from weak queen. This is their 20 inch glueless box, braided lace, front wig. When i got the package, it came with the wig two wig caps, a little thank you card with a coupon for a gift and instructions on how to take care of it and install, and it also came with a little satin bag to carry the wig in Or to store the wig in, so i really like that. Um, let's get into this wig, it's super super lightweight like it's so lightweight you can't even like. I don't think i've ever felt a braided wig this light before um. So that's a plus the braids are super neat and the parting space. It has a 13x5 parting space, so i mean it's 13 inches from ear to ear and then in a sensor, there's a 5 inch parting space um. So you can, you can wear it in a few styles with it. Looking you know natural. It also comes with a removable, wig band, and it also has adjustable straps as well as some cones to secure it down. So you can wear this wig as a glueless wig or you can glue it down like i did now on to the back of the wig, like i really like how these braids are placed and how neat they are um, how full they are because for the Most part, you can't really tell that there are tracks back there, but at the same time i wouldn't recommend this wig for like any high ponytails um, and i also don't like the burned ends, but the wig itself is really cute and the braids are neat. So, let's just get into this install all right. So to start, i'm going to start with these crusty braids, no, i'm not taking them loose. No, i'm not washing my hair! I'M going to go ahead and grease my scalp with my honey butter, babe, natural hair butter and then prep for my bar cap, using some got to be free spray and slicking my edges back until they are slick and hard and have that little extra layer of Protection then i'm going to put the wig cap over and cut out my little holes for my ears. I'M not gon na do too much talking. Um y'all shouldn't know like the ball cap method already, but for those who don't um, i kind of do a little bit different. I do add glue onto the cap at the ear tabs um. Sometimes i do the whole perimeter like the whole hairline, but for this wig i'm not going to be leaving it on for too long, so i'm just putting the glue at the ear tabs. So you know that's the first place where the wigs start, lifting i think so yeah. I dried that and then i put two or three layers of got to be free spray and dried that until it was like dry and then i went ahead and got my black radiance contour palettes applied to makeup to the cap um. So i can match my skin color and then i put that same makeup on the wig itself, all right. So now it's time to cut the cap to my hairline, i kind of cut it a little bit further back than i wanted to like. I don't know about y'all other big forehead girls, but i'll be trying to make my first look a little bit smaller when i be putting wigs on, but sometimes when i'm brushing it just it just don't go that way. So yeah so um go ahead and cut in the cap and then i'm going to use my shoes bomb collection, bomb, good, gel and put that on the tip of the comb, so that i can like seal those edges that are like lifting up all right. So then, i went ahead and cut the lace from the wig off camera and i'm going to go ahead and try it on now that i have the ball cap on it's going to fit a little bit better, and i don't know if i mentioned this in The beginning of the video - but this is a average sized wig, so the mean of the cap size is about 22 and a half inches um. I would say that, like it's big head, friendly um because it can stretch, but you know like it - i have the. I have the adjustable straps in and i also have that little band on and i have it on like the tightest like notch, because i wanted leg this wig to like be fit and fit, and you feel me so yeah um, i always says big head friendly Because of the fact that i know i have a big head, but for those people who have big head and a lot of hair, i don't know i don't know, i would think about that i'll think about that a little bit more all right! So now this hairline is really cute. It comes pre-plucked already with baby hairs, so that's a plus, like i could just wear this wig, just like this, like without gluing it on without doing anything extra. I could wear this wig just like this, so for those beginners or those who don't feel like having to do all that extra stuff to their wig. You can wear this wig completely glueless without glue without having to customize anything. The most part you have to do is put makeup on the lace and cut the lace off all right. So now, since i decided to glue this wig down instead of wearing it glueless i'm going to go ahead and apply the glue to my hairline and to the wig cap. I use like about one and a half, maybe two layers of ghost spine glue and, like i spread it out an inch wide on my hairline or inch back. I don't know you can see what i'm saying and no edges were harmed in the making of this video. I'M telling you it's not about using glue on your hairline, it's about how you remove that glue from your hairline that will make or break your edges. So if you want a video of me showing how i remove lace glue from my edges properly and like safely, let me know in the comment section below but anyways back to this install i'm just pressing this wig down into the glue. As you can see, it was not sticking properly, so i went ahead and pulled my baby hairs forward and pulled the braids back so that i could tie it down with an elastic band and dry it. Okay. So now i'm going to go ahead and style. The baby hairs - and i wasn't too for sure how i was gon na do this. When i first started, i was thinking about like leaving them long and poofy, but yeah, so i'm gon na go ahead and be quiet throughout this part. Um you're gon na see a lot of like you know me playing around with these until i get something that looks somewhat decent like for this first install, i didn't want to cut baby hairs too short and then, like regret it, so i try to keep them As long as possible for as long as possible, i ended up cutting it anyway, but yeah so i'll be quiet and yeah. I could just watch and see what i ended up with oh wait, i'm back i like so yeah y'all, can see. I ended up cutting the baby hairs, um and i ended up slicking them down or whatever, but um. My camera was cutting out and i was running out of storage space. So i only have like a couple of clips, i'm showing you like how these edges, like these edges right here, turned out um but then like as you've seen at the beginning of the video and at the very end of this video, i ended up washing out The gel, because i didn't like it so this is the first finished look and i really love hard lips as the middle part, but you can wear it as a side part as well, and i ended up washing out the edges, the gel from the edges - and I was going for a more natural like fuzzy hairline, so this is the second finished look and like i said, although it's the lace front, you can wear it in some styles. The braids are super neat and super lightweight. The only bad thing i could say is the burnt ends are kind of itchy, but other than that. The lace blended pretty good and it was overall, a super easy wig to install so definitely beginner friendly. So i want to give a big shout out to we queen, there's more hair information and a link to purchase in my description box below and there's also a discount code. So don't miss out on saving them coin, says for more pictures and videos go ahead and check out my instagram at starts by honey with two eyes: my tick tock as stars by honey and my pinterest at styles, by honey, big shout out to you, you and You for supporting, i love you all so much so please come back.


Comments
Stacy Adams: Beautiful job wig looks nice on you
Avanti Wingate: So pretty lace is melted giving scalp in part
p m: Honestly this unit is great but they should definitely did the lace ear to ear so individuals can wear it up without seeing the part that'd don't have lace on it you definitely can see the root of the darkness on the unit when pulling hair back not Kool weqeen but you look amazing lady did a great presentation thank you
C- Bunny: Hey Sis You sooooo f fire
Coreys Baby: Fire ❤
ladyj40: Why didn't you show the back when you had it in an up-do?
Stacy Adams:
Sweet Pee:
Lauryn Yearby: Purrr