How To: Make Jumbo/ Knotless Braids
- Posted on 02 December, 2022
- Easy Hairstyles
- By Anonymous
Hi Cluebeauties,
Welcome to my channel where we learn diys, makeup, hair and Ventilating and much more
Please consider subscribing
Let's be friends
Contact-08133734073
Facebook-CLUE'S SIGN ATURE, CLUE'SSIGNATURE (Facebook group and page)
Tiktok-official CLUE'S SIGNATURE
IG - CLUE'S_ SIGNATURE
jumbo knotless braids,knotless braids,knotless box braids,how to do knotless braids,large knotless braids,box braids,knotless braids for beginners,knotless braids hairstyles,diy braids,natural hair,jumbo braids,large knotless box braids,large knotless box braid styles,knotless braids on short hair,knotless braids on yourself,knotless box braids tutorial,how to box braids,knotless braids large,how to braid,how to
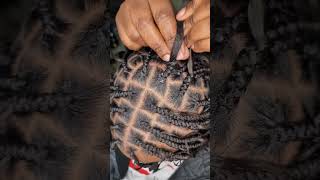
High clear Beauties welcome back to my channel Instagram AKA clip. Thank you so much for tuning in for today's episode and today, according to the title, we're doing how to make a jumbo, not less braids. So, like you guys know from our previous video if you've watched how to outline a fully, so this is the result of it and there's something like to do to my fullest. I like to first of all add it in hot water, not very hot, not very cold. I also had in hot water just to make it sit down very much easier for me, so this is a less thin spray. I used it for my um client, because she's dark in complexion, but after using the thin spray, I also went ahead to use my Foundation dark tones Foundation to darken it and make it more realistic. Okay, so after this I'm going to show you guys the materials we need. First, you need your full lace, vegetables, which I have the alkaline vegetables. Then you need your tack, pins or your tippings. Whatever I want to call it, then you need your shine and jam. I like using shine and jam for this knotless braid wigs because it makes it shine it's an edge control extra hold. It makes it Shine. I really really do love it now. This one is the olive oil hair polisher is from Vitalis. I like using this because it gives my attachment moisture, makes it soft and it's not. It doesn't make it very crass okay, so it makes so easy for me to work with. You know I like soft work, so this is the above ultra hold um, hair Muse. This is for the after use actually apply the hot water. So this is our hairspray conditioning um. It'S from care. Science is oil, sheen, okay, now the rest of the products. We have your um, your bands, your tapes, your scissors, your comb and reform brush. Then last but not the least, you need your attachment. I'Ve already cut this into cutting soon and I've already fished it out. So you need that as well. So now I'm going to show you guys everything when we come back after a short break and if you have not subscribed to my Channel, please make sure to give it a thumbs up, subscribe, share to friends and family and I'll be seeing you guys on a Short break foreign guys, I hope you guys have actually um subscribed to my channel and like and commented so if you have any comments for me just leave in the comment box below. If you have any video requests, I'm going to be doing all that just leave a comment for me: I've done a lot of I've done some video requests and I'm still working on making sure I do the remaining ones so guys just be patient with me. You guys know this is the busiest season for us ventilators and we make us and even for a makeup artist, so um. This is the hair. I'Ve actually unraveled one. You guys can see the baby hair, which was made with um a hair blend, so I've unraveled one and I've brushed it. Then this is my connection hair, I'm about to arrival one part of the fished out ones. Then I'm going to go ahead and take my oil and apply on it. So I said I said guys. The reason why you will love applying this oil is because it's very very nice. It makes the whole thing so soft, it's moisturizing, okay, it makes everything so soft. For me. I really do love the feel on my hands. That'S why I normally use it then, as you guys can see um I did the first one, but the hair, the other hair was actually on my waist, so I had to pack them all together before I start. I continue my work, so it's better to pin your stuff down then um pack, every other thing, so you will not get distracted while you're making a particular hair. This um braiding is very, very precise and should be taken very seriously. Okay, so I'm going back again to unraveling, but before I do that, let me just take something that gives me um. This joy and happiness, like I haven't slept. I didn't sleep. I'Ve been awake, trying to make your orders ready. I just decided to make use of this one to make a video with this one, so you guys can see. That'S all because I love you guys, my beautiful family, that's all so! Yes, we have finally unraveled that so um. What I'll do here is the amount of attachments you need to bring out depends on the hair and depends on what you started with okay, so I'm doing only four um, seven um strands. It should be seven okay, but how you add it is what matters the size of the braid and everything is what matters. So this is what something has to do physically to know exactly how much bread to add for each one. You add in so I'm going to use my shine and jam and Sleek the edges down. I'M going to use my brush to brush it and make sure it is well slicked and beautiful. You can go ahead and use any other edge control of your choice. It must not be this shine and jam. Okay. All you need is something to Slick the edges and make it beautiful, so we're going to go ahead and do the braiding I'm going to show you guys how to do the braiding the proper way so um yeah. This is what I have here. So you guys can see what I'm doing. I I patted the um first side out the important side out, so we are about to do it like this. I noticed that the center was open, which I don't really like. I don't like the center being open. So I just lose it again and I started to do it again. Um I, like my Center to be covered just like a normal human hair. Would look like so one thing you do, is you tighten you make sure you tighten the braids very very well, then try not to make it open. So once I braid, I notice that it's open I lose and then I start again till I get something that I want. So that is the thing and when I do it and it's loose for me, I start again because I really want it to be tight and not loose. I want it to be something of long usage, okay, so um. What I do is, I add one hand. I draw it, I add the hair around the tip because I really want it to be very, very long so when I add hair around the tip side - and that is it so let's go ahead and see what this have is taught for us. So if you look closely, you understand exactly what I'm doing exactly what I have been saying. So when you do it this way, you will not notice the hair that you are adding because you're going to be drawing it. I think I'm going to show you guys exactly what I did from the next one. I will capture. So this is how you keep doing it till you get to the legs you need, then you can go ahead and either twist it or continue doing it, but definitely around that area. The whole hair has become a lot shorter and Slimmer, so you just have to pack it all up foreign I did was to brush or comb anyone, I'm going to add the edge control to every part of the edges which I've already done. Then I'm going to brush it properly. Let me show you guys how I was trying to show you from the other parts. Now this is it now this is it um? You guys can see how I'm opening it up. The first part you open it up there. You now share the remaining parts into three: you get the first part and cross it over from the right side that you've already patted. Okay, I made sure the whole thing is precise and very, very neat, then I'm going to cross it over the other side. The right side of the Hem, then I'm going to take the right side and cross over the left side, where the left side comes on top of the two and the crossing continues, how it has always been, then what I'm going to do? What I normally do to make sure this is nice. Is I tighten it myself? Okay, I tighten everything. I said it should be very, very tight because you want your customer to use it for a very very long time, so I keep on tightening it to make sure there's no place, there's no room for it to unravel anything. Now, once I braid it like um. Three to five times, but what I braid here is just four times then I start adding the hair from the tip remember from the tip. If you want it to be very very long. So that's what I am I'm actually doing here. That'S exactly what I'm trying to do here, then I'm going to go ahead and get the rest and do the same thing to them. Yes, so this is how I'm going to be adding it then I braid like just so you add the braid one. Two, you add again, you braid one, two add again: you break one two, so the tip of the whole hair till the hair, the whole hair is finished, so you guys can see how I'm just doing it. Then that's um! You have to draw it. When you draw it, let me show you guys: uh-huh, can you see me drawing the hair, you draw it, it's going to make it invasive we're going to enter the middle of that braid and it will make everything very, very invisible. So you guys can see the beauty. Can you see the beauty? Can you really really see the beauty, so you keep on adding till your hearts content here the size is okay for you, and that is it. So, let's go over to another one. So I'm going to let you guys watch this by yourself. Okay, I'm going to let you watch this by yourself and let me know if you understand anything. I'Ve actually explained it um two times so, the third time you have to watch it yourself to understand this and feel free to ask me a question anytime. If, after watching, you're, not able to understand, feel free to ask me question at any time, but please you have to exercise patience for me to answer. Okay. Thank you. Thank you. Thank you, foreign. Thank you, foreign. Thank you. Thank you. Thank you. So guys you guys can see, so I hope you guys was able to learn something the previous one, so you guys can see the braids now I have to add more at the end parts of it okay. So this is already the next day for me because I had to go and rest since this was the last one for me to make so very, very beautiful. I um this is the measurements. I measured it and it's giving me 38, and this is so nice. So now it's time for me to trim the hair. So yes, I'm going to go ahead and start my trimming, so you guys all know how to trim hair now is um. Once you get your scissors, a very sharp scissors, then you have to stay where there is lights, which was the reason why I had to go and rest because there was no light again. Then you start streaming off the um protruding hair, there's some hair. That will be coming out from the normal from the trunk of hair that you've already braided, so those ones are going to have to trim it off and once you've trim it up. The next thing for you to do is hot water set. So next thing you do is what hot water set. So I'm doing the hot water make sure not to touch the very hot water on the net, so you don't see it or make it weak. Okay. I know some people might be doing that and after a while, the whole thing will just start tearing from your client's side. Of course, it's no longer on you, it's on your client, but these are the things you have to do to help your clients out to make the hair last longer for her or him. So all you need to do where you are pouring that hot water is on the hair, which was the reason why I told you guys that I first of all put my hair on hot water before I start making use of it now, even if you put In hot water, the um The Tint is going to come off, then you have to do it again, so normally I'm basically you just have to so after the hot water set. The next thing for us to go ahead and do is so apply the hair meals. This will help you sleep very much down, and this helps the net to slid down. So instead of doing hot water on your net, don't worry just go ahead and use this on the net. It'S going to slick down and remove any white residue that the edge control, that is, if you're, not using shine and jam edge control, the hair means is going to help remove every other residue that the edge control is going to leave. Okay, just make sure you apply enough of the hair meals. I really love this hair meals. I love the scent. I love everything about the hair Muse is so nice, Okay and that's why I like using it. So if you're able to get this and do your um, add your full braids, full knotless braids fullest, notched, Nautilus, braid up to this level, my dear you are a pro and is very, very nice doing it this way, I really love it. Then you have your um care times these my care times or your Sheen. I always use the oil sheen on it, and everything is just very nice. It'S going to keep on Shining, keep on being beautiful and, if you're looking for a client, the client really do appreciate it. Because it's going to be smelling very nice, you guys there is nothing so fantastic rather than having a hair that smells so nice. You know, even if you don't have any um any deodorants on your hair alone. We just cover up everywhere. You know we'll just be like wow wow, so this is the final look guys. I hope you guys love this hem, like I'm loving it. I wish this is mine. Like honestly, I think I brought out enough time to do this last one for my client, but of course everyone looks a lot like this, and this is so beautiful. Don'T you just love it I'll? Do I love beets? I love it. I love it so this is the picture and the videos I did that one at night, and this is one I did in the daytime, so you guys can see how beautiful this looks. I'Ve added the rubber bands so yeah, the rubber band. You have to add the rubber bands around the edges of the ear, make sure it's around the ear that you're adding the rubber band okay, so it can hold down the front part very well. So when you add the rubber band, it makes it a lot more. Like a glueless wig, but without the rubber band, it is not glueless. So thank you guys. Remember. There is adjustment um on the the net which is inside, so you adjust it for your for your clients and everything is just beautiful. Thank you guys for this tutorial. Joining me today and I'll be seeing you guys on the next one bye


Comments
Blog star333: Nice one