How To Mold Hair That Is Not Relaxed | How To Mold Hair That Needs A Relaxer
- Posted on 11 October, 2022
- Heatless Hairstyles
- By Anonymous
Thanks for watching my video!
Here is a list of the products used or suggested (if any):
-Goddess Super Growth Serum: https://bit.ly/3x8QIbt
-H2pro 1 inch ceramic Flat Iron: https://bit.ly/3cS8EQM
-H2pro 3/10 inch flat iron : https://bit.ly/3CWr6SE
-Goddess Polish: https://bit.ly/3RyG5Gz
-Hooded Hair Dryer: https://amzn.to/3BdgcHd
-Sebastian Professional Shaper Plus : https://amzn.to/3RfNk6J
-Rat Tail Wide Tooth Comb: https://amzn.to/3Bd3Sqe
Shop our Elite Hair Care products :
http://www.Elitehaircareusa.com/shop
For our amazing body care products:
http://www.Elitetotalbodycare.com
Subscribe to Crystal's Personal Youtube Channel:
https://www.youtube.com/c/CrystalWilli...
Want to learn how to better care for your hair:
https://Elitehaircareuniversity.as.me/...
Want to pick Crystal's brain :
https://Elitehaircareuniversity.as.me/...
Need help building your business or business building templates :
Shop our brother company for all your apparel and smokers needs : http://www.flamesup.net Use code ELITE!% to save 15% off your purchase.
Connect with on IG https://instagram.com/elitehaircareusa...
Connect with us via email: [email protected]
Want to send me stuff to promo Free of charge:
Elite Hair Care USA
PO Box 14
Apopka FL 32704
#alopeciahaircare
#elitehaircareusa
#blackhaircare
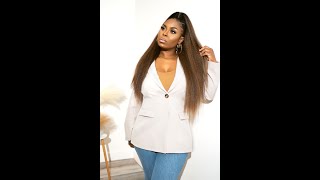
Hey Pros Crystal here from Elite Hair Care, USA. So today we are going to be molding. My client um. This is actually one of the perfect opportunities for those of you that have shortcuts to kind of see how you are able to mold your hair down. When you are getting close to your retouch time, um though I'll say it, because I have short hair molding when you have a relaxer need, can be great, but can also be very challenging all at the same time. Why? Because of course, we want to increase the density in our hair. We want to give that illusion that we have um a lot of fullness going on if you're, fine, textured or um. You know - sometimes it's just not time yet so today, I'm going to use my client here and we are going to do a couple Pro tips on how you are able to mold your hair um when it's time for your retouch or when you're, getting close to Your retouch and then you guys will be able to see the finished product when we're done. So what I'm using is some wrap strips a little bit of dark styling gel. This is a holding gel and then also um, some Elite silk wrap foam. Now the styling gel is actually not going to be hard at the end of the service, but this allows us to lay the hair down nice and smooth and then we're going to apply the elite. Silk, wrap foam over that and you'll see exactly what happens later. On when we're styling her what this actually does, so I don't want you guys to think that it's going to make her hair, crunchy or hard. This is actually going to be an aid that allows us to lay her hair down and we're still able to curl and style right through it. The hair is going to still be nice and soft, but you're going to see how smooth her hair will lay because we started with this base, maybe so now just a little bit more for me. So what I'm doing is I've applied the styling gel to the area where, typically, we have it, the most crunchy or the most um, the most in need, so right here by the occipital bone and also in the nape, is where we usually have the most trouble. When we're trying to make that area lay down, this is also the area that we see whenever we're looking in the mirror, because it stands out behind our ear and also the sideburns. You can do this on The Sideburns area as well. If you guys notice, I did not go into the longer hair. I only put it in the areas where there was short hair. There'S a reason for this. The longer hair, you don't want to add any styling gel to that area, because you want to make that area nice and pliable, and you can use heat in those areas to make that hair lay down nice and smooth in the short areas you can't really use. So much heat because it's very short, so this is going to give you a good canvas to work with when you're doing your mold. It'S also going to make your life a lot easier when you're doing your molds at home. This is how you're able to get through those grow out days. Now, when the hair in the in the nape area starts to grow out really long. This this technique does not work, you guys, so it only works on your hair when it's kind of short um. It'S maintenance time whenever it's like right before your relaxer time, like this kind of brings you through, but it won't work when you're in that girl out phase and you're trying to grow your hair out and your nape is a lot longer. So when you get to that point guys, we all have to go through that phase. If you're trying to grow it out all right, so I'm putting the elite silk, wrap foam right over all of her hair, including the area where I put the gel and then, of course, I'm gon na put some in the crown area. So you want to make sure you have enough to make the hair nice and pliable I'm going to use the same comb that I was using before. But now I'm going to start in my crown area and then work my way down and around. I choose to mold my clients this way because I feel like it gives a nice canvas whenever I'm doing the curls or their styling, but you can mold it straight down. Whatever works best for you, you can do that now. The gel is just kind of working as a weight. It serves more as a weight on the hair to keep the hair, nice and flat. Okay and then also manipulation with your hands is going to make a huge difference as well, and I like to use it also on the sideburns, and I actually learned this technique from another stylist who's, a very good friend of mine, and they shared this technique. With me on actually a couple years now - and this has proven to be a really good technique - we used to be afraid of gel on shortcuts, as stylists for a very long time like a lot of stylists would not add any form of gel to a shortcut, Because we were so afraid that it was going to make the hair hard or make it really really crunchy, and then, when I saw them, do this, I'm like? Oh, you have to teach me that so when they taught me this technique, I've never strayed away from it. It works really really well, especially for people who have fine, textured hair like myself. This is something that I deal with a lot where my hair, even when I have a relaxer, it's still super curly and it doesn't lay as flat as I want it to lay. So I use this even after I just got a fresh relaxer and it worked really well for me, it keeps my hair a lot longer and it makes that area lay down a lot better and then for my sides. I don't go past this area on the head because remember that hair is a lot longer and I do not put any gel anywhere in the crown. It'S not really necessary in that area all right, so we are going to finish out her mold, okay and then for this nape area. You just want to make sure that everything is nice and smooth again now what the trick is to this is even though you've put the gel and the wrap form in this area. You now have to lay that area nice and flat and weigh it down with wrap strips. So what I'm going to do is, I stretch my wrap strip first, I start right here in the nape and I place it nice and smooth in that area and I go around over the sideburns. I keep it nice and smooth, and I come right back over the nape again. Okay, you want this to be nice and tight, okay and then we're going to take a second wrap strip. Sometimes you'll use even three wrap strips, and what I'm going to do is I stretched it again. Put it right here in this area. Tie it in the front. I only do one tie. It doesn't need to be too tight, you, okay, okay and then I'm going to take a third wrap strip. Now my third wrap strip is going to go right over this area and go up and it's going to lock everything in okay. So I'm going to stretch it and it'll go right in the front, so, while she's under the dryer, these areas have nowhere to expand, they are forced to lay down. We have the gel, we have the elite, silk, wrap foam and this is going to allow this area to dry, nice and smooth the only part about this. Whenever you're doing this type of mold, the hair has to dry thoroughly, as it should with any shortcut reason being is. If this area has gel on it, it takes just a little bit longer to dry, but you cannot comb through this hair. If it has that wet gel, you won't be able to style it. So this definitely needs to dry all the way. The crown you don't have to worry so much about it can be anywhere between 75 percent and 100 dry and you can work with the crown. But you can't work with the sides in the back unless they are thoroughly dry, so technically you'd be under the dryer anywhere between 30 and 45 minutes. Typically, for my clients, who have a lot a lot more density, they'll be under for 45 minutes. I'Ve never seen a client be under there for an hour. It doesn't take that long, but as the time goes down when she gets around minute 20 to 15, I take the strips off to allow the rest of her hair to dry. So that's how you do that so we'll come back when she's dry style her and you guys will be able to see the finished product all right. So now she is of course, 100 dry um we're gon na go ahead and continue the cleanup of her nape area now guys, let's also talk a little bit about this. My client is a new client um. She is coming to me from another stylist which you guys know. I do not bash stylist in any way shape or form, so we're really just gon na more focus on the lesson here more than the stylus. So after looking at my client's hair, if you guys can kind of tell her haircut where her sides are slightly high and then the area in the crown is a little low me as a stylist. That is not my preferential way of cutting. But at the same time, I do not know what the style Choice was when my client got this initial haircut earlier on. So what we talked about was as um when we do her relaxer, that I was going to go ahead and correct the cut based on my cutting standards and that's the reason why I said based on my cutting standards. Um, because to me the cut is disconnected in the wrong places and it's not connected in the right places. Okay, at the same time, she has a little too much weight right above the occipital bone and also on the sides, but that can also be contributed to the fact that she has somewhat medium to coarse, textured hair and she has a lot of density. So that is just kind of eyeball looking at her haircut, so we did discuss um me correcting her cut based on my cutting standards and how I feel um, a true shortcut should look where it doesn't have weight in the wrong areas, because too much weight in The wrong areas can also add weight to your head. We don't want to look like. We have a big head. We want to look nice and Sleek right and then, at the same time, because she has color, you can see the difference in the cut because color sometimes exposes that. So that is another reason why I also was very enticed to do this video, because I know that some of you are also going through things like this. Where? Because you don't understand the nature of a haircut, you are trusting a professional to give you the cut to the best of their ability. But sometimes it does need a little bit of correction um based on cutting standards and also the standards of the stylus that you're dealing with all right. So I am using the three tenths of an inch micro flat iron. This is from H2 Pro um to curl. Her hair, so even though she does have a little bit of length. The reason why I chose this iron is because I wanted the curls to be a little bit tighter. Now, once I had started curling with that iron, I quickly switched over to the H2 Pro 7 10 of an inch, which is a little more than half an inch and a little less than an inch um, mainly because I wanted to see if it was going To smooth the area out better, if I like the way it was looking and then I kind of figured out that that was not the iron for me to use, which is exactly how it works, you guys also, I had to adjust the temperature. It was not um hot enough for what I was doing, which is also something that we also talk about when it comes on to using flat irons. You have to know what temperature works best for you, just because you hear the word 450. That doesn't mean that it's going to damage your hair, some hair just requires 450.. Sometimes your hair might require 200 if it's super damaged. So there's different reasons why you use different temperatures and, of course, the quality of that iron is always going to be very important. Hence the reason why I'm an H2 Pro distributor, because I truly truly believe in this line when it comes on to some and I'm going to say it that way, some of their irons, so links are in the description box for the irons that you guys saw Me using today excluding the seven tenths of an inch, the reason why I don't offer the seven tenths of an inch just yet is because it is a very odd shaped iron and a lot of you would not have a real reason to use that iron. So that's why I go from the three tenths of an inch to one inch, because usually that's what you should kind of have at home now also, this is a ceramic iron, so you guys also hear me use tell you that ceramic is also great to use At home I prefer ceramic over titanium unless you are soaking your hair out at home. Okay, all right! So let's talk about the nape of her neck. While we continue the the um styling in the crown area or in the top and the sides, so you guys can still see a little bit of um texture, I'm gon na, say texture in the nape area and also around the occipital bone. Guys, when you need a relaxer and you have a short cut, this is a part of the process. Okay, shortcuts are relaxed a lot more than longer hair. Why? Because your hair grows out really really quickly and it will not lay down so to the best of our ability. We can smooth it as much possible. We can use the gel like what we did in the previous clip where we were molding her. We were talking about molding um. You can do all of that, but inevitably you still need to relax that area at least once every two or three weeks, because that is what is required for that area to lay down and look nice and smooth okay, there's really! No other alternative, okay, so um. When she comes in for her next appointment, we will definitely be doing a full relaxer um fixing that area and also, as I said, correcting her hair cut um and then from there forward. It'Ll kind of just be maintenance, maintenance, maintenance and then, of course, when it's time to do any form of relaxing on the sides in the back, we will do that. We do not relax the crown, as often as we do the sides and the back. Okay, the sides in the back are very very short, so you have to think of it as your husband going to a barber shop. He cannot go six weeks without going to a barber shop. He has to go to the barber shop every two to three weeks on the minimum. Why? Because he has short hair and it grows out same thing with women. Just because we're women that doesn't exclude us from the the same kind of treatment that a man would have with short hair, so the size in the back. That is the reason why you relax that a lot more so now that we are finished curling her um. Now we're just going to comb through using our rake and her I mean her style came out great regardless. If she has a little texture in the nape area, we already know what we're trying to achieve um and then she also had an area of thinning in her crown that we um were trying to also cover and just let that area grow out. So that is something that we'll be focused on going forward and other than that you guys she is completely done now. The fact that we use the gel on the sides in the back. This is going to give her a little bit of Lage for a little longer time. It works very, very well specifically for fine textured hair, because our hair frizzes so much so you can also use that technique on fine, medium or coarse textured hair. It works great as long as it's the short areas only and if you guys can tell it's easy to maintain okay, but I hope you guys enjoyed this video. Please don't forget to go ahead and hit that subscribe button and also thumbs up this video, as you guys are watching um comment down below. If you have a shortcut and how often you get your short hair, maintenanced or cut, and then I'll of course see you guys in the next video, as I said before, don't forget all the products or recommended products are also linked down in the description box, including The irons that I use today and I hope everybody has an amazing rest of your day - peace. Thank you, foreign foreign

Comments
April George: I use this as well, thank you for the tips. Her style looks great!
Carleone Moore: Nice style and work, but I believe the title is misleading as this client's hair is NOT natural and has had both chemical services: color and relaxer. Perhaps molding hair that needs retouch relaxer would be better.
Michelle Morris: Beautiful style and excellent explanation of the process!!!
Beatrice Hamm: Wow that’s amazing you are such a great stylist.Love your products Sweetie. I will definitely continue to use them.
Renee Jones: I like the texture in the back, it brings out her natural wave pattern.
J Willis: Yes Crystal I use this method. The ONLY foam I use is the Elite Silk Wrap Foam! It's the absolute BEST hands down!! A little goes a long way to!!!
Cazatra Cain-Walker: I love how her hair turned out ❤️
Jae Bea Blessings: I use the gel on side and back to help my hair lay down then foam wrap. It does work! I just need a cut!
James Greenhill: You’re an awesome stylist
jem reandeau: Looks beautiful, nice job.
MissfabRSA: Beautiful outcome
Betty Diggs: Wow, beautiful cut and style.
Linda Scoty: Great job. Your an amazing stylist you can work hair !! Any grade everyone!!! Your so gifted. Wish you lived in Virginia
Ms E: Is it possible to finger wave natural hair with styling gel or moose? I refuse to return to relaxed hair for the style but would love to rock it with short natural hair.
LaKisha Montgomery: Good morning May I ask the name of your black wraps? The ones I find are usually not tight enough or if they're tight, they will not tie in the front. Thanks in advance! You are amazing family person, stylist and educator, and product producer. It's a blessing that I ran across your name on YouTube.
ben jones: This was nice but it looked dry. It needed oil or a shine. I think most of this dullness was due to the color. It was a nice curl.
Kay F: Yes I use this technique also
Georgia Bush: I love it you did your thing girl .
Mary Covington: Fabulous! Such professionalism!
LaTawn Hannah: Thank you Crystal for the great advice I have short hair and this video is most helpful in showing me how to take care of my hair. Great job
Tyrell Speed: There no such thing as needing a relaxer. You can only want an relaxer.
Edna Smith: Beautiful style
Harriett Hudson: Which gel do you use for white hair or gray hair I really enjoy it your video very knowledgeable. Have a blessed day
Diane Price: Wow just beautiful.
Hope Dabney: Beautiful.
MultiTalented Bri TV: Good morning love your work sending love and blessings
Ikee Casson: This title is extremely misleading. Unrelaxed hair consists of having absolutely no chemicals at all on the natural hair.
Margearett Armstrong: Beautiful
Jewelle Mason: Great job
Elmira Gates: Beautiful
M Bell: Gm Crystal, thanks for sharing this..please have a great day..ky
Angela Brown: Turned out really cute. You have magic fingers
Sis YaffaYah Yisrael: Shalom, beautiful technique
Cheryl Bailey: That's really nice
CU Young: You did it again!!,
Cheryl Bailey: I love the color
Brigida Silva: You’re the best.
Melissa Virges: Good Blessed Morning!
Shirley Fretty: Cut styling Crystal!!!!
GeeGee4444: I don’t have the head or face for short hair but this made me want to try it. Just beautiful!!!
Denise B: Very nice! She is a lovely lady
Donna Haney Ford: Pretty
corretta jefferson: laundry & beauty
Sandra Ferguson: Good morning
Nasrin S: سلام خانم هنرمند. بسیار زیبا شد
Elmira Gates: Good morning Crystal
Diane Price: Good morning.
Lady T: Good morning