Easy Heatless Curls Tutorial | Tik Tok Inspired Hair Hack
- Posted on 10 February, 2022
- Heatless Hairstyles
- By Anonymous
Today we're sharing a super easy & quick hair tutorial! You've no doubt seen this heatless hair curling hack on Tik Tok but we wanted to test it out ourselves... what do you think of the results?
xx
Ellen and Tara
Here's the product: https://www.xobeautyshop.com/collectio...
--------------------------------------------------------------------------
//LINKS//
Instagram:
https://www.instagram.com/ellenmackenz...
http://www.instagram.com/tardaeda
FREE GUIDE:
How to become a social media manager: https://www.ellenmackenzie.com/freebie...
Ellen’s business: https://www.ellenmackenzie.com/
Ellen’s coaching program: https://www.dishingupdigitalschool.com...
DISCLAIMER: This video is not sponsored.
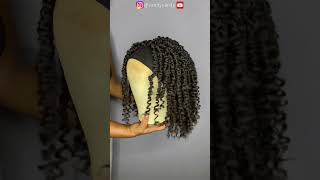
Hello guys today, i'm going to be doing a heatless curling tutorial using this kit from exo beauty. There'S a lot of brands doing these kind of like silky, like weird things at the moment, i'm getting all the instagram ads for them and i avoided buying one for a long time, because last year i'd actually seen them on aliexpress. So i know a lot of these companies are just importing them from aliexpress or importing them from china. Sorry, if you can see my dog in the background there and on aliexpress, if you are wanting a deal and you're willing to wait for shipping, they only cost like two or three dollars, but i did also want to support a new zealand business with this. I really like exo beauty. This is run by shannon xo here on youtube and she's, based in new plymouth. I know that she runs the business with her mom and everyone, so i just thought it would be cool. It popped up in an instagram ad and i was in a bit of a yellow boot. So in your cat you obviously get this thing which is going to go around your head. You get the clip which goes on top to hold it in place and you get two little scrunchies which i actually have been using on, like a normal daily basis, as well as to like tie up the curls, and i freaking love them. I think they're. So cute, so that's a little added bonus. So this is the second time i've used this, which i just thought i'd point out, because it's not like i've, been using the sages and like perfecting a technique or anything, but i wanted to leave it in overnight. This time to see how well it came out to see how easy it was to sleep in and so yeah we're gon na cut back to my footage from last night. So, apologies for the uh, yellow lighting obviously filmed this right before going to bed, and this whole clip was only two minutes and 20 seconds long. I'Ve sped it up a little bit here, but that's just to give you an idea of how quick and easy this whole process is. So basically, what you're going to do is you're going to clip this bad boy onto the top of your head and divide your hair in half and take little pieces and wrap this around your little tube and each time you wrap it around you'll. Add another piece of hair in and you're wrapping this away from your face, because that's the way we want the curls to go and you're just adding in a bit at a time and twisting it around. It'S really simple way easier than doing like a braid and one issue that i have been having is sometimes it's not tight enough, like i twist it all around and it starts to unravel slightly. So that's why i've started clipping it at the back of my head. I'Ve done this both times now and it just helps it keep it in place and really tight to really make sure that i've got tight and secure curls, because my hair is really thin, so it doesn't always hold a wave very well and with this approach, i've Found it holds it for quite a long time and yeah i'm really impressed by it. So this was my first time sleeping with it overnight and it definitely moved about a little bit. It wasn't too uncomfortable. If you sleep on your back, you probably won't want that. Clip in there, but i didn't have too many issues with it and i was kind of willing to put up with the clip in the back of my head, because i wanted to keep it really secure and tight and hope that the curls came out well. And i really think that they did, as you can see, it's just a matter of playing around with them a little bit brushing them out. If i had thicker hair and could hold a curl better, i probably would have taken my brush all the way through the curls, but i just kind of brushed the top of them and yeah. That is the finished look. So i think overall, this side definitely didn't. Do as good in terms of like up the top, you can see there's not much of a curl there, but it looks okay when i just kind of flip it around, and i could just touch that up with my curling tong before i do my filming today. Um other side looks really good. I think i definitely had this one a bit tighter and obviously that front bed didn't fall out, so yeah overall really happy with these. I know that when i had them in um the other day, i only left them for two and a half hours and then they lasted me for the whole day. By the time i got to the afternoon, they had dropped quite a lot, but still like relatively curly. They just weren't, quite like you know like tight bouncy curls like this, but i do always have problems with my hair holding curls. It'S just like quite thin and straight so i was still pretty happy with that and it's just a nice alternative to have on days when you really don't want to apply any heat, and you want to give your hair a little bit of a break. So, overall, i would give this product a 9 out of 10.. It can't be 10 out of 10 because that's gon na be some sort of amazing invention, where, like maybe like a dyson air wrap, would get out a 10 out of 10 from me. But unfortunately i will never pay the money for a dyson air wrap. I don't think i say never now, maybe one day i'll be ridiculous enough to buy it, but this is definitely a lot more affordable. So i will pop a link to this from exo beauty. In the description box below - and i hope you guys enjoyed this video - i will catch you in the next one, bye guys


Comments
Gustave Duplechain: ? ᑭяỖmo??