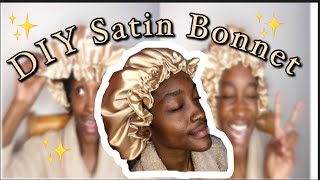
How To Make Satin Bonnet Without An Elastic Band | Most Comfortable Bonnet For Sleep || 4C Hair Tips
- Posted on 18 November, 2020
- Long Hair
- By Anonymous
Hello Beauties,
In today's video, I will be showing you all how to make a satin bonnet with a mixture of Ankara fabric and Satin fabric, no elastic band will be required for making this hair bonnet. This bonnet is one of the important items required for ensuring that your 4c natural hair is moisturized and that the moisture is retained for days. I really hope this video is very helpful to you and your 4c hair stays healthy, moisturized and long.
DON'T FORGET TO LIKE , COMMENT AND SUBSCRIBE {https://www.youtube.com/channel/UCHMPZ...} for more Videos
Love you guys, See you soon in another video
***************************************************************************************
WHEN I AM NOT HERE, I AM HERE
----- (●'◡'●) ----- Connect with me -----
* My Instagram ▶ https://instagram.com/funmibiolawore/
* My Facebook ▶ http://facebook.com/funmibiolawore
*My Facebook Page ▶ https://web.facebook.com/FunmibiOlawor...
* My Email ▶ [email protected]
▬ CHECK OUT MY OTHER VIDEOS ▬ :
HOW TO REGROW YOUR EDGES/HAIRLINE BACK FAST | 3 PRODUCTS YOU NEED + BEFORE AND AFTER PICS
NO MORE DRY HAIR: HOW TO MOISTURIZE DRY HAIR | USING JUST 3 ITEMS | 4C NATURAL HAIR
HOW TO PACK YOUR 4C HAIR INTO A LOW SLEEK PUFF USING JUST 3 PRODUCTS
HOW TO: TWO STRAND TWISTS ON 4C NATURAL HAIR || STYLE FOR MASSIVE HAIR GROWTH AND LENGTH RETENTION
HOMEMADE PROTEIN TREATMENT FOR HAIR GROWTH AND STRENGTH USING ONLY 3 INGREDIENTS || FT. MY 4C HAIR
WASH YOUR HAIR LIKE THIS TO REDUCE BREAKAGE / HAIR LOSS ||WASH DAY ROUTINE FOR 4C NATURAL HAIR
NATURAL HAIR PRODUCTS HAUL 2020 | THESE PRODUCTS ARE SAID TO BE GAME CHANGERS
HOW TO APPLY FOUNDATION ( UPDATED SKINWORK ROUTINE) - FOR BEGINNERS
GET TO KNOW ME | THE NEWEST UPCOMING YOUTUBER IN PORT HARCOURT
FAVOURITE SKINCARE PRODUCTS FOR BROWN SKIN| MELANIN FRIENDLY PRODUCTS
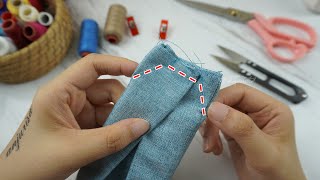
I love wearing satin bonnets, but these types in particular give me a serious headache and i don't like it at all. So in today's video i found a way to get rid of that issue with this type of satin bonus, and i'm just here to share with you, i'm going to be showing you how to make this very easy to wear satin bonnet. That is very gentle on your head, gentle on your strands and just makes you very comfortable when rocking your natural hair. So if you want to know all about it, then you definitely want to keep watching okay guys. So it's time to get started. What i'm doing now is i'm showing you the items that you're going to be using in order to make this satin hair bonnet you're, going to need your ankara fabric, your satin fabric, as well as a stretchy fabric, the fabric, i'm using for that part in front That is, stretchy is a lycra fabric, feel free to use an old headband or anything stretchy. Basically, what i'm doing now is i'm cutting my satin fabric and i'm cutting it on a dimension of 25 inches by 25 inches. This is going to give me the amount of room that i need to just cover up my head, conveniently, while wearing my bonnet feel free to make yours bigger or smaller, but this is a standard dimension for you to make an adult satin hair bonnet. I also cut my ankara fabric using the same dimension, 25 inches by 25 inches. What i'm doing now is i'm folding that fabric into four pieces in order to achieve my full circle. If you are a fashion designer or retailer, you know the reason why i'm making these moves that i'm making while making i've said making like four times these procedures that i'm taking a tailor would understand what i'm doing, but for newbies on here. This is how you're able to make a full circle. So if you're trying to cut a full circle, a perfect full circle, you need to fold your fabric into four pieces, and that is what i'm doing right now. You'Re going to start cutting from the closed part of your fabric, make sure you're not cutting from the open part right here that i'm showing you all so yeah. What i'm going to do now is i'm going to start marking the radius of my full circle. So, in order to get my full circle, i need to mark my radius in order to cut the circle you guys should just go along with me feel free to leave questions in the comment section. If you have any questions for me, so the radius of my full circle is 12 inches and yeah. That is what i'm measuring right here. As you can see, this circumference of my head is 22 and a half inches, so i'm just going to say 23 inches. So, in order to get the amount of room that i would love to give me the comfort that i need, while wearing my hair bonnet, i prefer to use a radius of 12 inches for my full circle before circles. I'M going to be using to achieve my hair bonnet. I hope i'm not losing you guys on here. I really really hope you guys are following so what i'm doing now is just measuring 12 inches from that peak points. The peak points i decide where our fabric is folded right, the part where the fabric is unfold, that's where you want to start measuring your dimension from the dimension of your radius, so yeah, that's what i'm doing now and once that is done, i'm going to go Ahead to cut out my full circle, i'm going to show you guys what the full circle looks like once that is done, but i need to mark that same dimension as well on my satin fabric, because i'm turning the anchorage with this satin fabric. So when i say i'm turning this ankara with the setting fabric, what i mean is the inner part of my bonnet is going to be made of satin. Well, the outer part of the bonnet is going to be ankara. I like to use satin for my hair. If you have a force in natural hair, like me, you know that satin is very gentle on your strands. Satin: silk fabrics in that family are very gentle on your strands and that's what i'm going for cutting and all those other fabrics will be a bit too harsh on your strand so yeah. This is my perfect, full second kind. I see that we have a perfect circle right here. A taylor already understands this whole process. Well, these details, i'm providing are for just my newbies and sewing that may be watching this video, so i'm going to place the fabric wrong side to one side, so this shinier part of my satin is the right side right. While this dull part is the wrong side, so i'm going to place my ankara fabric, the wrong side of my ankara fabric on the wrong side of my satin fabric. So this is what i have now and all i'm going to go ahead. To do now is to pin them to secure them on each other. I love to use my pins when working with fabrics, because it just ensures that things move smoothly and perfectly i don't like doing shabby jobs when sewing stuff for myself or for people that i may be sewing for so yeah. I'M going to go ahead to pin and i'll go and sew this circle on each other on a dimension of just half inch, i'm going to sew that circle around on half inch and once that is done, i'm going to begin gathering with gathering all you need To do is just pull on one of these strands or the threads of your machine. The thread that your machine would have left out after swinging just pull on it to gather your circle gently just be very gentle, because if the thread should cut, you have to start from the beginning again, and that will be very, very frustrating. So just be gentle. Take your time, just like i'm doing right here. Take your time gather the circle very well. Unless you're satisfied with what you have, you need to make sure that you measure again and make sure that you have the right dimension. Don'T allow your bonnet to be too small or too big. The circumference of my head, like i said earlier, is 22.5 inches, but i just decided to make it 23, so i need a you know, a bonnet that is like 11 and a half inches wide, and that is exactly what i have here. So all i'm going to do now is i'm going to just cut up this on cut edge, but before i do that, i'm going to tie the thread that came out of my machine after i sewed the thread. I used to gather this bonus, i'm going to just tie them together to secure my bonus suit to prevent it from unraveling. Basically, so this is what i'm doing now, i'm just going to tie that once that is done, i'm going to cut up the edges of this bonus, so the gathered edge is right. I'M going to just trim it not be careful when cutting too. So you don't over cut right, so cut it as gently as possible just to make things neater by the time you attach the band of the satin bonnet, so the band of the satin bonnet is made of a stretchy fabric and the stretchy fabric. I'M using is that black light craft fabric. I show you guys at the beginning of the video but we'll get to that part. Now all i'm going to do now is you know, cut up this trade and yeah. This is my light craft fabric, i'm cutting five inches of lycra by 22 inches of lycra, so i removed one inch from the total circumference of my head, so this is 22 by 5 inches. What i'm going to do now is fold that 22 inches into two to give me 11 inches and just join it together on half inch, and that is what we have here. You guys, i hope you are following if you've been enjoying this video so far, please don't forget to give me a big fat thumbs up. So i know you guys are finding this video very, very insightful. All i'm doing now is i'm going to attach this lycra headband part of this hair bonnet right, i'm going to attach the lycra to the main bonus and all i'm doing now is just pinning it. You guys know that i love to pin stuff when sewing, so i'm going to pin it around just to secure it and once that is done, i'm going to take the bonnet back to my machine to attach this lycra fabrics, the stretchy fabric that is going to Serve as the headband area of this bonnet to my machine, so i'm going to join it together on half inch and when joining it together, make sure they are sewing such that your sewing will not show at the other side. So, on the ankara side of the fabric make sure that you're sewing just make your sewing very hidden right. So i know it can be very tricky, but just be careful - and this is what i have now - i've gone ahead to sew my lycra fabric onto the anchor fabric round, and this is what i have i sewed it on half inch like you can see. So once that is done now, all the rough edges, all these edges that are not just aesthetically pleasing you know just just looks rough right. I'M going to trim off these parts of this bonnet before i now fold the lycra into the bonnet right and then just sew it around one more time. I know i know it sounds very complicated, but trust me guys. This process is very simple: just try as much as possible. There'S anything i'm not mentioning just pay attention to the video. I provided every single information you need on how to achieve this particular satin bonnet, so yeah. This is me now i'm going to go ahead and just fold this like right in towards the side of the main satin bonnet, so the silk side, i'm just going to go ahead to sew it such that it looks neat right, so you're going to fold it A little bit first, like you, can see then now fold it into two and go ahead to so. This is just to make the inner part of the satin bonnet look very neat, so it doesn't look tacky and just somehow just looks very good and professionally made. So i'm just going to pin it around as usual before i take it to my machine and then just so it ramps once that is done, i'm going to show you guys the finished look so yeah just watch me pin my my lycra onto my satin bonnet. Okay, guys, so this is about it, and this is what the bonus looks like. Can you guys see that this particular procedure is very, very simple? All it needs is just patience. This is where the inner part of my hair bonnet looks, and it's going to be very gentle on my first natural hair strands. You guys know that i'm very particular about hair care, and this right here is a fantastic part of your hair care routine. Even if you can make one for yourself make sure that what you are using to cover your first natural hair is a satin or silk head, wrap or bunny or scarf just make sure that is a fabric that is going to be gentle on your strands. This is me rocking my new found love right here. My hair loves it it's so gentle. On my you know my forehead, my hair strands and all that feel free to recreate this. I'M just going to show you guys up close what the bonnet looks like if you enjoyed watching this video. Please go ahead to give me a big fat thumbs up. Also, if you are yet to subscribe to my channel, please do well to subscribe and join the family and make videos twice every week. Thank you guys so much for watching. I can't wait to see you in another one bye,

Comments
Life Of A Certain Bech: Thanks for this❤️
With Mandy: love it, i will be making one for myself.
Ruth Richard: This is really creative
Funmibi Olawore: Thank you so much for watching this video, please don't forget to LIKE, SHARE AND SUBSCRIBE TO THIS CHANNEL, we are on the way to 1000 subscribers . I have a tutorial on a newer and trendier style of satin bonnet available on this channel. You would find it under the "DIY" playlist on my channel. Feel free to check that out as well. Thank you guys
Elise Reid: Oooooh huny, you should read the phone book or something like that, your voice is soooo soothing, it put me right to sleep. Awesome tutorial too, once I watched it. I'll be making one of these soon.
Sara Upchurch: What type of fabric is the printed fabric? I know the black fabric is satin.
Temmy Jane Omonojo: Cool.Whats the material of the band called
Ruth Richard: Road to 200 subs