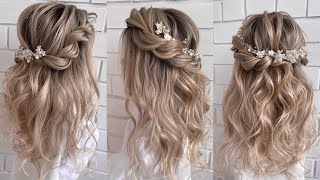
Live With Pam - Quick Textured Low Bun With A Braid! Perfect Bridal Up-Do For Brides & Bridesmaids!
In this weeks live tutorial, Pam will be teaching you how to create this beautiful textured low bun with a side braid. A perfect up-do bridal hairstyle for brides and bridesmaids!
Pam recently created this detailed bridal up-do for one of her brides bridesmaids on the big day with no prior trial for the bridesmaids! Whilst some brides may opt to have bridal hair and makeup trials for their bridesmaids, many brides do not do this!
Therefore, it’s important to feel comfortable and confident in knowing how to create a variety of gorgeous bridal hairstyles as you may have to create them with limited time and no prior practice… But don’t worry - you’re in the right place!
We'll help you practice your bridal hairstyling perfection with another fabulous live weekly tutorial and guide you through the correct hair preparation techniques and which hairstyling products are best to create beautiful hair - every time!
To continue learning, join our online bridal hairstyling community and learn how to create a variety of beautiful buns, up-dos and more that will perfectly compliment your hairstyle creations to give your clients some unique detail!
Links to the products used by Pam (where available):
Big Sexy Hair Play Dirty Spray Wax: https://amzn.to/3g7oVwA
Goldwell StyleSign Creative Texture Unlimitor
Hair Styling Wax in Spray: https://www.notino.co.uk/goldwell/styl...
L'Oreal Infinium Extra Strong Hair Spray: https://amzn.to/2wQ5b08
Subscribe and learn the latest wedding, bridal, prom & party hairstyles alongside timeless, classic hairstyles and vintage looks that never go out of fashion.
Visit https://www.createbeautifulhair.co.uk/... for more information on learning with Pam.
Want to master the art of bridal/wedding hair and learn with Create Beautiful Hair? There are many ways to learn with Pam: https://www.createbeautifulhair.co.uk
1. Join our Habia approved award-winning online bridal hair course, learn from home and submit work directly to Pam for assessment and feedback as you work through the models; receive as much support as you need! Complete the assessments and receive a Habia approved CPD certificate upon completion of your bridal hair training. Our SALE has begun! ***Use code SAVE200 to join this course with HALF PRICE OFF!*** Find out more at https://www.createbeautifulhair.co.uk/...
2. If you are in London or nearby, enquire into private Bridal Hair one-to-one tuition for yourself or for a salon! DM for more information on private courses!
3. Check out more of our YouTube channel for a selection of our freely available tutorials . . . like and subscribe for more information and updates, YouTube link: https://www.youtube.com/channel/UCDKUM...
4. Join us on Facebook for more tutorials and all things bridal and wedding hair!! https://www.facebook.com/createbeautif...
Whichever option you choose, please do get in touch and share your fabulous creations and suggestions on what you want to see next!
We've got it covered . . . we even have tutorials covering the curly girl technique!
Great for fans of natural unintentional ASMR!
Hairstyle tutorials include hair prep, hairstyling and hair up, blow-drying, curly girl techniques, working with different hair types, hair textures and hair lengths.
Create hair up & bridal hairstyles and become a bridal hairstylist with Pam Wrigley, UK Wedding Hairstylist of The Year!
Just SUBSCRIBE & LIKE!
And welcome to tonight's tutorial, i'm ham wrigley and i'm a bridal hair stylist and tonight i'm going to show you how to create a really pretty kind of low bun that i created on one of my bridesmaids a couple of weeks ago. It'S quick and it's easy. It doesn't need a lot of hair prep, so it's really good if you're kind of working under pressure. If you have any questions as we go through the tutorial, please just type them into the chat box. Hi carter. Thank you for joining me. So please just type your questions into the chat box and i'll do my best to get back to you straight away. Last week, carter asked me a really good question that i missed. I didn't see until i'd finished, so i'm going to answer your question tonight carter. So i'm glad really glad you've joined me again tonight um. But just let me tell you a little bit more about this hairstyle before i go on to uh speaking about carter's question. Last week, uh as i was saying, it's a really good style for short hair. It needs very little hair prep what i would do if your client has uh. Let me get that curl out of the way. If your client has a very soft silky, hair or quite fine hair, it's a good idea to put a little bit of mousse in the hair, a quick blow-dry. It doesn't need to be kind of. You don't need to go through it all with a brush. You can just go through it with a you know: lift up the hair, get the hair nice and dry with a mousse on there. So you're, not wetting the hair you're just getting the hair damp, but with mousse. So you don't need to put any water on there. So get some mousse in the hair. Do a blow dry. You could, if she'd got kind of frizzy hair you you could go through with straighteners or with the tongs just to smooth it out a little bit, but it's not essential. So if you are it's a good kind of quick hairstyle, if you short on time and i'm going to show you how to get the style really secure as well, which always helps, especially when you're working with short hair and we've got a couple of braids. So there's a lot going on in this style, but let's just begin. First of all, uh we're going to separate out our side sections. I'Ve already done the other side. Sometimes i think you might find it easier when you're creating hairstyles, whether it's for you know it could be for any special occasion. It could be a wedding, a party, a prom. Whatever the occasion you probably, i think it makes everything a lot easier if you kind of separate the hair into different sections. So we're going to separate our side section our front section here: i've decided where the parting's going to be, and it's kind of off center part for this particular style. So you decide that with your client and i'm working with a mirror off camera separate your side. Section out and just clip that out of the way you can see, she's uh got a few kind of um, i wouldn't say bald patches, but she's got some fine hair here, which is not a bad thing. You know if you find you get that happening on your practice head. This is i've. Had this practice head for quite a while. She started off as a long practice head and we've kind of cut her to various lengths and now she's, a little short bob. So she's a little bit slightly worse for wear, but actually sometimes it's good to practice with people. Who'Ve got with practice heads with fine with quite fine hair, because you're gon na get clients that have got fine hair. So not everybody's gon na have this gorgeous thick glossy locks. So it's good to practice if you're gon na, if you want to become a bridal hairstylist, then it's good to kind of get experience working with all different hair types, thick thin straight curly and of course we do have our online bridal hair course, which you can Join and we have hair tutorials there for all different hair lengths, so you can always join me on there. If you'd like to learn more, it can be a bit difficult to show you close up and in detail what i'm doing on these live tutorials. But you should get an idea and, as i say, it's all on our e-learning platform, so which is 50 off at the moment. So, let's create our height here, just a little bit of height. We don't want too much remember this. Lady has got short hair and we have to kind of explain to our clients. You know what's realistic if she's got short hair and she wants lots of height, then she's going to lose some there's only a little bit of length here, but she's going to lose. It here so that will affect the bun, so i would say if you're working with kind of a little short bob like this and she wants a bun, then you want to avoid having too much height because we need a bit of hair down here for our Style so let's get our braid first of all, so now we've got that little bit of height and it's kind of a little bit of it's a bit fat at the back, which kind of gives the impression of height. So it's not kind of pulled tight. So now let's create our braid and you might want to here decide which little bits are gon na you're gon na leave down, and then this will also save you time. So you can check with your client i'm gon na see which little bits want to come down here, but check with her find out which little she likes to have down and say we want those bits down. They might look. Okay, let's have a little see, there's another little bit here, so, whichever bits you decide you want to have down and you can clip those away, i'm not quite sure, if they're quite the right ones, but for the purposes of a little bit of speed here tonight. Let'S assume she wants these down, they will need re-curling at the end, but i don't think i've switched my tongs on. So that's it there we go now. Let me just our lighting's changed all of a sudden. So let me just go and correct. My lighting bear with me two minutes. It'S just me here today. Let me go and correct my lighting, because the sun has come out. That'S a little bit better. Sorry about that. Ah, the pleasures of filming alone. Okay, so where were we? Let'S get our start? Our braid here so we'll need to re-curl these little sections here, but let's do the braid! First of all. Now we want this braid to kind of look as chunky as possible. So i'm going to do a little french braid here. Hopefully, you can see i've clipped these bits away, so it kind of makes the braiding process easier. You could always give them to your client to hold just so you don't kind of accidentally include them in the in the braid. So we're going to split into three and, of course our french braid is where we go over with our sections, and this is i'm just going to add hair from the front here, make sure i don't add those sections in so i'll pick up. My section add it to the front one and i'm going to go over now. I know you can't see i'll, try and move it. So you can see what i'm doing here. It'S not easy, i know, but we do have tutorials showing you exactly how to create this kind of one-sided, french braid and the reason i'm just adding for to the front section and taking it over and i'm not adding to the back section is because i want This braid to kind of cover this parting here, whereas if i do a kind of the french braid, where you add to both sides, you can, let me just make sure i'm getting this right here. Bear with me one second talking too much while i'm braiding. So if you add you can do it where you add to both sides, but it's harder to to cover the parting. So this is, you can do it by loosening out the braid, but this is just a little bit easier and you know what this is about. Making hair styling easy: it can be stressful enough on the wedding day. So if you can make something a little bit easier and save yourself a step later on, then this is the way to do it, so you can see already without doing anything. I'Ve already covered that part there, and you just continue that braid onto the end. So it's a kind of this doing it. This way, organizing the hair working kind of cleverly being smart when you're braiding makes the next step easier. So now all i need to do is just loosen the braid a little bit and i'll put a band on the end, because the hair here is quite short. So, even though our lady has a lot of kind of fine hair at this temple area here, you can't see any of it. Well, not the temple just behind the temple. I think it was underneath there, but it's all covered. So it's a step that you don't have to worry about and that your client doesn't have to worry about. So that's our braid created and very pretty is two and let's put a hair band on here. Let me find my hair bands, that's it. So i don't want this to come out and then we're going to use a little bit of padding. That'S it. So here we go. I'Ve already done a braid. I already created a little bit earlier on that side. We'Ve got our little bits down. There. We'Ve got our little bits down on this side need re-curling a little bit, but we get the idea. Now, let's create our bun. Now i hope that's central. Sometimes, when i'm well often, i should say all the time when i'm creating these cells on camera and i'm working from the side. It ends up slightly lopsided, so uh. Let'S hope it's not too bad tonight, just in case i pop another grip across there and i'm going to get a little bit of padding, but we don't need a lot and this i'm using blonde padding tonight, it's just a little bit of donut that i've unraveled Cut into pieces and when i'm working with long hair, the padding gives me stability. But when i'm working with short hair, it gives you stability and also gives a little bit of kind of extra bulk. But i'm making it difficult for myself here because i'm using blonde hair and it would be much easier to lift her up a little bit, so you can see a bit better. It would be much easier if i was using dark padding. So again, that's another way. You can make your life easier, make your job easier. I should say by using dark padding if you're working with dark hair. Let'S just make sure this is nice and secure using the up and over technique and going behind that row of bobby pins there into the padding back out again using a hairpin, i'm using a strong hairpin to secure the padding and we could have brought the braids Underneath that padding, actually that might have been easier actually because then we would have covered this band. So maybe i'll just do that. I might just push that underneath. That'S better. I mean if the hair had been a little bit longer, then i probably would have used the hair here to help me cover the the um to help me cover the padding. But it's not really long enough. The end of this braid, so i'm just gon na chuck it underneath there and hope that i've got enough hair, let's get a pin. So, let's see, let's hope i've got enough hair now now i just need to cover the padding, but we've got our little anchor here, our the foundation for the style. Actually, you would say so make sure that this foundation is secure, because we want this style to look soft and relaxed and gorgeous. And in order to achieve that, we need to make sure it's got to look soft and relaxed and gorgeous. And it's also going to stay all day so to achieve that, we need to have a good, secure foundation and the foundation for this style. Is this padding here so make sure that this is nice and secure? She is a bit lopsided. I can see already it's kind of over to that side, but bear with me. Let me see what i can do and then we're just going to get these sections and twist them and cover the padding. So again, if you're working with fine hair, i wouldn't suggest you do this on your practice head. But a little bit of texturizing powder on each section before you twist and before you loosen, will go a long way to helping you to help you to create this style and having it all kind of stained together. Looking gorgeous and making fine hair look like there's a lot more hair, so this question that carter asked me last week was: what do you do? At least i think this was it the right if i'm not right carter. Please just correct me on this one, but the question was: what do you do if your client doesn't like the style? When you finish, even though you think it's lovely well, what i would do is hopefully, if you're working with a mirror, what you need to do really i mean if, if your client doesn't feel it's right, there's a reason and our job is to find out what That reason is now you might have come. You might have copied a style exactly from a photograph that they've shown you so um and she still isn't happy, but remember what we have to do part of our job is to adapt the hairstyle. I might just take that hair that hairband off there, because i don't think i need it and i might be able to use the end of this hair. That'S it that was from the end of the braid, but what we have to do part of our job as a bridal hairstyle, so just any kind of special occasion, hairstylist i'm using a little bit of wax to help this hair to shine. But as i say, you could use a little bit of texturizing powder here, so our job is to interpret what our clients ask for and to learn how to adapt the style to suit their hair type, their face shape. Whether they've got big ears small ears, a fat face a thin face, so our job isn't just to recreate a style. It'S to create a style that looks gorgeous on that person, but not just what we think looks gorgeous. They have to feel really beautiful. So, bearing that in mind, you'll find it much easier if you work with a mirror. So you can see me looking down here quite a lot, because i've got a mirror here, just off camera, so work with a mirror and and just mention to your client as you go along. You know you can kind of say right as i'm going along. If there's anything you don't like, you know, if you don't like the parting, the position of the parting, if you don't like the little bits of hair that are down, if you don't like the way it covers your ears, basically, as you go along get your client To tell you to say what they do and don't like, because then, as you create the style, you're getting input from your client, and it will just make your job so much easier because we might think it's gorgeous like if you go and buy something in a Shop, i don't know a dress or whatever it is. It doesn't matter. If the person in the shop tells you you look fantastic, but you just don't feel right, then you might buy that dress, but then you'll get home and you think i'm not sure and really there's something not right about it. And if the shop assistant is doing her job properly, shall i find out what it is you don't like and change it and get you a dress that kind of suits your figure or just your taste, so you just need to identify what it is that your Client isn't happy with, is it too tight is it? Is that she not got enough height? Is the width you know? Is it not tight enough at the sides, or is it too tight at the side whatever it is? You need to find out what it is. She doesn't like she might love the style, but just maybe she thinks i don't know her. Hair um isn't long enough, in which case, if you're, if you, if it's a trial, run i'm about to finish this. All i'm doing by the way is picking up pieces of hair twisting and pulling so if it's a trial run, then you know she's saying she loves it, but she doesn't think her hair is long enough. Then what you can do is you could suggest you get some little clipping extensions that you can add into the style. You know if she's having the hair down, maybe you could use a different sort of curl, maybe it's the curl she doesn't like. So if you do like more of a beachy wave you'll find because the hair isn't kind of going all the way around in these curls. If you just do a beachy wave, it makes the hair look longer. So it could be that she feels she's lost too much length in her hair with the sort of curl that you've that you've chosen so bear in mind that the client is always right and sometimes we do have to manage our clients expectations. Don'T get me wrong. You know i'm often often people will show me hairstyles. You know they might have hair that's kind of this length and will show you pictures of cells that are kind of down halfway down the back. So you do have to manage their expectations, but at the same time adapt the style to suit her face, shape, find out what it is. She doesn't like about the style. It might just be something small that you can correct, so i hope that helped and look. I think, oh, that little bit there could do is coming up and we've created our gorgeous little bun. While i've been nattering away, just lots of twists little pulls and secure it in with a hairpin or a bobby pin, oh good, i'm glad that helped! Thank you! Carter but yeah find out what's wrong and if you've got a mirror, it makes your job easier because they can tell you and sometimes people it might just be hurting. Maybe she's got a grip digging in her head. You know maybe she's uncomfortable and also watch their body language, because some people won't necessarily tell you that they don't like it, but they might just start touching it a little bit at the front and then you can just say to them or she might push it Behind the ears something but watch that body language, because quite often people will touch bit of bits of hair that they're not happy with, and then you might just say take that little bit up and then so yeah that's much better and it could be just something. As simple as that, it might be the way their bangs or the fringe is sitting, but the key is to find out what it is and put it right. So i hope that was helpful and here's our gorgeous little style for short hair. Now you wouldn't think that this her hair, this lady's hair, was kind of a little short bob, but it is, and it does look lovely we've got our lovely braids here. I do need to do a little bit of work here on these little side. Sections just put a little curl in them and uh yeah. It'S looking great, though i say so myself, so i hope you've enjoyed tonight's tutorial looks a little bit there sticking out and that's another reason. The mirror is good or you can take pictures because you can then kind of see it from different angles, see any bits that are sticking out that aren't quite right. Some of them look better. So thank you for joining me. Don'T forget to subscribe and um. Let me lift it up, so you can see a little bit better, that's it! So. Thank you again for joining me and i will see you next week. I think next week we've got a style that one of our uh students asked for she's got a lovely low, braided style. So i'm looking forward to showing you how to do that next week, but thanks again for joining me and hope. You'Ve enjoyed tonight's tutorial and i will see you again soon take care thanks again bye
Comments
Muffy Crosswire: Pretty