Special Effects Watercolor Brushes Review!
- Posted on 28 February, 2023
- Medium Hair
- By Anonymous
Do these FX brushes by Creative Mark work for painting fur and foliage?
In this video I'm trying out the 10 brushes in this set and putting them to test in an actual painting!
Grab my FREE 24 page Watercolor Pet Colors Ebook Guide ➡️ https://watercolormastery.com/pet-colo... Get my FREE Watercolor Jump Start Guide ➡️ https://watercolormastery.com/jumpstar... Watch the REAL TIME narrated LION tutorial (along with over 150 more tutorials!) through my Watercolor Mastery Membership ➡️ https://watercolormastery.com/wmsp
❤ SUBSCRIBE if you're new to my channel & click on the bell so you never miss a new video. Also, feel free to leave comments below; I read each and every one. Follow me on Instagram @e_olson_art
These are the supplies used in this video:
BAOHONG Academy Grade Watercolor Block, 100% Cotton, Acid-Free, 140LB/300GSM, Cold Press Textured, 20 Sheets per Block (Cold Press 7"X10.2“) ➡️ https://amzn.to/3SoxWGj
️ Creative Mark FX Effects Taklon Brush, Set of 10 - from Jerry's Artarama OR purchase on Amazon here ➡️ https://amzn.to/3EstfFM
Daniel Smith Ultramarine ➡️ http://www.dpbolvw.net/click-9110141-1...
Daniel Smith Burnt Sienna ➡️ http://www.anrdoezrs.net/click-9110141...
Daniel Smith Indigo ➡️ http://www.anrdoezrs.net/click-9110141...
Daniel Smith Hooker's Green ➡️ http://www.jdoqocy.com/click-9110141-1...
Holbein Yellow Ochre ➡️ http://www.anrdoezrs.net/click-9110141...
Holbein Permanent Alizarin Crimson ➡️ http://www.tkqlhce.com/click-9110141-1...
Holbein Turquoise Blue ➡️ http://www.dpbolvw.net/click-9110141-1...
️ Silver Black Velvet Size 8 Round ➡️ http://www.anrdoezrs.net/click-9110141...
Mijello 18 well palette ➡️ https://amzn.to/3KpNZld
UK/Worldwide Shipping (Jackson's Art Supply)
BURNT SIENNA ➡️ https://bit.ly/3hnOuuJ
ULTRAMARINE ➡️ https://bit.ly/2YuwMyj
INDIGO ➡️ https://bit.ly/3gvX21H
HOOKER'S GREEN ➡️ https://bit.ly/2CRraqf
Holbein YELLOW OCHRE ➡️ https://bit.ly/3gm1zU7
Holbein PERMANENT ALIZARIN CRIMSON ➡️ https://bit.ly/2YrIIRv
Holbein TURQUOISE BLUE ➡️ https://bit.ly/3hpnx9Y My favorite brush: Silver Black Velvet Size 8 Round ➡️ https://bit.ly/32SS9uE
Mijello 18 well palette ➡️ https://bit.ly/2EdslkK
Film & Editing Gear ️
- Canon EOS R Plus RF24-105mm F4-7.1 is STM Lens Kit ➡️ https://amzn.to/3pC8mR9
- Canon EF 100mm f/2.8L IS USM Macro Lens ➡️ https://amzn.to/35uGlUS
- Canon EOS M50 Mirrorless Vlogging Camera Kit with EF-M 15-45mm Lens ➡️ https://amzn.to/3MlGdYl
- Studio Lights ➡️ https://amzn.to/2Tz1xib
- Manfrotto 055 Aluminum 3-Section Tripod ➡️ https://amzn.to/3sNshi8
- Manfrotto 502 Video Head MVH502AH ➡️ https://amzn.to/35QTU0w - pangshi 11inch Adjustable Articulating Friction Magic Arm ➡️ https://amzn.to/3CkT73X
- Shure SM7B Cardioid Dynamic Microphone ➡️ https://amzn.to/3tA3nBr
- RODE PSA 1 Swivel Mount Studio Microphone Boom Arm ➡️ https://amzn.to/3vIfgbb
- Cloud Microphones Cloudlifter CL-1 Mic Activator ➡️ https://amzn.to/3tz3rl5
- Editing Software: Adobe Premiere Pro
Please note, some of these links are affiliate links, which means that if you click on one of the product links, I’ll receive a small commission at no cost to you. This allows me to continue creating helpful and entertaining free content! I only recommend products that I use and love.
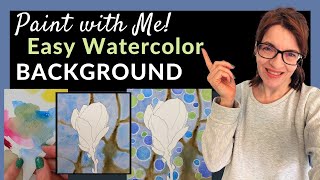
Well, these look interesting. What'S up everyone welcome back today, I'm going to be trying out and reviewing these FX Special Effects brushes. These are by creative Mark. I got them from Jerry's Artarama for 32.99. It'S a set of 10 brushes so about three dollars a piece on the back. It shows the different uses for these brushes. There are two sizes of ribbon brushes a number one and a number two three different Dabber brushes a size, two eight and nine two angular multi-liners size, five and six and regular straight edge, multi-liners, three and four and then the number 10 is a small dagger brush. These look super cool, I'm so excited to try these I've never used any of these kind of brushes before. So what I'm going to do first is open them up test them out on some paper and just see what they do with just Mark making before I try an actual painting with them. That'S always a good idea if you're completely unfamiliar with a new Supply test. It out first, so, let's open these up, I'm gon na try to keep them in order, so that can kind of follow, along with the marks on the back of the paper here showing what they are and if you open it up inside, it actually shows you More close up what these different brushes can do this Dabber, oh, I didn't even know you could do something like that. It almost looks like fish scales. That'S crazy! So I'm using cold pressed paper to test out the brushes, because I want to see what they will do on the cold press texture since that's the kind of paper I use most often anyway. So let's start with this ribbon brush check this out. It almost looks like the tail end of a fish. I'Ve never used a brush anything remotely like this. In the example they show it looks like you can apply, paint on one side and on the other and create these multi-colored swirls, it's a little different from the style. I usually work with if you're going to paint that way with multiple colors loaded on the same brush but hey. Let'S try that so that's going to be the first one I test out here I'll start by wetting the brush and softening the bristles up a little bit and then, let's see, let's try dipping one side of the brush in Red, so it'll be strategic here, red Right there and then let's do the other side with yellow okay, I'm going to dip in the water again just to make sure the paint is loose enough and having never tried this before. Let'S see how it goes. Okay, let's try to do a swooping motion. What not so great? Oh, how did they get three colors in there? That'S what I want to know, hmm, okay, so somehow I need to figure out how to get the middle of the brush into another color. Okay, let's try that again. I think it needs more water, I'm gon na dab in the water again and we're gon na try to force this to happen. I'M going to take another brush and put some purple right here in my palette in between those two colors, okay and then load it up with watery paint. Okay, let's try it again: oh that's, better! That'S kind of fun! My colors got a little muddy together, but that's okay. So, let's try this now reloading the brush again, with more paint and again, I'm gon na put some purple right here in the middle of my palette, swipe the brush with all those colors loaded with just a bit more paint. Oh there we go now we're talking all right, that's pretty cool. I still have no idea how I'm gon na use that on a painting, but let's try it with just a solid color and take some yellow kind of Muddy, yellow and just see what it can do. Oh so this could be really great too for some grasses or something like that. Nice, let's try the next one. So this is another ribbon brush this one's a lot. Smaller, it's a size, two ribbon brush. You can see it's the exact same shape as our first example, so I've gotten smart by this time, I'm going to put down a couple of colors side by side on my palette. Let'S do purple and blue I'm going to wet the brush first and then try to load one side with blue one side with purple all right. Here we go. That'S very pretty again, I'm not very good at this multi-color on the same brush sort of technique. I think I could get better at it with practice. Let'S try a swirl, my very shaky hands. Oh my goodness. They make it look so easy on these examples. Look how perfect those are. Okay, those look like crab claws, so let's try something kind of fun. Maybe just swishing the brush up and down and almost reminds me of fire flames if it was the right color, okay, so those are the ribbon brushes. I don't honestly see myself using these too much in a painting, but that could change. You never know. Let'S try! The next one this is a multi-liner brush size, three and boy. Look at that unique shape on this brush. You can see it has two long points that are on the same plane and then three shorter points again all in the same plane. So, let's dip it in the water first and loosen up the bristles, and I can definitely see myself using something like this for grass for their example in the photograph you can see they used it to create this look of hair or brambles. So, let's try something like that reaching for my green loading up my brush with paint ooh, especially for a larger painting, because this is a pretty large brush. I could totally see myself using this for grass that is so fun, so you know the whole point of this exercise is to just make marks and see what happens. Let'S try the smaller size. I don't know why the numbers go bigger, as the brush gets smaller, not really sure why that is on these. I guess everybody's got a different number system, so this is the multi-liner brush number four and we'll try the same effect, maybe a different color. This time. Let'S go for permanent, delivering crimson and on the dry paper I am noticing you know you get a lot of this dry scratchy effect, it's cold pressed paper, so it's more textured. That means to get it to flow better on the dry paper you're going to need to most likely make your paint kind of a watery consistency if you're using these brushes this way. So let's try the smaller one. Now you could just kind of flatten your brush out too see what happens if you create flat shape. Okay, let's dip into the orange, let's try some grasses. Oh, I think this will be a great brush for grass. For me personally, I think the smaller size will be more functional, a little more useful than the larger size just for fun. Let'S try bubble shape, let's try the next one, the angular, angular multi-liner brush the difference in this one, as you can see, is that, instead of the two longer bristles coming out on the same plane, they are formed at an angle like this and in the example They do kind of this interesting starting with the longest one in the middle. They create this almost pine tree shape, oh yeah, that could be really useful for Pine boughs and, let's see what happens if we do this kind of motion that works too an up and down motion for grass, maybe or fur, I'm starting to think ahead for fur, Because the example I want to try to paint today is going to be a furry male lion and I'm thinking ahead to all that long fur and the Mane. And when you flatten the brush a little bit more, you can get more density and it can soften it out a little bit. That looks like fur to me. I'M excited about these angular multiliner brushes the next one's. Also, an angular multi-liner brush this one's a little larger. Let'S try to make our marks again based on planning ahead for painting for something animal-like. Now, if I use less pressure on the brush, I really like how that looks. You end up with this softer more Whimsical. Look with the brush Strokes versus kind of this. You know pressing down hard you're going to just get more clunky looking marks so oftentimes when I'm painting fur texture. I use very, very light pressure, but I like how you can kind of cover along a big distance. All at once with this brush and then next we have the Dabber brushes start with our smallest one here so check out the bristles on that they're very short and Stumpy, and I think that'll be very useful for fur texture. Let'S use a animal color. One of my favorite colors burnt sienna here and let's try it just with a dabbing motion. Oh I like this one and then, if you pull sideways, oh these are great brushes, so thinking mostly about animal painting, because that's what I do a lot of I'm finding! This Dabber brush has a lot of potential. Oh yes, this might be my new go-to brush for fur. We'Ll have to see look at all that scrumptious fuzzy texture. Let'S try this one, the next one's a bit larger. This is a size eight, and this is interesting. It has kind of this almost this hollowed out center part of the brush, so wetting the brush. First, I like to do that just so that it's ready to handle the paint. Oh yeah, see how it makes these Circle shapes. I could totally see this for fish scales, especially if you like to do design work and then, when you flatten the brush or hold it up more of a 45 degree angle, then you're really just accessing the side of the bristles one side at a time and Getting the same effect as you got with this other Dabber brush, but goodness how fun is that? So if you make more marks more densely, you get the look of this stubbly dotted fur, that's really cool all right and then the last Dapper brush also has this kind of hollowed out Center. But it's slightly smaller than the number eight and I need to make a little bit of room on the other side here for my dagger brush. But since I feel like the Dabber, brushes are all really similar, just different sizes, we'll just kind of try it out over here again, you can make that circular shape if you just go straight up and down and then, if you're utilizing more of the soft side Of the brush you'll get plenty of that lovely stubbly, fur, texture or grass. This is great for foliage too. These smaller brushes are going to be super useful. Then my last one is the dagger brush. It'S a small dagger, a lot of Botanical artists, love to use these for leaf shapes and petal shapes. Let'S try that you can tell Botanicals are my area of expertise. I don't know what I'm doing with the dagger brush. I'Ll be honest: let's try this again loosen up that paint just trying to paint this ubiquitous little plant shape, not bad, and I like that you can use the tip of it for smaller things like stems, that looks really pretty depends on how how delicate you are With a brush to get that fine tip there or if you want to flatten the brush out for larger, leaves: oh that's a great brush. Okay, so we've officially tested out all 10 of our brushes. Let'S use these in an actual painting. I began with a sketch on my Academy, watercolor paper pad. This is ba Hong paper, it's cold pressed paper and, although I'll be using the special effects brushes throughout the painting, my main brush for the project is my regular silver black velvet size 8 Round brush. I use clean water to paint over the background working just in the top left corner and dropping in some turquoise blue for some suggestions of sky and then adding in some hookers green. Now, the first time I used one of these special effects brushes, I loaded up with green paint and I'm trying to pull some of that paint towards the main. I want to create the look of white Mane, Hair overlapping the background, but keeping it super soft and fuzzy almost a completely lost Edge, in fact, and the brush worked pretty well for that. I then switched to one of the Dabber brushes. I think this is the medium sized Dabber brush and again loaded up with paint making sure it's damp before using it, so that it flows smoother Across The Damp surface. And then I use this to pull some color in towards the nose again creating the look of white fur overlapping. The darker background, the Dabber brush, worked amazing for this. This is the larger Dabber brush which I'll use. Next, I start by loading up the right hand, corner with dark paint using my size, 8 Round brush and then using that Dabber brush again to pull the wet paint in towards the lion. Once again, you can see how easily and quickly and almost effortlessly it creates the look of white fur or lighter colored for overlapping a dark background, and it's so soft, it's not at all ragged or chunky. Looking it definitely looks like soft fur, so I did discover throughout the course of this painting that the Dabber brushes were my total favorite here. I'M doing that same technique under the chin of the lion, applying dark paint and then using that Dabber brush to pull the wet paint up towards the chin. Really quick. If you're enjoying the process of creating this lion, good news, it is available in real time just head over to watercolormastery.com, where you can become a member. This lion tutorial is just one of an entire catalog of over 200 full-length, real-time narrated tutorials. Each tutorial comes with a reference photo and a traceable line, drawing and a complete list of supplies used in the tutorial I'll leave a link in the description, so you can check that out. Alright, let's get back to the video throughout the process of this painting. I stuck with my silver black velvet size 8 Round brush for most of it here in the center of the face, I'm using clean water to pre-wet the paper so that it'll be ready for some wet on wet effects. Then I take yellow ocher, pretty much pure pigment straight out of the palette and lay that into the wet paper and then right next to that I lay down some ultramarine blue. You can see in the reference photo there's this beautiful play of warm and cool colors. So that's what I'm trying to do with these different color temperatures, if you're confused about how to choose colors for painting something, that's especially in Shadow and you just feel like you don't understand. Warm and cool color temperatures be sure to download my free guide on pet portrait. Colors I'll leave a link in the description for that below. So once I had a good bed of color laid down, I did use my multi-liner brushes quite a bit to produce even more fur texture around the ear, and then I switched to that Dabber brush again. This one is quickly becoming one of my favorites and I think it's going to be a staple when it comes to painting soft fur texture, you can see how well it works just to take that wet paint and pull it out. Just make sure that you're using a light, delicate Feathering motion of the brush not pressing too hard. If you do press hard you're just going to get a darker more solid color here across the top, it had to be really careful to negative paint around some bits of fur that were completely illuminated in the sunlight, while also producing some darker colors around those shapes And the two different brushes, switching back and forth between a multi-liner and a Dabber worked so well for this. Here I used the Dabber brush to apply more dark paint around the ear and again just using a Feathering motion to gently pull it normally. I use my round brushes for all of these effects. I just kind of beat them up by splaying out the bristles and using those for the fur texture, but this is a great way to save your nice brushes and use brushes that were actually designed for creating these different effects. It was such a joy to paint this beautiful backlit lion using all of these different special effects. Brushes they worked so well. I would say the only ones I didn't use, as I predicted were the ribbon brushes and I didn't use the dagger brush at all, but the multiliners and the Dabber brushes were a big win for me. I I hope you enjoyed this little tour of these special effects. Brushes, they sure were fun to use. I enjoyed them a lot and I definitely plan on using quite a few of these in future paintings, particularly for fur and grass check out this next video. All about my favorite brushes for painting fur and I'll see you over there.
Comments
Marika Reimer: Hello Emily, What a wonderful brush review, I don't have these but I think the dabber brush would be my favourite! I love your painting of this wonderful lion, TYFS !
Cynthia Gentry-Brooks: Every time I see one of your newest paintings, I am amazed Emily! I have watched your artistic gift blossom and grow exponentially. I am SO proud of you! Carry on!
Daphne Benjamins: Awesome video, great that you showed us how to test brushes and by doing a painting with the brushes! Thanks!!
Cindy P.: I think the dabber brushes would be a great help for beginners to learn to do fur. I would get those ones for sure. Thank you for sharing this video and information with us.
Miche Daisy: Not sure I like the complexity of these brushes. But I am grateful for your testing them out. I like the simplicity of traditional brushes.
Inger_ music&art: Thanks for reviewing those brushes. Beautiful lion painting ❤
James Art 🖼️ : Your latest work is incredible.
Karen Thomas: Wowzer brushes after my own heart. I have for yrs made my own out of cheaper brushes I can cut up. lol these are awesome. ❤❤❤ Tfs
Phillip stroll: I make my own brushes. My wife doesn't treat her hair or blue dry it, thank God. So when she gets it cut, not her trimmings but actually cut, she'll have them band up the last few inches for me. From which I make all the specialty brushes I could ever need. No way would I spend money on crap like that. With that being said however, glad it's there for those whom would.
Roxanne Rosecrans: Very interesting . Lol I'm still working on my regular watercolor brushes. Great tutorial!!
Yoshi: Beautiful!
Chantellearts: This looks like a really intriguing set, a little bit gimmicky, I'm not sure how much use the average artist would get out of them, but fun nonetheless
Louise Johansson: I really want a dabber brush! The problem is that I can only find it in the set she is trying out. And I rather just by one higher quality brush that I will actually use. Dose anybody know if other brands might call that type of brush something else?
Miche Daisy: And THANK YOU for the watercolor freebies.
Amy P and Dirty too: Hmmmm.... in spontaneous style Chinese brush painting it's all about using the fewest amount of strokes to convey the subject. There is a lot of using other paintbrushes to literally paint different colors onto a larger brush. Maybe they got three colors by painting the third in the middle?
Kissezez: 74.84 in canada for these same brushes. ouch
Deborah Amaral: Those brushes are quite ugly!