Detailed Frontal Installation
- Posted on 27 January, 2023
- Pixie
- By Anonymous
HOW EASY CAN THIS BE? WATCH AND FIND OUT ..........
shop hair and products: www.exquisitesignature.com
THANKS FOR WATCHING, DON'T FORGET TO LIKE, COMMENT And SUBSCRIBEhttps://www.youtube.com/channel/UCrPBQ... for more Videos
Love you guys, till next time, stay fabulous and stay blessed
xoxo
▬▬▬▬▬▬▬▬▬▬▬▬▬▬▬▬▬▬▬▬▬▬▬▬▬▬▬▬▬
.+.+.+.+.+.+.+.+.+.+.+.+.+.+.+.+.+.+.+.+.+.+.+.+.+
▬▬▬▬▬▬▬▬▬▬▬▬▬▬▬▬▬▬▬▬▬▬▬▬▬▬▬▬▬
.+.+.+.+.+.+.+.+.+.+.+.+.+.+.+.+.+.+.+.+.+.+.+.+.+
♡WHEN I AM NOT HERE, I AM HERE
☆ ----- Connect with me ----- ☆
☆彡My Instagram► IAM_ONYINYEOKEKE
▬▬▬▬▬▬▬▬▬▬▬▬▬▬▬▬▬▬▬▬▬▬▬▬▬▬▬▬▬
♡CHECK OUT MY OTHER VIDEOS♡:
HAIR PRODUCTS I USE
HOW I STARTED MY BUSNESS
QUICK AND EASY VERY HAIR UPDO
JHERI CURLl ACTIVATOR ON HAIR ➟➟➟HAIR
SEWIN 101 / FULL SEWIN NO CLOSURE, NO FRONTAL NO LEAVE OUT
EASY LONG DISTRESSED BUTTERFLY LOCS } NEW METHOD | PROTECTIVE STYLE
SEWIN NO CLOSURE NO FRONTAL / VERY DETAIL BRIDAL HAIRSTYLE / FT XPRESSION
NO FRONTAL NO CLOSURE SEWIN WIG
NO FRONTAL NO CLOSURE
SEWIN NO CLOSURE NO FRONTAL PIXIE CUT HAIRSTYLE
How To Marley Twist / How To Make Bouncing Kinky / kinky twist 4 ft Xpression
HOW TO INWARD CORNROW / TIPS AND TRICKS GRIPPING THE ROOT / BEGINNER FRIENDLY
HOW TO CORNROW HAIR STRAIGHT/ SEWIN CORNROW / TIPS AND TRICKS GRIPPING THE ROOT / BEGINNERS FRIENDLY
*NO CLOSURE / NO FRONTAL / BRIADED WIG /
HAIR TRANSFORMATION | GENIE PONYTAIL WITH FRINGE BANG
.▬▬▬▬▬▬▬▬▬▬▬▬▬▬▬▬▬▬▬▬▬▬▬▬▬▬▬▬▬
+.+.+.+.+.+.+.+.+.+.+.+.+.+.+.+.+.+.+.+.+.+.+.+.+
☆ ----- MY FILMING SETUP EQUIPMENT ----- ☆
CAMERA:
HAIR TUTORIAL = CANON 80D
VLOG = CANON M50 + SIGMA 16MM LENS
African fashion
African women's wear
African lifestyle
Women's wear
Nigeria fashion.
For business and branding opportunity: [email protected]
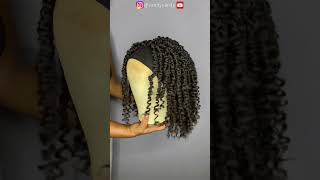
How do you guys remove glue from your client's head as a frontal glue? So for me um, my client right now she has um glue on her hair, so I'm just showing you guys what the glue looks like. So I'm going to use this alcohol and just pray around that place and then use baby wipes to clean that place off just to bring out the glue on her hair. Like so, do to me all right - and next - I'm just going in with this gel to just lay her hair because her front hair, because we are going to be laying another frontal. So I I did like I laid a frontal on her hair. Initially I'll probably leave a picture of what that one looks like, so that was like a side: okay, it's a side party, but it's short, hair, short curly, hair. So right now I'm going to be laying a long, coily, hair and also side parting, so that first one I didn't film it. But this is what I decided to film it just because I noticed so many people. So many of us do not really know how to lay frontal properly, so I'm just going to show you guys how to do that. But right now I'm using like um. It'S not a new lace, I'm just using like an old lace like something that she has laid before, so all the whole process of laying a new lace. I'M going to be doing that in another video for The Next Step, I'm using this stockings cap. First, I'm just laying it like so like I'm wearing her the stock is Cap. You guys already know the stocking scrap metal. That'S what I'm going to be doing today and I noticed that this stock is cup method actually makes the hair like it brings out a different kind of look on a front tile. If you want your frontal to be Flawless and to be giving this, you know this cup kind of look when you're patting the hair or when you patting the lace for you to be giving this um cup. You know scalp kind of look. You have to use stockings cap, so I'm wearing her, the stocking scalp like so and then next, I'm just using this got to be sprayed just spray on around her front line or her front edges or her edges just to lay the the stockings cap. And next I'm using I'm using these scissors to just just open up the ear side like so uh. After doing this side, I'm still going to go ahead to do the other side, the other side of her ear between me and you, I feel a chemistry yeah. I'M still using my hand dryer to dry the spray that I sprayed. Initially, that's the got to be spray and before I move over to the next step, I'm just going to use needle and thread to just sew, the middle part or the middle. The center of the stockings cap with her hair, like I'm, going to sew the stockings cap onto her hair just so that I can cut off or trim off the excess at the back and also trim off the excess. So next I'm using this scissors now to just trim off the excess in front. This part the treatment, I'm just going to make sure that I trim it especially the front part, not the ear side, I'm just going to make sure that I trim it properly like. I trim it very neat because I do not want the lace to start exactly where the starting point of the stockings cup is so I like to take it further a little bit. So what I like to do before I go ahead to install the frontal I like to fit in the hair. First, I'm just fitting it in just to make sure that it fits her hair and before then I already made the wig. So I made the wig myself before she came and also tinted the lace you guys. I know I promise to teach you guys how to tint lace plug lace, so I'm going to be doing that in the subsequent video, so yeah. So I already did that off. Camera so right now, I'm just trying to fit the frontal wig onto her hair just to know if it actually fits her or to know where it starts. That'S where I'm going to be laying the frontal also where I'm going to be applying the glue so moving on I'm using this glue, so this glue is called ghost Bond glue. I think so I like to use both the board hold and this ghost bun this glue is actually underrated. Like I recently I've been looking for the boat hold here in Abuja. I could not find it so. I decided to use this my old ghost Bond and I noticed that it actually holds better, but the both of them are also good. So this is what I use so first, I'm just going to be placing or applying the glue on her head, like so just in dots and after applying or putting it in dirt on her hair. That'S the stocking scalp! I'M just going to go ahead to use um this stuff, I'm just going to spread it using this brush to just spread it like so the back of the brush or the other side of the brush to spread it like so and then, after that, I'm going To use a hand dryer to I'm going to use the hand dryer to make it dry faster. So, while waiting for the front part to dry, I'm just going to use my scissors to just cut off the excess stockist cap at the back of the hair or at the back of her hair, and once I'm done with that, I'm just going to be using My powder to just apply on the front part of our hair, just um the shade of her powder, so just apply it on the front of her hair like so, and I'm using the brush to do that for the application. Once I'm done with the powder, I'm just going to go ahead to apply more glue to her front hair or to the front part of her hair like so and after that, we'll go ahead to stay, Spread, spread it like spread it like. So last reminder I'll still use my hand dryer to just help it dry faster. Like so, and once I'm done with that first application, I will still go ahead to apply more glue um before applying the glue I'll make sure the initial glue turns clear. You know the first application. The main color of the glue is chalk white, so I'm just going to allow it to turn clear. First, like clear white first before I go ahead to apply another glue once the glue is turning into clear white, I'm just going to go ahead to lay the frontal like so or wear her the wig and then laying the hair exactly where I actually apply the Glue like so and after that, we'll see go ahead to apply more glue to the part. Where did not stick well so like that, I'm just going to apply the glue I have to apply. It will spread and then allow it to tone clear white first before I lay down the frontal, so we'll be doing that to all the sides that did not glue all day long. After doing all of that, we just go ahead to use this band, to tie the frontal or to tie her head like so just so that the hair can stick or the frontal can stick wait a little bit um like 15 minutes max. I will just wait for 15 minutes and after that we just go ahead to to untie the band and then start The Styling. So for this styling I'm going to be doing a side part or a c cut by the side. So I'm just going to be laying the baby hairs I'm and I'm going to allow you guys to watch and see what I'm doing as you guys can see. That'S as in the pattern now, as I'm, you know patting the hair, it's actually looking like a scarf. This is because of the stockist cap I used, and the fact that I also use the shade of her powder to you know, touch the or yeah to touch the stockings cap, just so that when I patting the hair or when I'm trying to style the hair, Everything will still be looking like. I was Cap all right at this point, I'm going to allow you guys watch just in case. You have any questions, you can leave it in the comment section below and for the job, I'm using I'm just using Gorilla gel. It'S not Gorilla, Glue, gorilla, gel, that's what I'm using to lay that part. I'M mixing it with got to be gel and I'm mixing the gorilla gel with got to be gel, and I'm also using this brush to style the baby hairs and then for styling. The frontal I'm using shine and jam just a little amount of shine and jam on the hair with the brush and then use my hot comb to just press it down just so that it can lay adults for it to look Flawless as well. So at this point I've said this like how many times I'm just going to allow you guys well just watch, so you learn something. So if you have any question, let me know I'll be doing more of this guys. So if you have any questions, let me know in the comment section below so once I'm done styling, I'm still going to still use the band to tie it down again and allow it for like 15, more minutes again just so that everything will leave very well And you yeah yeah here is what it looks like um. Thank you so much for watching. So for the back of our hair. I didn't do much. I just used water and conditioner, like leave-in conditioner I put in living container leave-in conditioner inside a spray bottle and spray around the back hair and then use my hands to just unravel and also, like you know, just unravel the hair uh yeah. I also like make the coils pop all right. This is what the back hair looks like see, how fine it is it's so fine, and this is what the front looks like. Thank you so so much for watching the video. I hope you enjoyed hope you're able to learn something, and this is one of the trendy Styles right now so yeah um, please do not forget to share the video leave a comment in the comment section below subscribe to the channel. You guys uh yeah I'll talk to you guys in my next video Stay Blessed bye,


Comments
Learn Chinese with Tyler: This video was so helpful. Thanks for sharing ☺️
Olufunke Oshakuade: The glue is touching the hair