Diy I-Tip Extension | Microlinks Install On Short Hair
- Posted on 30 July, 2022
- Pixie
- By Anonymous
SUBSCRIBE: https://goo.gl/nYhZbg
DIY I-Tip Extension | Microlinks Install on Short Hair
PRODUCTS USED:
DIY I-tips I used 1 bundle
All tools are from Glamorhair.co.za
Perfect Touch Heat Defence
Perfect Touch ultimate hold spray
FILMING TOOLS:
Ringlight - Neewer
Camera - Canon T6i/750D
Lens - Canon 50mm f/1.8 STM, ‘Nifty Fifty’
Editing - Adobe Primere pro cc
I want to also say that I’m happy to have you apart of my family, you guys make me so happy! You encourage me everyday to do me and keep doing what I love,
Thank you
B U I S N E S S E N Q U I R I E S
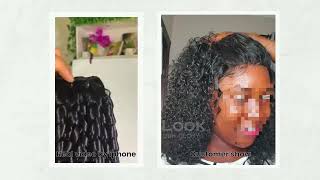
Hi guys welcome back to my channel i'm back with another video and in today's video i'm going to be doing my hair, so today we're doing something a little bit different. I am going to be installing some extensions on my hair. I have this carotene extensions. My crawlings eye tips that i made myself and they look like these and i used 20 inches bundles. I always have like hair lying around and i always try to find ways to reuse the bundles that i have, if they're still in good condition. So i find that it's easy for me to make them, and it doesn't even take me long like to make this probably took me about two three hours and i'm just chilling at home, and all you need to make this uh. You need some keratin bonds or pallets, which looks like so you just melt it onto your straightener and i use like the dark brown ones. Last time i did this kind of extensions. I did the fusion version where you melt the eye tip which looks like this. So you melt this onto your hair, but this time i'm going to do like a micro link, so micro link is when you use this kind of beads. So these are the ones that i see a lot of people using these are the most popular ones. They'Re, like the silicon lined beads, the ones that i'm going to use are the cylinder ones, which also looks like this, so these ones are a little bit longer, which covers most of the eye tip find that these ones are more comfortable, especially if you have fine Hair, like me, this can be a little bit irritating because they're like a little bit bulky where else these ones are not as bulky and they're light, and they also come in different colors depending on your hair color. So i just buy the black one and with this kind of extensions installed on your hair, you can wash your hair. You can color your hair. I think i even touch up my relax side. One point because i did have a live out, so you can do like everything. This is kind of like your hair. In a way i just wanted to take a break from like protective hairstyles, so for the ones that i'm going to be doing today. I'M going to need a eye tip which are extensions, i'm going to use some cylinders and some hair pliers you're also going to need like a looping tool. I like using a small crochet. So first i'm going to section my middle part and now i'm gon na do my size here and the trick that i learned is to take your comb and put it on your leave out to see. If it's still visible, then your extensions will probably show so. I'M gon na take another like centimeter and then put my comb, so this this is better. Now, it's not really like that visible. So here's all my leave-outs. Let me show you the back. This is the bag. I have the back left out here and the sides as well, so i'm gon na go ahead and start at the back. My filming space here is a little bit limited, so i can't really do the back and be able to see it. So i'm gon na do the back i'll, keep updating you guys until i get to the front and you guys can actually see exactly what i'm doing, but for the big i'm just gon na. Do it um sitting in a different location. So here's the first row done. I did, i think five. So as you can see, they are really really light and comfortable. I can put them up. I can put them down like they're so light. I can't even like fill them, but this is done and they are super secure, like they're not going anywhere. So i just finished row number three, and this is how they are looking so far. They are starting to get a little bit full, which is what i want. So that's row number three done, so this is how it's currently looking at roll number five. So now i just finished row number ten, and this is how far i am. This is how it's looking i'm like almost done, so this is how much is left to install, so i'm gon na show you guys how i've been installing them with this hair. So first i'm just gon na a piece like this much like so and then take my looping tool, which is this small crochet and a cylinder and put it through in here and then latch the hair and then close. It pull it through the cylinder and now that we have my hair inside the cylinder, i'm going to take a piece of extension here and then put it inside the cylinder like. So this is another thing that you also have to bear in mind if you're, making your own make sure they can fit in your cylinders or your beads or whatever that you're using to attach and then making sure that the extension is not exposed in the front. Here of the cylinder just for comfortable reason, because it can get like really irritating. So i'm gon na take my pliers and then start closing the cylinder and you just like pinch it together with your pliers, and i also like to use the flat side of the plier just to make it extra flat. So, and that is done so again. Taking my little crochet, attaching it and then pulling through my hair through the cylinder and then take a piece of extension, put it in like so making sure i have enough space of my natural hair just so that the extension can be comfortable and then close. The cylinder and then also making sure that the extension piece is not exposed on the roots here, because it can get really uncomfortable and then turn my pliers and just press it together. Just so that it can lay as flat as possible. And, as you can see, you can move it any direction, so this makes it easy to do whatever style. You want so again, taking my um crochet with the cylinder inside close. It pull it through, like so making sure i have enough space for it to move around and then take a piece of extension here, put it inside the cylinder and then take my pliers and close it and then turn my pliers again to the flat side. Yes, to make it super flat, and that is so - i'm just gon na continue finishing all this um hmm, so i am done now they're all done. I have enough leave out to still be able to cover my extensions, so i'm just gon na take everything down. So i can start straightening my hair, so i'm done straightening all the hair and, as you can see, you can't really see the extensions i mean. I can feel them a little bit when i touch through my hair, but you can't really see them and the leave out is covering everything i want to mostly wear my hair, like this, like behind the ears, but also with a little bit of length. So i'm just gon na separate this into two and i'm putting on some rubber bands just to guide me on the haircut and i'm just gon na. Take my scissors and start cutting and to make it less blunt and to kind of like feather it. I'M gon na use this razor comb. I got this from this cam. Hmm, you so here's the ponytail check. So this is how my extensions are looking as you guys can see. They look really really good. They look natural, i mean like the hair and the extensions are not really like the same texture, but they do blend quite well, which is what i love about this hairs and i just added some loose curls, which is going to be a separate video. It'S going to be a video after this one, so yeah. This is how they're, looking i'm just going to show you the bag. So you can get extensions like this. Even if you have thin short hair, you just have to know how to do your hair and know how to blend your hair with extensions. So i just try to blend my hair with my extensions, and i think i did a pretty good job. So i hope you guys enjoyed this video and if you did don't forget to thumbs up subscribe to my channel, if you haven't already and i'll see you guys on the next one bye
Comments
Nancy Purter: I really really enjoy watching your videos. You make it look so easy ❤
Lebogang L: Your hairstyle ideas are always on point
Kearabetswe Makwane: You’re the queen of all hairstyles!!!!
La_dweng: THE OUTCOME WAS BEAUTIFUL
Sandra Phongo: You are very talented ❤️