Beautiful Quick And Easy Little Girl Hairstyle | 4C Hair Type
- Posted on 18 February, 2023
- Ponytail Hairstyles
- By Anonymous
Hi lovely people, Welcome to my channel.
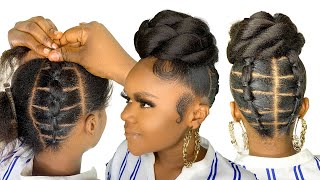
I did this beautiful hairstyle for my 6 year old daughter and she loved it.
Items used:
Quick Afro Pony puff
Shine and Jam
Eco Styler Gel
colourful rubber bands
ORS olive oil sheen spray
scrunchies
Rat tail parting comb
edge brush
Hair Moisturizer
Thank you for watching ❣️
Please subscribe, like, share and comment.
Music: Rainy Day
Musician: EnjoyMusic
Music: Yugen
Musician: Jeff Kaale
Hey Beautiful People welcome back to my channel, so here is my beautiful daughter, Madeline. You can call her majua and she's six years old. She loves her hairstyle. I just did this for her and look at her giving you a 360 view of the hairstyle and um. She loves it and this was a very simple hairstyle, so without further talking. Let me show you how I did that for her. So I got this afro quick, afropony Puffs from the beauty supply store. It comes in two in one and then you would need your shine and jam some colorful rubber band, some Echo Styler gel some comb and brush to clean out your parts, and that has saying hi to you all, and so here I was trying to blow dry. Her hair, as you can see her hair, is a 4C thicker, and so I was trying to blow dry, but she didn't like it. It didn't go well for me, so I stopped I moisturized the hair and I am dividing the hair into four so from front to back and ear to ear honestly doing. Madeline'S hair is a bit of a struggle because her hair is a 4C hair and thick. It'S hard for me to do it it's hard on hair and it's hard for me as well, but I have to do it regardless, because her hair need to look good and so yeah as much as we both don't like doing the hair. We still have to do it, and so here I'm trying to get the parts clean, so I divided it from front to back and then from ear to ear, and so that's what I'm trying to do. I am getting the parts clean. Okay, so once I'm able to divide it into four, I will use some scrunchies to hold them in place, and so, as you can see, I've divided it into four and yeah, as you can see clearly from the video I've divided it into four and then I'll Be working in sections, so I take one part of their hair and then I would divide that into two and that would be from the crown of her head to the front so towards her eyebrow. That'S what I would say the arch of her eyebrow I'll divide. It that way, it gives me some kind of a triangle pattern for all of the hair. If that makes sense, this is how I am trying to explain that and then I will clean that part with some shine and jam and make sure that the parts are clean and crisp. Thank you, okay. So once I'm able to get my parts clean, I will take one part of what I've divided into two and then with each part. I would divide it into three, so I would then take my first part. As you can see, I will clean that up as well make sure that it's looking good and then I would divide that part into three going upwards. Okay. So once I have my three parts for that section, I would comb it through, especially on the roots and then I'll clean it up with some shine and jam and some gel and then with the rubber bands. I will secure that into place, so she chose pink rubber bands, so you can use any color that your child wants and then I would secure it into place and make sure that it's not too tight, because sometimes rubber band can be tight, make sure it's not Too tight on the child's hair and then I will then take the remaining part of the hanging hair and twist that so, as you can see, I am just making a simple twist and then once I have that I would take it add it to the second Part and then secure that with a rubber band as well so I'll comb that second part make sure that it's um, not lumpy or it's um together and then, as you can see, I've added that to the second parthen, and I have Twisted that as well. Now I am adding that to the third row and then I will secure that with my rubber bands as well. Okay, so, as you can see, it's going upwards that way, it gave me that triangle shape so three pattern in each row and that's what I'm gon na do for all the hairstyle and that's you can see. I have completed that. I have to do most of them off camera and then I'll put that in a ponytail, the remaining of the hair at the crown and then secure it with a scrunchie and then once I am done with that, I will go in with the quick Pony afro Pop and this comes two in one in a pack, but I'm only using one if your child has lots of hair, you don't need to add this. You can just let the child's hair show just fluff it up and let it show, but with Madeline she doesn't have that length. So I decided to add this afro pop to elevate the style, and so this comes with a strange in the middle of it which you can pull and tie, and then it also comes with some um pins that you can secure under the hair. So that is what I'm trying to do, I'm trying to get it into place. So what I do is I secure it with that PIN and then I will pull the strange it wasn't hating. You have to ask your child. If it's heated, then you have to take it easy, but I actually it was okay, it was. I was securing it to the hair and not on his scalp, so she didn't feel it and yeah. That'S it just look at it. It'S all done once I secure it. It'S all done. You could keep this hair on for like two to three weeks, depending on how your child's keeps their hair. You know how children can be sometimes yeah, so that was it and she enjoyed it. She looked very beautiful and she really enjoyed the style and then once that is done, I wanted to add some shine to it. So I use this ORS machine spray. I sprayed a little bit on the hair to give it shine and it was popping, I hope, you'll be trying this on your little girl too, and let me know how it went. Thank you so much for watching this video and see you in our next one. Bye for now thank you.
Comments
Genevieve Ofori: Beautiful niece ❤
Akua Amrado: Beautiful . Sorry Maadwoa could feel your pain but mummy made you look good