Wig Install: 90'S Inspired Half Up Half Down Tutorial Ft Klaiyi Hair | @Beautyrebellion
- Posted on 03 March, 2023
- Ponytail Hairstyles
- By Anonymous
Get 26% off Use Special Code: MY26
●▬▬▬▬▬▬▬▬▬♛#KlaiyiHair♛ ▬▬▬▬▬▬▬▬▬●
Direct Hair Link:➤https://st.klaiyihair.com/f7gvq
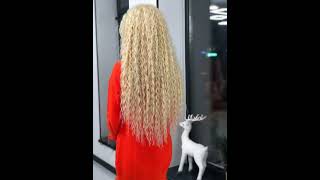
Hair Info:13*4lace front wig, Jerry curly, 24inch, 180%denisty, auburn color
Official Website:➤https://st.klaiyihair.com/f7h01
Best Sellers:➤https://st.klaiyihair.com/f7gvv
Affordable Natural Density Lace Wigs:➤https://st.klaiyihair.com/f7gvu
Aliexpress Klaiyi Hair Store:➤https://s.click.aliexpress.com/e/_opNA...
Amazon Klaiyi Hair Store:➤https://amzn.to/3OLRlhL
YouTube "Klaiyi Hair": http://bit.ly/2zpjQhu
TikTok"@klaiyi hair": https://www.tiktok.com/@klaiyihair
Instagram "@Klaiyihair_no1": https://www.instagram.com/klaiyihair_n...
Facebook "@NO1KLAIYIHAIR": https://www.facebook.com/NO1KLAIYIHAIR...
Contact for Wholesale: +8618337492297 Email: [email protected]
#klaiyiwig #lacefrontwig
Makeup welcome back to my channel if you're new here my name is: I go by Beauty rebellion and, if you're not new, welcome back Rubble. Today'S video is going to be a tutorial on how I achieved this really cute 90s. Inspired claw clip hairstyle shout out to clay hair company for sending me this wig. This is the box that my wig came in. The Hair Company always sends me like really good quality, wigs, so shout out to them. I love how this wig came out. If you guys like the way, it looks too just keep on watching for the tutorial all right guys, so the wig that they sent me is the 24 inch auburn color, Jerry, curly frontal wig. The frontal parting space on this wig is 13 by four, and the wig is 180 density. It comes with a removable elastic band, as you can see, I already went ahead and prepped the frontal pluck the knots and everything I'm just going to go ahead nail and try the wig on and make sure that it fits perfectly. So one thing I will say is that the adjustable band that they are putting on these wigs now I kind of don't like the way it fits like. It doesn't go behind my ear and it makes the wig lay a little funny and it kind of hurts when I sleep with it on so I'm just going to go ahead and take that off and there are two little Clips in the back of the wig. I just like to attach these together and that acts as my elastic band - and I don't know it just feels a lot more secure. I'M gon na go ahead and cut the lace off of the wig on the back and the front of the wig something so once I'm done, cutting the lace off of the wig. I'M going to go ahead with my ebben lace, tint spray in the color dark brown, and I'm just going to go ahead and spray this all over my lace. This is going to ensure that once I put the lace down, it's not too light for my skin. It kind of like just Blends in with my skin complexion now that I know exactly where I want my wig to lay down at I'm, going to go ahead and use my ebben lace, bonding spray and I'm going to spray that around the perimeter of the front Of my wig and then I'm going to take a comb and just like press the product in until I feel like it's kind of melted and then I'm going to take my blow dryer and then make sure that it's completely dry with that ha. Thank you. Foreign. Now that the lace is somewhat intact, I'm gon na go ahead and start this styling process. This style is a little complicated, but we're gon na we're gon na try to achieve it right. So first I start off by parting, my hair directly in the center of my head and I'm just taking my hot comb and just making sure that part is defined, making the sides of the hair a little bit flatter. Once the front of the hair is pretty flat, we're going to go ahead and section off the front part of our hair, which will be like the Sleek ponytail to the back. So I'm just sectioning that off doing a big braid here and then I'm going to do the same thing to the other side, foreign foreign. This hairstyle you're going to need at least two scrunchy and I'm going ahead and sectioning off the middle part, because there is going to be like a ponytail in the center of our head. So I'm just going ahead and sectioning that off and honestly guys moose is gon na, be our best friend for this hairstyle I'm going ahead with my mousse and covering that ponytail part that part we sectioned off for the ponytail completely with the mousse and just sleeking. It back into a pony later on in the video I did end up doing this ponytail over, but as long as it is out of the way of the front sections and the back section of our hair, we're good. I'M gon na go ahead and take those braids out of the front section nail, so we can start styling um before we start the ponytails just to make it easier and get it out of the way I'm gon na go ahead and create those baby hairs. So, just taking out four little sections of hair, you know on the front on the side near the ear Tab and you know on the front of the other side and the other side of the ear tab. If you see my lace lifting up on my right side of my hair, don't worry. I am going to fix that later on in the video but yeah once those sections are sectioned off, I'm taking my hot comb, just pressing it and then we're gon na cut them and curl it and lay those baby hairs down. Thank you. Thank you. Thank you. Now that those baby hairs are done, I'm going ahead and tying down my elastic band just to make sure that those baby hairs really just like settle in and the lace that was lifted on the other side, just text down a little bit more now, I'm going In with the sections I'm taking my mousse again and I'm sleeking down the sides and then we're going to create that ponytail in the back just to ensure that that ponytail, that we're creating is super super Sleek. I'M going in with my ebb and spray again. The stronghold and I'm just spraying, that on the hair on the front sections and taking a hard brush and just sleeking it straight to the back, thank you just to make sure none of that other hair accidentally gets in our ponytail. I just clip that out of the way - and I'm going to take that second scrunchie and take the two sections that were in the front and just sleep there straight in the back and make it into a ponytail. Basically, you're going to make the ponytail like go behind the wig like underneath the wig. I should say thank you and honestly guys once that's done. It looks super cute already like it really does, but I want the curls to be a lot more defined, so I'm taking my mousse and I'm just adding that all over the hair and as you can see here, the ponytail that we did earlier in the middle Of our head is a little loose, so I am going to redo that ponytail after we Define our curls. I'Ve literally been seeing this hairstyle all over Tick, Tock all over Instagram and YouTube for like the last year - and I did try out this hairstyle before. But I never filmed it for you guys. So I said why not let me just film it today with the curly hair and I really really think that the curly hair with this hairstyle looks a lot better like I did it before, with straight hair and with body wave hair. But I think the curly hair really really just makes it. It gives it that more dramatic. Look that I'm basically looking for foreign. Thank you all right guys. So this is pretty much the finished look. I am obsessed like when I say obsessed. I am obsessed. I actually did this hairstyle a few months back in November for a photo shoot and I absolutely loved it, but I did it with straight hair, so it didn't come out the same. It was cute, but it wasn't like this like this. You know this looks really really really bomb, so shout out again shout out to clay hair company for sending me this wig. If you're interested in purchasing and trying out this look yourself, I will leave all the details to Claudia hair company's wig website, as well as the links to this wig down below my description box. Thank you guys so much for watching make sure to give me a thumbs up. Leave me some feedback Down Below. In my comment section and I'll see you guys in my next video bye, guys
Comments
Blair Lashea: I love, love, love❣️