How To 2022 Copper Hair Trend Balayage Using A Cooboard
Using colouring board @Coo board to create a 2022 copper hair TREND colour balayage ribbon highlight result
Join this channel to get access to perks:
https://www.youtube.com/channel/UCYL1K...
Hey everyone, thank you so much for joining me on this online HAIR education journey. I bring you two videos a week about all things HAIR. Thank you for all the support and love shown I truley appreciate it!!
HAIR MUST HAVES
Coloured hair -- https://amzn.to/3GPghAV
Damaged hair -- https://amzn.to/35dq6Ll
Flat hair -- https://amzn.to/33C4CXS
Dry hair -- https://amzn.to/3IsZjsS
If you would like to support my channel you can buy me a coffee
https://www.buymeacoffee.com/paulwatts...
This gives me the ability to stay awake longer making more content for you to enjoy. On a serious note, it gives me the cost of your coffee, allowing me to keep making content for you all to enjoy.
*My Salons*
www.paulwattshairdressing.co.uk
*The Products i use in all my videos*
*PWH Clothing *
https://www.merch1st.com/shop/pwh
*FREE Editing Software I use*
Vidiq code - http://www.vidiq.com/paulwattshair
*My Filming Set Up*
Camera - https://amzn.to/2R7X5H6
DJI Osmo Pocket - https://amzn.to/34bA9fq
Vlogging Lens - https://amzn.to/348lLnY
Joby Tripod - https://amzn.to/2wdeNBH
Studio Tripod - https://amzn.to/2X6hRue
Micro Mic - https://amzn.to/2wdqmZv
Studio Mic - https://amzn.to/32IH1Rz
Wireless Mic - https://amzn.to/3v2N7YW
Ring Light - https://amzn.to/3dRJzRv
Studio Lighting - https://amzn.to/34e2t0G
*get 25% off your first track from Lickd https://lickd.co/r/paulwattshair
*Follow on Instagram*
http://www.instagram.com/paulwattshair...
http://www.instagram.com/paulwatts.lif...
Business contact: [email protected]
Post to: Paul Watts Hair, 7 Market Place, Kettering, Northamptonshire, NN16 0AL
Music: @epidemicsounds & @lickd
Get Every Single Time by Bissett here https://t.lickd.co/E1ojEdLRQ5R
License ID: pv87N9y35Yn
Get this and other songs for your next YouTube video at https://lickd.co
DISCLAIMER: All opinions in our videos are our own. This description contains affiliate links. This means that if you click on one of the item links above, we will receive a small commission at no cost to you. This commission helps support and grow the channel and allows us to continue to produce videos. Thank you for the support, we really appreciate it.
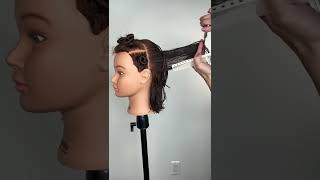
In here back home in here back home in here back home, hey everyone welcome back to the channel very much for being here. If you are new hit the subscribe button, give it a thumbs up, don't forget to comment down below what you think about this video. Today'S video is going to be a color technique, i'm going to be using a coo board. What a keyboard is? It'S a big balayage board. You can see how wide it is. It'S nearly as big as my head and it's got these little teeth at the top. Just to secure the back comb away from sort of seeping in and you sort of mistakenly coloring that part we're also going to be using a wireless park, sort of dressing comb. But it's great for backcombing, and i'm going to show you today that, when we're backcombing when it comes to color, we want to be backcombing differently to when we want to be back combing, we want to be putting hair up. So all i'm going to do is like three passes and it's really easy to detangle at the basin, because that one thing that people often get scared about. It'S like, oh, my god, i'm back combing. All of this, like that to create diffusion at the root, which is why we're back combing and then, when it comes to the basin, it's like loads of conditioner loads of spray, trying to get it all the all this out and it's creating loads of stress and And pain and everything for your clients sitting in the back wash so i'm gon na be doing that today. We'Re gon na be working with this mannequin head here. It is a warmer level sort of eight i'm going for more, like a copper sort of feel. It'S a really seventies, inspired color somebody's gon na be massive right. Now, i'm off to italy very, very soon to do a distinguished 70s show with the italian joyco art team. Uh alberto is heading it up and i'm going to be there with david murray, i'm going to do the color dave's going to be doing the cuts and yeah. So this is just going to be a little bit of a inspo session video for you to see what i'm getting up to in italy. This might be put up before might be put up after, but one thing i'm going to tell you is i'm going to be vlogging a lot more? I want to try and get a lot more videos up on this channel. So if you want to see me my day-to-day or vlogs or travel vlogs working away, let me know in the comments down below or any video ideas comments down below, because i'd love to see it and i'd love to start creating more videos and more content that You guys are really interested in now before we get into it. I'M just going to show you my new setup. This is a whole new software that i'm running on to to bring in this video today. I'Ve i'm waiting for one more camera above me, which is going to give us the the top down view of the heads what i'm going to be working on in the future. But if we just take a look at this here, so we've got a camera angle. Here and it's going to be looking at the sort of side angle or whenever i need to show you this side and then, if we jump to here here is another camera and it's going to be showing you this side. So when it comes to, let's jump back to there when it comes to leveling up like these uh videos and my lives, we're gon na be bringing back the lives as well very soon. So when it comes to all of this, i'm gon na be leveling up completely and we're gon na have an extra camera. Above so i'll show you the top sections. I can show you how i'm applying color a bit better, so yeah be sure to hit the subscribe button if you're new, because i've got so much stuff. That'S gon na be coming invested, a lot in all of this kit, all my lighting and everything so um yeah, let's get into the video. I hope you're gon na, enjoy this one again gon na be using the keyboard gon na be using this comb. I'M gon na be creating a really soft dimensional color melt, that's warm coppers and all that sort of thing so yeah, let's get into the video. So what we're going to start with is a simple hot cross, bun section in pattern, so you can see. Just comes down from the high point head to just behind the ear and then central back section as well through there just gives us a nice quadrant to work from. So when it comes to what we're going to be working from today. Is it's going to be something really quick, something really uh efficient? You can work in the salon, so i'm not using foils, because i want to get lots of sort of an air lift i'm using joyco blonde life and i am using 30 volts. I want to power through that lift. Now what i want to do is i'm just going to work diagonal back sections all the way through the sides and i'm going to work diagonal forward sections all the way through the back just so they sort of link up and then what we're gon na do Is just so you can see so there's the sectioning pattern there diagonal back and then all i'm gon na do ribbon pieces. So two ribbon pieces there and then that piece which is left out and then i'll come closer. So you can see the backcomb. All i'm going to do is three. So in here back comb in here back home in here back home, three we've just got some soft backcomb in there i'm going to get the keyboard and then what we're going to do is going to put it into the hair there and then sort of backcomb. Again and then what that gives us is, it takes i'll, show you again in there and it keeps that back comb away from where we're going to be coloring. I also want to say thanks to the guys at color track for sending me load of brushes and then we're just going to start on the middle on the sort of mid lamps and ends and then, when i've got all my saturation. What i want i'm just going to start blending through up into that root area. It'S just going to give us really soft hand-painted ribbon highlights so as we're coming up we're just stroking softer onto that hair, so through mid-lengths and ends. We want full saturation through there and then, when we come up through here, i'm just blending with my brush up into create these points of light up into there and then that saturation through there take out that through there, then let that hair just fall off next Section again we're going to go an inch up, and i don't mind if hair sort of touches on this, because i want there to be dimension in the hair. I think it gives it that little bit more little sort of specks or fits like that. So here we are just get that section through and go in there back comb, one two three and then, if we're thinking, oh, i need to get some of that out one two and three and it is out. So that's how easy the backcomb is to get out so in here into the root into the root into the root. All of that uh. What'S the word, i'm looking for can't think of the word softness it's going to give us dot diffusion! That'S the word! I'M looking for again keyboard in and i haven't weaved this one. This is going to give us a bit more color, so in there push up into that root area and then we're going to just saturate those mids and ends through there, and we know we're going to get diffusion because we've got all that back comb. So all i'm going to do make sure i've got saturation mid-lengths and ends, because that is where we want all of that lift to be. But we don't want to under-saturate through the blend because we'll end up getting yellow and orange patches. We still want there to be enough product on the hair to give it lift, so you can see i'm just creating a blend not as hard as when i did my weave, because i don't want to be quite chunky up here. I want there to be a lot of color through my lips and then through this, but i still want there to be lift through there now peel away and just let it fall away and that's what we're going to do all the way through the head. So next section again falls on that hairline by an inch and then what we're going to get now is when we come to weaving we can determine or place. If we want to be getting a piece near that hairline or we we want to sort of not do a money piece, we want to come away from it, but i want there to be a bit of lightness around the face. So i'm going to go and weave a piece through there, a bit in the middle and a bit on the end, and i'm just going to let that drop down. I'M then going to one two three into that route: get my keyboard in push to that root, and the thing i like about having the lightener already on the board. Is we get the underneath saturation as well, but also just gets it to stick again saturation middle ups and ends and we're going to go higher with this one? And we know i've already got a blend because we've got the back comb. So, no matter if we just left a bit sort of a bit heavier in there, that backcomb is going to blend all of that, but we still want to make sure we're getting a blend. So just flicking up into that area making sure we're getting the saturation. We need through there bend it away and just pull away, so it sits softly through there last should this last section another inch back and it gives us another. This is the penultimate section so through there. So again we're going to do a full section here. So there one two three with no weave in push onto there. We'Ve already got the lightning on the board and i'll just drop it down, so you can see, but this is where the top camera is going to come in so handy and it's just been delivered today, so get ready for what is to come with these videos And remember saturation through here and then we're just flicking up into here. So we've got a mix between ribbon, highlights balayage ombre and we're just creating vibrancy through the hair. Basically, so when clients come in and they're sort of saying, i don't know if it's balayage or highlights, or what we're doing right now with color is basically just creating bespoke, looks on pretty much every single client. We do because there's a bit of balayage there's a bit of foiling there's a bit of ombre, and this is what we do so flicking out with that root pulling away and then just letting that sit over there just remove some of those brush marks there. We go last section. This is going to be a weave, so we're going to weave weave weave, sits over the top there. One two three in there sit in the hair on top saturation with lips and ends, and this is basically all i'm going to do all the way through the hair. So if you want to see these sort of quicker videos where i'll be doing these um and then just doing a piece and then i'll sort of fast forward through the rest, but the placement is going to be exactly the same. So we're going to go up in an inch we're going to backcomb a weave section and then we're going to backcomb a full section, and then that is how it's going to work throughout the whole of this head. And then you just take that comb off. Let that hair fall through there, and that is that side done. So when it comes to something really simple like this, we're just going to be working from the front diagonal back the back diagonal forward and then they're just going to sort of come in and blend in together, because those lines are going to be. But where we've got the back cone for diffusion, we've got the weaves for sort of subtleness, but then we've got the bigger pieces for like impact of color, because what i want this to be, i'm going to tone this with like a well actually you'll, see it In the video make sure you stick around because i'll get all of this done and then you can join me at the final result to the last couple of sections. We'Ve worked all the way around, so you can see. There'S two weaves there. Now we've got this section, so in one two: three i want to try around here then i'll get the board secure, saturate those ends and then just melt up into that root area. Remember stuff, keep it saturated because you need to get that lift. Don'T like a band of warmth through here, but you just want a nice soft blend and the backcombs are going to give that as well and then saturation all through there flick off there final section gon na weave, weave and weave these little highlights on the top One two three quite fine through there and we've got these really nice little highlights on the top they're gon na be beautifully diffused because of the back comb and the way we're applying. So that's my mannequin done for the pro for the application i'm going to process it, bring it back to you all, toned all styled beautifully. Let me know what you think about the result, and here we are guys here is the finished result. All toned, dried and styled have a look at the side view you can see all of those beautiful tones that are all running through there and yeah. So this was basically that technique that i did with you, which was the cool board, and it was like some weaves back comb, some slices back home to create all of that dimension that you see there. So you can see all the colors all running through and then what the toner was was 7 cc and 10 ng in lumishine, with 10 volt and so i'll just put that all over and then let it develop for 30 minutes and we're left with this result And i think it's stunning like really soft but subtle, but really sort of bang on trend for what what's happening right now and you can just see all of that color and it's just it just looks really natural. But it's just a really cool technique to do and uh yeah we'll drink to the styling, so nice high quiff over and then just all that dishevelment shows off all the time. So i hope you really enjoyed the video. If you have. Let me know in the comments down below and i'll be sure to be bringing you a lot more color videos very, very soon hope you enjoyed the video be sure to hit the subscribe button. If you are new comment down below what you want to see next and then hit the thumbs up, because it helps me immensely when it comes to the algorithm so yeah take care, see you in the next video. Thank you so much see you soon.

Comments
ST MARK: I wish you showed the finished result WITHOUT curling or waving it. Also, a close up of the hair would have been nice.
Suzanne Watts: Wow, the new system is great Paul. Hair fab as usual. Fabulous hairdresser. Xx
Sandy Lee: Hair magic in progress thank you. I envy your skill and talent. i'm lucky to be able to just comb my hair and make it look decent. LOL
Angela: Lovely as usual .would love to see live models too❤️
Jessica Watson: Ești un idol CUMPUSSYY.Uno mereu în inima mea frumos, dragoste, alegere, cultural. Sunt unul dintreb cele mai bune concerte....
Maysa Haj:
Vladimir Fv: La mejor parte es ver a KISSSSSS.Uno se da cuenta de lo locoi que es el fandom real.
Ka M: You have balayage the color rubio , Blondie?