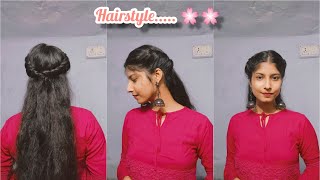
Gaunde Meori Iyonghae Boseyo~Yebbeunmoyang Mandeul Su Isseoyo /Updo
- Posted on 20 October, 2022
- Updos
- By Anonymous
안녕하세요 머리하는 숑이 입니다
오늘도 쉽고 예쁜 방법으로 셀프헤어 해봤어요
머리하기전
고데기 말고 시작해 주세요
펌한 머리는 생략 하셔도 되고요
잔머리 많은 분들은 머리하기전 왁스소량 아주~~소량만 바르고 시작해 주세요
부족하면 추가 더 바르셔도 됩니다
왁스를 손바닦에 녹인다음 발라 주세요~
마지막 스프레이 뿌려주셔도 됩니다~^^
행사때 사용하실때 스프레이 뿌리고 머리 감을때 걱정하는 분들이 계세요
그런 분들은 린스부터 2번정도 감고난후~ 삼푸해주세요 ~
항상 새로운영상으로
준비하려고 노력하고 있어요
남은 시간도 행복하세요
감사합니다
#가을헤어스타일
#updo #longhair
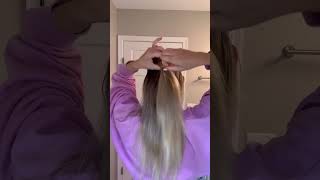
Hello I'll divide it in the middle of your hair.. You can divide it in the middle and tie it using a rubber band or a hair tie. You can tie it as close as possible so that it is not loose.. You can use the middle hair to make a shape, so you can hold the hair a little and tie it Twist it slightly like this. I made it like this to make space easier. I twisted it once to make space easier, I'm going to put it in the middle of the hair on both sides of the head. You can put two of them in grab your hair as it is, and pull it out completely. You have to pull it so that it is not loose.. Now I will bring it to the left side of the right hair.. You have to comb it while bringing it to the left. I'll hold the hair in between the hair spaces and pull it out completely. So I think you just have to look carefully at the direction of putting in and taking out. Before making the shape. You only need to process the middle part of the braid here.. If you have thick hair, you can cover it like this, but if you don't have a lot of hair, you can remove this part little by little and make it look like it connects with both hair.. You can make it freely, but I will braid it in three strands.. You can braid it in three strands, but it doesn't matter. If the shape is not pretty, You can braid it roughly.. It doesn't matter if you braid it in two strands. You can make it in size.. I think you can make a shape using a u-pin or a thread pin while holding it as it is.. You can fix the head on both sides so that it does not shake In this way the u-pin or thread pin. I think you can fix me. I tried to make the first hair easier, too. Apply it and make it look prettier than me I'll start with the second hair tied in the middle. You can bring it and put it in your hair as it is. You put it in from the right side.. Just put it in from the left to the left, hair from the left to the right side and pull it out.. You can pull it out without looseness I'm going to do a three-strand braid for you.. You can tie it with a rubber band at the end. Isn'T it beautiful to tie it like this I'll make a shape too. I'll make a space for the upper part. Make a good space so that the hair doesn't get tangled, put your fingers in it and then grab the rest of the hair and pull it out. Depending on the length of your hair, the holding position may vary At this time. If you have thick hair straighten your hair so that it is not too thick and then fix it.. I think you can fix it with a U-pin or thread pin while pressing it. So that it does not stick out, You can fix it with a u-pin like this.. Do your own hair pretty on the second hair.. The third hair is also tied in the middle. I'll split the hair in half I'll. Take the hair out in the space on the right. I'll split the right hair in half and not the whole hair. I'll split it in half and put my hair in the middle of the space and pull it out.. I will cross each other in an x shape and pull it out. I'll fix it. With it fixed too little hair came out under the hair. The whole hair on top needs to be thick enough, but I think my hair at the bottom is too small.. So don't divide the hair too little at the bottom, like me. Divide it and make it thick enough to fit at the bottom or to a certain extent., Pull it not loosely and now hold. Only the hair on top. Hold only the hair that was pulled out like this.. I hold it and tie the laces a lot only space four, You can put it in this., While holding the hair that was pulled out, grab it from both sides of the hair. Underneath put it together and just tie it back together, The number of times may vary depending on the length.. You can add 3 or 4 more times and tie it like this. In this state. You can tie it with a rubber band so that it does not come loose. While tying the ends depending on the length of the hair, depending on the length of the remaining hair. You can take it off in half or completely. All right. I made the ends as short as possible to handle them as much as possible.. Now you can set the position.. You can decide whether you want to do it on the top center side or left only Fold it in half in the middle and roll it inside. Your hair or fold it in half and fix it like this, using a thread pin or u-pin. You can fix it with something comfortable.. I use this too~. You can fix it with something comfortable depending on the thickness of your hair.. After putting it inside the rest of your hair, you can fix it with a thread pin so that it does not stick out.. I think you can finish it. There are three methods in total, but I made a little shape using the middle hair.. There are some difficult parts, but I think it would be good to apply it a little and make it your own way. I also tried to make it easier apply it to make my hair look prettier than me.

Comments
뀨뀨수: 손재주가 좋으시네요! 염색 머리셔서 좀 더 보기가 쉬웠어요 ㅎㅎ 감사합니다!
윤Alice: 볼때마다 .. 숑이님 머리카락들은 정말 숑이님 말을 잘 듣는구나...라는 생각과 함께 감탄을 하고갑니다☺
도토리: 1번 성공! 감사합니다~
솔개: 매번 예쁜 헤어스타일 만드시는 혹시 웨딩헤어 꿀팁은 없을까욤?
북망산 저승사자: 1번,3번 이뻐요.
북망산 저승사자: 앗싸1등.