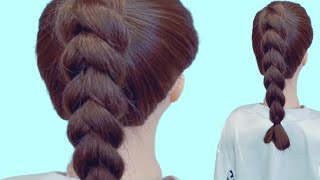
Women Love This Hairstyle! The Perfect Hairstyle For Any Length Or Texture Of Hair! Revealed!
- Posted on 18 October, 2022
- Hot Topic
- By Anonymous
Women LOVE this hairstyle for good reason! I'm going to share with you the techniques I use on almost every haircut I do behind the chair to create a layered hairstyle that EVERYONE loves! If you're a hairstylist, I have you covered, and if NOT, this video will help you explain what you want to avoid the common mistakes that leave you hating your hairstyle. This technique for layering hair works on ANY hair length, short hair, long hair, thin hair, fine hair, thick hair, curly hair...doesn't matter. If you've ever had layers that were choppy, I'm going to share how you can easily erase the choppiness...EVEN AT HOME! If you have thin hair and want it to look thicker, this technique can help make your hair look much thicker and seem to have much more volume! It's a longer video but WELL worth the watch! Hope you love it!
Check out my wife and my brand new Adventure/ Travel Vlog Youtube Channel here! https://www.youtube.com/c/DionnaJustin...
can't WAIT to get on the road and meet some of you awesome folks as well as have the opportunity to cut some of your hair! If you want to stay up to date on where we will be, when and how to connect for a haircut near you, CLICK HERE: https://bit.ly/HickoxHairPopUp
SEND ME STUFF OR CONTACT ME ABOUT WORKING TOGETHER:
Email: [email protected]
Justin Hickox
621 sw. Morrison st.
suite 150
Portland, Or 97205
Below are my favorite products and tools!
PRODUCTS
VOLUME
-Hairstory dry shampoo https://amzn.to/3z625ze
-Bumble and bumble styling cream https://amzn.to/3iLzlW6
SMOOTHING AGENT
-Amazon oil https://www.hickoxstudio.com/shop-onli...
HAIRSPRAY
- L’Oreal Hairspray https://amzn.to/3rmv6V0
SHAMPOO/CONDITIONER
- HairStory https://amzn.to/3y1mwx6
STYLING TOOLS
FLAT IRON
-Infra shine https://amzn.to/3ew1bV6
-Dyson https://amzn.to/3wLpBQB
CURLING IRON
ELECTRIC ROUND BRUSHES
-Dyson Airwrap https://amzn.to/3zcFQrs
-HOT TOOLS https://amzn.to/3eyoBZP
BLOWDRYERS
-Dyson super sonic blowdryer https://amzn.to/3rBU9mP
-Chi Touch 2 https://chi.com/chi-products/chi-tools...
-Chi Rocket Search Amazon for the best price. I’m unable to find a link for it but it’s on amazon.
BRUSHES
- Wet brush https://amzn.to/36KYQ4c
- Volumizer https://amzn.to/2UVXjFI
- Olivia Garden Round Brush https://amzn.to/2UVXjFI
Instagram: https://www.instagram.com/justin_hicko...
Facebook: https://www.facebook.com/justin.hickox...
Collaboration: [email protected]
Okay, I will tell you right now that women absolutely love this haircut. It doesn't matter if your hair is thick thin. Curly fine, stick straight super coarse, it's irrelevant! It doesn't matter what length your hair is. This is the layering technique that I approach over 99. Of my haircuts Behind the Chair and it's the one that I've used for the past over a quarter of a century, it kind of is the simple way to avoid all of the major concerns. So if you've ever had a situation where your hair, you felt like it was over layered, maybe it felt too thin. Maybe you felt like your hair is thin and you could never have layering because it would make it look even thinner. Maybe your hair is too choppy after layers. This is going to help you address all of those things, so if you're a stylist, this is a very simple walkthrough. That'S going to give you my step-by-step process on how I approach all of these haircuts, but if you're, not a stylist, don't run away, I got you covered. This is going to help. You understand better how to avoid the simple mistakes. The common mistakes that lead you into a position where you hate your hairstyle, so it'll help you to explain to your either current stylist or your new stylist. The way that you want to approach your hairstyle or you can even just show them for the video and give them a better insight as to what you want from your hair - and this is my wife, say: hi Diana hi, you didn't say hi Deanna. I know I usually do and we are going to take this hair and make it shorter in the middle of Joshua Tree in an Airbnb and with no mirrors and I'm gon na pray that I get it even because if I don't get it even you're going To hear about it, a lot yay for me, so with all that said, should we dive in and pray that I do this right? Yes, yes, we should. Let'S do that now. Okay, the very first step. I told you this works for any length. So the first thing we're going to do is determine what length we actually want her hair to be now. Diana has already told me that she wants her hair to be well show them Diana, actually I'll. Let you do it about right right in here. We'Re kind of going for these photos and yes, I've flirted out the faces because I don't know if I can use them, but this is the hairstyle. So this is the kind of general area that we're trying to land with this particular cut. So now that we've figured that out, I'm actually going to have Donna stand up, so I can cut the length to the length that she wants. This isn't something that we have to do in the salon. All the time I most of the time. Actually, don't do this, but the reason that I'm doing it today is mainly because it actually does a really good job of helping you get the line straight. That'S an important thing for me today, many times if you're sitting in a salon chair and you cross your legs, your shoulders are going to be a little bit dipped one side or the other, or maybe, when you sit down, you just have a tendency to lean To one side, a little bit more, that can mean that when that length is cut even oh, the sudden you stand up and it's a tad bit uneven. So I like to have people stand up, go ahead and stand up. I get to ever stand up. Come back this way and hit the mic actually turn around like this right I'll have your stand up turn around for you guys and what I would do is just actually comb it down and take the length off while she's standing and she just stands Square normally. Then we can cut a straight line and it'll be a little bit more appropriate. We know that it'll be straight so I'll. Have you do that right now and I like to actually start from the outside moving to the center, so that it doesn't actually do this and get really uneven, so I will actually comb it down if you look down just a tiny bit, let's section this get Some of the hair out of the way, so I can get a nice clean cut, just take a smaller section to the back of the ears from the occipital bone to the back of the ears for stylists. If you're watching, if you're stylist, you can use Clips on this part, if you like, I prefer to just comb it in front of the ears and kind of use the ears or the shoulders as a clip makes it a little bit easier. For me, it's a little faster but there's nothing wrong with using clips and comb the rest down foreign cut to hopefully close to the right length for her, so she doesn't yell at me too much now we start with the front layer. So I always move from the length to the front layers and then the next step after that will be the actual internal layers or what I call the top layers or the side layers, all the other layering that you see. So one of the things that Diana mentioned is that she wants the layers in the front to start around her jawline or longer nothing shorter than that we're going to start there. So usually, what I do at this point as it's really basic I'll, take a section from the top of the head to the top of the ear, and I section that out right to the actually right to the back of the ear. So it's kind of the top, the top of the ear, but right behind the ears where the actual section goes to and then you can move all this stuff out of the way and then you're just dealing with the very front and that's the front layer. So that's all of the stuff that could be layered in the front now all you're doing at this point is it's really basic. All you're doing is determining how much of it? How short do you want this piece in the front? So we know that we want to start at our jawline, so we're going to start down here and then how much layering do you want? So we know that this right here is the length that we can't take any shorter, because that is our actual length. So as long as we just take this and go okay, we've got this length now. Do we want them this long in the front this long in the front this long? Let'S move that up until we get to the right length, then we're just going to draw a line now if we want less layering, maybe you want more, like a bob shape haircut, where you want this length in the front a little bit or that line that Just means that you start that section a little more forward and you just take - maybe it from right here and you leave all of this stuff back so that you're only layering a little bit so any way you want to do. It is fine either way, but you just don't go beyond the hair behind the ear. You just don't layer any of that as long as we stay away from that we're not going to get too much layering or too much of a disconnect or looking too much kind of like a mullet. Unless you want a mullet, then you know now. You know how to do it, but you're going to avoid all of the massive concerns that happen with front layers. It'S really basic, so she does want to keep most of this length. She doesn't want a lot of layers in the front, so I'm just going to start those layers a little bit farther forward so that we don't layer quite so much. We leave this. What she sees as the length we leave that length so that we don't cut too much, so I just do the same on the other side. So it's just a little bit and then all I'm going to do is just basically draw a line from here to there. So we'll just take this and we go okay. My starting point is her jawline right here. So if I come in and start now, I've got some tension on this, I'm pulling it down, so I'm going to start longer, knowing that's going to cinch up. So I'm going to start down here and I'm just gon na slide my shears down and just do some light layering in the front ends at that longest Point. Without cutting it worst case scenario, it's too long. We can always take it shorter, much harder to put it back. Do the same thing. On the other side, I've got an assistant here that you guys can't see, but he's 100 pounds furry and his name is Kevin. The burner he's right under my feet. Right now not making things easy so I'll do the same thing over here, I'm starting I'm not even combing this down. I am just holding it and free cutting this down into the layers, or I also have the ability to start from the bottom and work. My way up either way, whatever's easy and comfortable for you. I choose to kind of go at it both ways. Sometimes so now we have some very light layers in the front and I can always take those shorter. If I want to take those shorter, let me do check these, though you should do some what, even since I have no mirror to look at so now. One part one important part that I didn't mention about this - that I should have is that I have it parted, where she's going to part it now, if you're a person that flips your hair back and forth, and the layering in the front what you would ideally Do is actually part your hair to cut the layers in the center. This allows it to have a little bit more evenness, no matter what side you go to, if you part your hair, always over here, for instance, or if we cut it over here and then you're constantly parting, your hair. On this side, it's going to be very uneven and kind of heavy on one side when you try to part it at home. So if you're parting it down one side all the time, you part it exactly where you part it, then you cut the layers so that everything looks right as it hangs normally and if you're flipping it back and forth, you use the center part straight down the Center and then cut those even and then it's going to be mildly off on both sides, but really not a big deal all right. Now we move into the internal or the top layers. This is where the magic happens when new clients call my salon. This is exactly what happens. Hey. I need to make an hair appointment. Oh well, tell me what's going on, I just don't like my hair, it's not working right! Really! Okay, I'm pretty sure. I know what's going on already, why don't you go ahead and come on in and we'll talk about it? Oh okay, cool sounds good, because these are the common mistakes that always happen, and if you follow this particular layering technique, you'll never make those mistakes. This keeps you from being able to make those mistakes, so This Is How We Do It. I will section the head off so we'll take a section from the top of the head to the back of the ear again. Okay, that is one section. So we have our front and then we have our back okay, just like this, then in the back I will take what we call pie sections. It basically just means diagonal or kind of pie shaped sections. They look like this right and what I'll do is I'll? Take a starter section in the very Crown here in the very back I'm going to take a small little kind of pie, section that starts at the part line and I'll pick the hair straight up now, what's going to happen, is in the back the hair at The occipital bone so that bump in the back of your head, where your hair head indents right here, all of that hair we're going to pull that up. The top layers are not going to go any shorter than that. Can they go shorter than that? Yes, there's always exceptions to the rule, but if you want to be safe - and you know you want to steer yourself away any of the common concerns, you don't cut the layers on the top any shorter than that. We will pick this up and I will everything below that I will allow to drop out of the head. I won't even touch that it won't even be in this section. Then we'll pick this up and what's going to happen, is the hair that comes from directly. Above that that hair right here that length this becomes the guide to how short we can cut these layers. So I know that I need to leave them longer than that, but as long as they are longer than that we're good, depending on how much layers you want, if you want a little bit of layers, you leave it a lot longer. You don't take much off if you want a lighter layering, you go as short as that piece of hair is again just don't go shorter. One thing I would say - and this is not always - this is a rule of thumb I like to follow and it tends to work best. Usually speaking, the layers in the back should be no shorter than the flare in the front. So for her, we know that this is at the chin right, so I don't want to take those any shorter than the chin if you take them shorter than the chin. What can happen is all these shorter hair will push that hair forward and you'll end up. Looking like you've got these kind of dog ears in the front that would look very thick right around the front pieces. It'Ll kind of look like you have a bob that goes like this. Then you have all this other hair that just kind of hangs there. So as long as they're longer than that front layer, they'll blend nicely and you won't have a problem so we're gon na pick this up and I'm gon na start a little bit on the longer side just to be safe and then we'll take it shorter. As we feel need to take it shorter another thing that I'm doing is, I always do what we call in the salon point cut, so I always cut into the hair. I don't cut it blunt like this now. The reason for that is because it tends to always blend better when you cut into the hair than it does. When you cut up blunt, if you cut a blunt you're forced to take out a line. So, if you've had your hair there in the past - and you saw a lot of choppiness to it - that very well may be. Why, especially if your hair is thicker coarse, if your hair is thick, coarser has some wave to it and it's thicken coarse, especially, and you cut it once you are absolutely going to see choppiness in that layering, which I'm going to show you at the end, how We kind of avoid that or how we erase that, if you will, but a good way to start by not even putting it in, is just by Point cutting it like this versus blunt cutting. It so point at that got a little bit of Larry in the back. Now, I'm going to start take another little pie, shape section. We talked about pick that straight up and I'm just going to do the same thing point cut into this okay. Now, when we get to the side of the head, all I'm going to do is I'm going to take what we call vertical section. So I'm just going to take a section that goes right to the back of the ear, like we already parted that off I'm going to take another one right next to it, maybe an inch or half an inch forward and then I'm just going to do the Same thing, I'm going to pick that hair up everything below so this recession draw a line that goes back to her occipital bone back here. Everything below this I'm going to allow to fall out of the hair. So I'm not going to actually layer that or cut that any shorter. It'S going to help me avoid doing that. Little thing where you cut these little holes or you see some thinness over here it looks really scraggly at the bottom. It'S going to take all of that concern out. This is how I can tell you that, if you've got fine or thin hair, this technique can actually make your hair look thicker, because what helps your hair look thicker is a strong. What we call a strong Baseline, meaning this hair down here, if I'm not layering any of this stuff, you're still going to have a lot of hair and strength down there or as much as you currently do. For the most part, there are certain situations where one length will look denser, but I'm talking with a broad stroke here and for most people that even have thinning hair. If we layer it in this manner, your hair will look thicker. It can actually handle it because it avoids being over layered and making her look thinner. So now, I'm gon na take this little section and I'm gon na pick this straight up again, so you can see I'm letting all that stuff fall out. I'M going to pick all this straight up and I'm just going to do the same thing and take that length out. Okay, so I'll turn it like this, so I can actually cut it and not have it all. Okay and again Point cutting into it versus cutting it blunt okay, so this is leaving me her length, but still allowing me some layers and it's still going to look thick and dense at the bottom. I'M going to do the other side and we're almost done with the laryn. We'Ve got one little final thing that will finish up after we actually dry her hair, but as far as the preliminary cut we're basically going to be done at this point. So it's fast. It'S efficient and it's super safe. That'S what I love about it and again it will work at any length range. You have okay, so now what I'm going to do is I'm actually going to dry her hair. Then, after it's dried and styled, I'm going to show you how I texturize those ends a little bit to make it blend even better, not over texturize it. So it doesn't look too thin and if you've ever had choppiness. This is how you're going to erase those choppy layers. You can literally do this at home if you have any sort of texturizing shears, so I'm gon na get our hair dry and then we'll come back. So give me one second: okay, now that we have our hair round brush and mildly, dried and kind of partly finished, I'm going to show you an absolute Game, Changer, oh, and if you want to see the video on actually how I style this or why. I use a particular blow dryer that I used while I was styling this and the round brushing method just to get it dry and smooth. So you don't damage your hair. If you're watching this video of the week it's going live, then you will see that video next week. However, if it's been a little bit, there'll be a link below that you can check that out either way, there'll be a link below probably so go below and find it you'll find it then so by the way for next week next week. The way I finish, a haircut every single time is, after I've, basically styled it or got some sort of dryness and movement into it. I'Ll go through and I basically take the exact same sectioning that I did when I cut the hair originally when I layered it and I'll pull it up and all I do is look at the very ends and if they look too blunt I'll, take these shears Textures and shears - and I just texturize the very tips, so what this is key in this to make sure that we don't over texturize is I only do that last about inch of hair. I don't go below that and I just very quickly just kind of break up. Those ends take out any sort of lines. So I'll do the same thing. I'Ll go all the way up, and if there are any lines in here or just looks a little bit uneven, I would just take out some of those lines, the very end. What this is going to do is it's going to blend all your layers in so when you comb your hair down, you shouldn't see choppiness It'll, be very nice, blended layers, it lightens up bulk. So if you feel like your layers are really heavy for some reason, this is a great way to get rid of some of that bulk without taking off too much length, it will feel a tiny bit shorter, so be aware of that, but not dramatic. By any stretch - and it works Magic on here so see, there's kind of a little bit of thickness and bluntness to the end of that, so just lightly go through and just texturize those very ends. Now what happens when things go wrong? It'S because people go too far down and they start texturizing too much down here and then it looks really thick down here and it's just like really thin up there. But I like to texturize just the very ends, because it allows me to get a lot less bulk at the ends and a lot less bluntness at the ends, meaning there's no lines, meaning it Blends well, and I legitimately, like I said I literally do this on Every single client, so you can see in here we have a lot of movement and layers a lot of texture in her hair. I could even take these layers a little bit shorter, but if I comb her hair down like this strain flat, you're not going to see a bunch of choppiness in here, you don't see a bunch of lines, horizontal lines to there, because it's all Blended. So, even though we have layers in there for movement and texture, we don't get the blunt choppy layers and it still looks, dense and thick and full. It gives her some nice movement and texture, and now we're going to get some curl on this and waving this and we'll come back and show you the finest result, sound good, sound good. I like it, I like it all right. Okay, and now we are back with some waving hair, I did not show you the process of how we waved your hair. She just used a curling iron actually because I've got multiple videos that I walk you through all of that process, so you can go and check out I'll link a couple of them in the description box below so you can find them. But nonetheless, as you can see, we have wave, we have style, we have layers and in the profile you can see that there's still a lot of movement and texture to these, but nowhere does it look thin or choppy or any of the things. So yes, now the question is: did all that make sense? Did you tell them about how to follow our journey? Oh yeah yeah, so we are journeying around. We are actually looking for a place to call home, so we are currently living in a van driving around the United States trying to find that specific home for ourselves. So if you want to check that out, you're going to go ahead and follow the links below too, we've got Instagram pages to follow this dude and us as well as another YouTube channel, we'll be sharing all this stuff so check that out right now. Otherwise, I'm hot this window is hot man, so we're gon na leave. Now I'm gon na turn the AC back on so bye, bye, bye,

![[(Updo Hairstyles)] Easy Bun Hairstyle / Hair Stylist](https://static.hairurl.com/p/2022/10-30/941c2cfcfd8d427f168464a14b5b3738.jpg)
Comments
Kathleen Shields: The problem is..... finding a stylist that can do all these fabulous hair style/cuts!
Daphne N: It’s so hard to find a great hairstyle that actually knows how to cut.
Mary L: I’m 54 years old and still waiting for that haircut that wows me. I’m thinking it will never happen. I always go in to the salon with pictures of what I would like but I never end up walking out with that haircut.
Jade: This is exactly how my stylist has been doing my hair! I love all of the movement I get without it being choppy. Thank you.
T.J. and Katie Batty: As a cosmetologist, I wish they would teach it how you just explained it. It has taken me years to teach myself some of the tips you covered. Great video, thanks for sharing.
Liz Summers: The Road Home: This makes so much sense! I am also saving this in case I need to cut my own hair again ... I cut mine for a year first year of COVID ... gave up on back layers mostly. Anyway, thank you! I've watched your travel videos and those are great also ... highly recommend the channel. Side note ... I have had an RV for many years. I am self employed and have worked from home for 37 years ... anyway, on my months long rv trips, one of the challenges was getting my hair cut ... even just trimmed ... finding a salon primarily in small towns and mostly without recommendation. I had a few OMG cuts. All to say, that I am a bit envious of Dionna travelling with her stylist !!
Pamela Berry: Her hair is beautiful, the highlights, cut, fullness, shaping. All beautiful. If I Had enough hair and length, I’d length. I’d love to get it.
KadyM: I agree. I had my hair layered the last time I had my hair cut - almost one year after the previous cut due to Lockdown, and it was awful. The hairdresser cut the layers way too short from a bob as I wanted to keep the curl without having to style. After nearly ten months it has almost grown out again and is getting very long but I am too afraid to go back to the same hairdresser and I can’t afford the very expensive stylists in my town who could probably do a better job. I have greying, thinning, very fine and wavy/curly hair.
Gen with a G: So I literally just did this to myself. It came out absolutely perfect! It’s completely fool proof. Granted, I do usually cut my own hair but following this method was spot on!
Julianne Rogers: Love this haircut, I basically have this but my hair is longer. I'm lucky to have a fantastic hairdresser (of almost 30 years) that does an amazing job on my cut and color. She does texturize my hair more and not just the ends, but I believe that is because my hair is heavy, and it takes out some of the bulk. Its pretty blunt on the ends and not thin or scraggly at all. I've been following your van adventures too.
Sugarplum K: Looks fantastic. That’s how hairdressers always cut my hair. I’ve had many cutters over but they always do the same cut. I have a lot of hair and it’s curly. I’ve had shorter layers at times but my hair curls too much. I need longer layers like you did to keep some weight at the top. You did a beautiful cut.
Steph B: I must have an awesome stylist. He does ALL of this with my hair. Been going to him for 20+ years, he knows his stuff!
Khanjari Joshi: What a wonderful video to see you in action! I think I have the same hairstyle but I just don't style them in waves and I do, flip my parting from side to side so my hair stylist keeps equal bangs on both sides! It will be such a dream come true to someday get a hair cut from you! Loving the van life videos, insta stories and this minimalistic house! Totally understand the 'moment' Dionna had and honestly, that is what keeps thongs real amd relatable! Its like saying a person would be lyingnof he/she said there has never been a fight in his/her marriage. Much love and light to both of you ❤️. Hopefully the next 'home' is North Carolina
Diane Thompson: It shouldn't be so hard to find a stylist that know how to cut this way. This is a cut I learned how to do in beauty school. Point cutting came years later, but the basic cut should be what everyone was taught.
Lisa Schooler: Your wife is gorgeous and seems so kind! My hair looked pretty close to hers in style (Have a great stylist in the bay area California) BUT with my more ordinary face, I got tired of the length and got a layered bob 3 years ago. I get more compliments on my hair when it’s in a more structured style and feel more confident. However, I’m now in the process of growing it out again so seeing this video has been inspirational reminding me of what I’ll have in about a year if I stay patient :-)
Rena Mae McDonald: Love how you demonstrate & explain what you're doing & why!
PAWSATION: This is done so beautifully. Thank you for the free advice, I always start with the mindset of a DIY haircut and then it ends off with the self talk that this cut needs a professional. If there is any hairdressers in Ireland that can do this please comment below. Thank you. My previous cut was a angled lob but it's so uneven, and I get it why, I was bubbling non stop that day and I had coffee while she was busy cutting.
Carole Rainer Lopez: This exactly addresses why I am unhappy with my hair! The problem is explaining to my stylist without insulting her. I’ve been going to her for years and consider her a friend, but I leave so unhappy with my hair. Suggestions?!!
Samantha van den Bosch: That is pure 100 percent trust ! I would never trust my husband to even trim my hair ! You are blessed to have a husband as a hairstylist !!
Sharon DeCaro: I ask every hair person to cut my hair like this. Seasoned stylists can't or won't do it. It's frustrating.
Lorena Wolfman: Love it! Wish I could find someone who could do that with my hair!
Christine R: HI Justin, this is a great video! I like how you explain what you are doing and why. Dionna is a total babe and you made her look great! Your videos are informative and fun. Thank you for all the great content!
farzaneh11030: Thank you. This is a no hair cut year for me after my regular stylist cut my hair way shorter than I had asked for. .I have been using instructional videos to give myself a haircut to keep it decent looking during this process. I need to clean it up again, and the timing is perfect and video is really great and clear. Thank you.
Diana Allen: Thanks for sharing your skills and insights with us. I am learning a lot, not just about hair but how to adventure in life. So much fun to see you both loving life on the road. Wishing you well in finding your special place! I’ll stay tuned in.
Maria Diaz: I love the haircut Your wife is absolutely Beautiful
Nancy P: Fab! Love this! Beautiful! I am not a hairstylist. There’s nothing worse than ending up with puffy dog ears . Been there - Yes! Zoom call nightmare! Having super thick hair, great layering is key. Thank you for sharing!
Silver Wraith: Hi Jus, looks great! Your wife is beautiful. (Though I actually liked it more before the curl and wave -- because the layers were so beautifully done.)
Justme77: You make it look so easy so when I watch you I think I can do it but I know I can't. You're an artist! Your wife is so lucky to be married to a hair stylist! Your wife is beautiful, by the way! After watching to the end....Whoa! Move to southeast Virginia!! I'd go to you for my hair!
stargazerbird: This is the same basic cut I get offered in all the salons. It’s always looks good. You can even do it yourself with a bit of care. Check out Elle Bangs
Gen with a G: This video was fantastic! You are very talented, and your wife is a beauty!
lizcustor: This is the cut you gave me and it is was incredible! Best of my life!! Now with your travels I need a new person This is one of your best videos yet!!
Kim K: Love, love, love it! I am 61 and have long wavy hair, on the dry and frizzy side (which I plan to keep - long that it). I would love this style but I wouldn't trust anyone around here. They all get very scissor happy and don't know what even means. Ya, so I cut my own.
cattycorner: Yes. that is EXACTLY the haircut I want!!!
Carla Watson: LOVE LOVE LOVE and so appreciate all the details you give.
Elizabeth: I love all the videos as I learn sooo much from you both! Thank you!
Meow Meow: Getting my hair done next week, but forwarding this to my stylist now!
Gamersoldier100: Would actually love to see this done on someone with super thin/fine hair. Then finding a good stylist and having them remain working where you go is exhausting.
Shannon Nauer: First off she was making me laugh when she started laughing at something while you were doing layers!!! Love you guys. Second, I am pretty sure I need to fix the dog ear problem, but I don't want to make it worse. Can you tell me how or is it too lengthy of an explanation? Thanks for the video! Much love from AZ ❤️
Tricia Clark: Is no one going to comment on the change in length from the first cut to determine length, to the next cut of the hair from the shoulders brought to the back. It went from like 3 inches to 6 inches cut from the length. If you pause it at 3:58 you can see the original length guide and then where he’s about to cut the next section of hair. Guess she decided she wanted it shorter. That was very confusing. Otherwise cool tips.
Margarete K: Awesome thank you so much! I am at that growing out stage where you are ready to cut! Thank goodness toque season soon! Lol Love your tutorials
Pamela B: Seeing a peek of your Berner makes me miss our girls. We had 2 Berners (sisters) and they were the sweetest dogs we’ve ever had. Someday we’ll get one or two again. ❤ Loved the hair cutting tips. Thank you
Mylee Leonard: Thank you both for this awesome hair cut tips!
Mccram68: Beautiful cut! Good luck on your journey to find a home! ❤️
Mia Hess Music: I'd love to see this with short hair. I am so unhappy with the last few haircuts I've gotten. I enjoyed this video but almost all stylists do this kind of lovely "do" with long hair.
Deia Draper: Great hairdresser things I've been doing for 50 years everybody says it's a God's gift I just call it speed cutting you don't need to layer section after section and my other Secret was I used to blow dryers at one time one with a cool button and one with a medium button so not to burn the hair I did for an hour
Mela Roper: Thank you for this! Super helpful
robinmcgee16: I would attempt to cut my own fine, wavy/curly hair like this before I would let anyone other than Justin cut it. So, Justin, if you and Dionna make it to South Carolina in your travels and you offer haircuts while here I will be at the front of the line!
Lorena Wood: Love the tip to blend only bottom inch!
Lorena Wood: Love the tip to blend only bottom inch!
Chris p: Best haircut ever! Great demonstration!!
Jorie: Beautiful results!
ogg: When you're young and beautiful, any cut would look great. What do you do with old hair(post menopause) that is fine, curly, extremely fried and does nothing but frizz no matter whether it's air dried or styled? I only wash it once per week and only at the roots. The color is so ugly between going grey in some spots and some horrible dull dark color that I have to dye it regularly to be my old light brown/ blonde color. I used to have such pretty hair and now I look like a cartoon witch.
Ozark Belle: Get a stylist chair for your rig and you'll have us standing in line in every town you pass through!! Either that or move to Rolla, Missouri please! :)
Anneke Visser: This is exactly what I want.
Natalie S: Using texturizing shears on my hair destroys it. It may work for some but not all hair types. Somehow my hair used to get cut without all this texture and it looked fine. Now it always looks thin and scraggly at the ends and is much more prone to tangling and breakage.
Susan Baker: Excellent job lighting this video. Really difficult with full on light behind you. Bravo! I can see your wife and haircut perfectly. For those watching on your phone, just brighten your screen setting.
Jane Fryer: Love it! Thanks
Loyette Minkler: My question is will a dry haircut give you the same results if cut the same way?
Deia Draper: I always show my clients a great layered haircut when combed in place looks like all one layer until movement and wind blowing that is a good layered haircut
Bevi Vision: Thank you for the wonderful tips!
Dee Johnson: Hello from Iowa! Question...are the texture shears the same as razor shears? I have very curly fine hair and when I forget to tell my stylist not to use the razor one, I get extra frizziness. Great video!
Brie Pasos: So if I were to go to a stylist, what exactly do I ask for without showing the video ? How do I put it into “hairdresser” words?
Dsl Art: Donna's hair looks great! It totally is the best cut.
Mary Hamric: Excellent! What a helpful video!
Nancy Carol: Another excellent video. Love it all!
Sue S.: I love how you did her hair ~
Ananda Arunima: As a stylist, there is nothing more satisfying than hearing those shears snip closed. Some stylist love to do colour, I love to cut hair!
Georgina: Not sure if it's my phone or what but it's so dark I can't see anything. Sounds great but sadly won't be able to show my stylist. Normally love your videos. Hoping to see more next time. All the best from the UK.
Min Moller: Thank you, I love this!
Lucy Jane: You are amazing! She would look great with warmer, deeper tones btw. Amazing cut though.
Jennifer Britzke: I can't wait to see your adventures! Come check out the Indiana Dunes. :-) Also, thankful that my stylist uses this technique! It's the only way that works for my hair.
lovly 2cu: the person who hacked my hair last year didnt do what you are doing. Nice to see how it should be done. This is the cut I have been going back to for 50 years.
alaura roarialis: Ok, here is my pondering re: this video/concept - You say "any length" well, ok, but why did you chop off several inches of her hair and will this work with waist length, fine hair? I've been kicking face-framing layers back and forth for a year or so now and I just can't really pull the trigger because I don't really want to lose all my bulk length.
Pam Stephens: I’m a stylist and love watching the work of other stylists. Legit stylists will give u a free consult and u have the right to walk away! Don’t feel obligated. I’m in central Florida.
Tanya Maxfield: Great video. Very informative.
Angele Johnson: I've had the "dog ears", what a disaster! Love your work Justin
Dawn Stonerock: My stylist always tells me : don’t cross your legs!
Lesley Crane: This is awesome Justin! I have fine thin hair and bangs. How do you integrate the bangs, thanks
Lucille Rafter: Great video. Will this cut work for a senior who has thin fine hair plus a receding hair line?
selective outrage: I will have to rewatch and take notes in case my stylist won't watch this. I will copy the diagrams, too!
Vivian Raymond: Thank you for showing your technique on a live ( and very lovely woman) !
Annette DeMary: After watching your video, I went and got a shag haircut. I love it!
Dana Yan: Please consider Vancouver Canada Or even a visit would be great! Would love a haircut from you.
Jackie O: Now to get a stylist to watch this
DeDe Staggs: Love it!
A C: I think her hair would also look great doing square layers.. no point cut.. it would allow her to have more fullness and body. IMO.. thanks for the video!
Annette L: Love the view in the background too! Amazing house and hair cut
Lauri Patterson: I have the Hair Dryer you allude to…… I’ll leave it a secret to you post the video. Its a great dryer! Love it. The hair cut is excellent so is the tutorial .
Jessica Brown: What a treat to watch the master at work!
Holly J: looks great
Ann Lynch: Tell your wife her hair looks great!
Christie G Hunt: I want that cut!!!!
Melanie Sanchez: Beautiful haircut! Thank you so much for showing us this. You could consider moving to Orlando!
Jane White: Love this!❤❤❤
SarahandJenny: Problem is stylists are not open to getting shown anything. Showing this video would be met with a very upset stylist I admit I dont speak stylist and am horrible at trying to relay my thoughts or am not sure how to appropriately answer what I want when asked in stylist speak. I wish the stylist would ask in a way of cause and effect. They know what steps will result in a particular outcome I dont live in their world that is why I come to you. When I try to show what is in my head because I dont know how to correctly ask for what I would like to see as an end result I am met with an attitude that I must think they dont know their stuff. It is so totally not that, it is my inability to speak your language in a way that you can then transform my wishes to a fabulous experience for both of us
Barb Keeley: And to add to Kathleen’s comment…how oh how do I explain to my stylist “how to do this” without offending ?
C G: Will this work on very fine, very thin, naturally curly old lady hair?
JMK: The view was fabulous but it was really hard to see the details of this cut with all the light coming through the window and without additional lighting. I turned the brightness on my tablet to max and it was still hard to see what you were doing.
carmcgee: Please consider Houston for your forever home. We have the heat, humidity and all kinds of other harsh conditions that will ruin a hairstyle in record time. If you could conquer these issues, you would be the most sought after stylist this side of the Mississippi! (Love your videos)
Uc Sipa: Love the videos but I'm so jealous! :)) Can you recommend a salon/stylist in Manhattan/NYC who's good with makeovers? I haven't been feeling good with my style for a while. I like my stylist but I'd like an edgier cut he can't seem to quite manage. I'm tired of fighting with my hair. There are so many salons here, hard to know who's good.