How To Cut And Style Flat Top - Greg Zorian Haircut Tutorial
- Posted on 01 January, 2018
- Hot Topic
- By Anonymous
Premium Grooming Products for the Modern Man: http://www.ZorianOfNewYork.com by Third Generation Master Barber Greg Zorian. Infused with Natural Ingredients. Made in the USA. Not tested on animals.
Learn the art of barbering from Greg Zorian, streaming 24/7 in full HD, anywhere in the world. Start a free membership today! Learn from the world’s largest library of men’s haircutting videos, tutorials, step-by-step guides, and more! http://www.HowToCutHair.tv
Like and Subscribe!
Facebook: https://www.facebook.com/ZorianOfNewYo...
Facebook: https://www.facebook.com/HowToCutHair....
Instagram: https://www.instagram.com/howtocuthair...
Newsletter: http://www.howtocuthair.tv/free-member...
LinkedIn: https://www.linkedin.com/in/greg-zoria...
Interested in carrying Zorian of New York in your Salon, Barbershop, School or Retail Location? Zorian of New York is found in premier barbershops and salons throughout the United States and Europe.
Your customers will appreciate the quality and craftsmanship of our line. Barbershops and Salons will enjoy the customer loyalty, personal support you receive from our team, and generous margins.
Contact us for more information on our current promotions, complimentary back-bar, merchandising and education support. Receive a free gift on your first wholesale order! http://www.ZorianOfNewYork.com/wholesa...
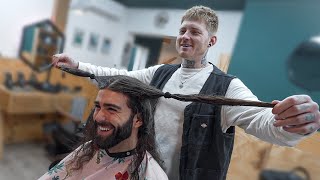
By now everyone has seen Simon Cowell’s flattop that he make famous. Dark stubborn hair that does not want to stand up that easily. In this video learn the tricks of third generation master barber Greg Zorian uses to work with stubborn hair to give that perfect square flattop.
When cutting a flattop starting out on the sides instead of the top is key. You need to make sure the corners are tapered in so that when you cut the top it is not too wide and the corners have a tough time standing up. Start out on the sides and back with a 3 ½ metal blade on a detachable clipper similar to the oster classic 76, Andis BGRC, Andis MVP, Oster Octane, Andis Supra ZR. Using slow strokes clipper up the sides and back of the head. Make sure when you get to the top you take an imaginary line straight up in the air until you run out of hair. This will create a fading and blending effect into the top so you do not have any heavy lines of demarcation to blend out. Complete this step all of the way around the head.
Next, use a 1 ½ blade around the outline of the haircut to start the tapered finish. While doing this you can touch up and blending into the top. Remember, when we start on the top we want the sides completed to make squaring off the top easier. The 1 ½ blade is a great tool for cutting and blending. By angling the blade to a 45 degree angle and running across the comb the blade will cut and blend at the same time avoiding the need for using the thinning shear over comb barbering technique to blend. Next, complete the tapered or faded outline. Use an adjustable clipper such as the Andis Envy, Andis Master, Wahl Designer, Wahl Senior, or Oster fast feed in the longest blade setting and use a scooping motion around the outline of the haircut to fade out. Repeat this step with lever adjusted halfway and then the shortest setting scooping the clipper a little bit lower each time to finish the taper. Last, use a t-outliner or trimmer to finish the haircut. Line off the sideburns and the diagonal line behind the ears without cutting into the natural hairline. On the back of the neck use an upward shaving motion without getting too close to the tapered or faded hairline.
Now cut the top. Apply a small amount of Zorian Of New York firm hold gel to damp hair and blow dry the hair standing straight up. This will smooth out all of the cowlicks and different growth patterns so you are cutting an even surface. In this case the hair is growing from front to back so start in the back. Round in the crown area first. Then cut from back to front keeping the comb parallel to the floor leaving the front longer to stand up. Repeat this step to the left and right. Touch up the corners making sure to keep the top square. Last, complete the style with the Zorian Of New York Shaping Paste. This is a very strong paste that will keep the hair standing up all day with a matte or dry looking finish.
For our model, today, we're gon na be doing a flattop haircut. This this model is actually a longtime client of mine, and I chose him for a flattop today, because he actually has a really difficult flattop and I've been getting quite a few requests for this type of hair. To do a flattop on people are getting um. Some customers, with difficult hair and struggling with with the flat tops, so I really want to focus on how we're going to style the hair properly before we actually cut it to get it nice, and even so, we can bring it down and get it nice and Square, so I just want to spin him around really slow to show you why it's so difficult well to start out in the front, you can see how his hair wants to lay down in the front. So that's going to require a lot of work to get that to stand up in the corners and then, as we spin him around in the front, he has a part on both sides where the hair grows forward. So that requires a lot of work and a lot of product to get it to stand up properly, so we can cut it, so we can cut it evenly and then, as we spin him around towards the back, you can see he's got a pretty wild hairline Back here it's grown out quite a bit, but you know when I lift it up, you can see how it comes to a point in the center there. So what we want to do is we're going to taper that right out, but it's not as intimidating as it looks, because what we're going to do is we're going to start with our longer blades and work our way down to our shorter blades. We'Re going to use actual metal blade attachments on a rotary motor clipper, which is very powerful. So, by the time we get to the shorter blades, it's going to start to work its way out where it gets a little tricky as when we get down to our adjustable Clipper and our trimmer. When we're, when we're fading, that out, it gets a little bit difficult, but we're going to show you a few tricks today and then, as I spin him around to this side, you can see again the same thing. He has a very strong part right there, and the hair kind of grows forward goes straight forward and lays down, but we're gon na we're gon na stand that right up with a really strong, gel and dry it up and square it right up. So, most importantly, what we want to do before we start any flattop, I'm just gon na lightly dampen the hair, but when you cut a flat top, I always like to start on the top and work my way down with all my hair cuts flat tops. It'S the opposite, so if you can follow me think about it, if we start on that, if we start on the, if we start on the top and square it up on the top, we have nothing to blend to here. We have no guide here. So what I want to do is I want to create my guide first on the side, so by shaving the hair, all the way up and blending it up and getting it nice and narrow right here, then it's going to make it much easier. Then we're gon na have a guide on the sides to follow. Otherwise we're not going to have any guide and we're gon na have to recut the top, and it would be very difficult so for flat tops. I do it in the reverse. I'M still going to start with my longer blades and work down, but I want to get all this blended in everything, tapered out, nice and even and just right and then we're gon na focus on the flat top. So I almost approach it as two separate haircuts to fade and the tapered neckline get all that done because that's difficult enough as it is, and then we worry about the flat top. So actually the slower you work, the more efficient you're going to be so that means you're going to be done with the haircut faster now, with flat tops on straight hair in the back corners. It grows out very quickly and they grow out what we call it look. They start to look like horns sticking out on the side, so what we want to do is find where the pivot is so we can see. The pivot is right here and I'm going to shave right over the pivot area, so the back is actually going to be rounded somewhat, and this this will give you it's very difficult to get a flat top to last longer than three weeks, but if you can Get one to last three weeks: that's that's really good! So, but if we don't round these quote these back corners in it'll, never last three weeks. Okay, so we clean that area out now real easily. We just work our way and the other thing cutting slower is going to do is you're going to make sure that you cut every here. The last thing you want to do is go so fast that you start pushing here and then you leave a few long hairs and the client walks out of the door, and you missed a couple hairs. So when I dry this astray, it's gon na be straight up when I dry it straight up and I'm not gon na, have any hair hanging out so we're kind of killing two birds with one stone, as I'm spinning the chair around. So I'm gon na leave the corner alone and I want to further fade out the tail in the middle now at the bottom here, where the hair is growing straight up, I'm just gon na take the Clipper and drag it down against the grain, and, while I'm In the back, I'm going to blend this to the top, so I want to have everything blended. So when I do dry the top up with the gel before we start cutting the top. Everything is all blended in. So we just angle the calm, and I can see my previous cut my previous guide right in there. Are you a member of how to cut hair TV, learn the art of men's barbering from third generation master barber Greg's Orion in full, HD 24/7 from anywhere in the world, sign up for your free membership and learn how to increase your efficiency and make more money Behind the chair, how to cut hair TV now, since his hair is all growing to the to the center at the bottom, there's really nothing that we're gon na be able to taper out there because we're just pushing the hair. So we're just going to line that off. So I want to keep the blade parallel to the floor and I want to further thin out that the tail and we're using a quick scooping motion and that tapers or fades the hair out. Now I'm going to close it halfway down and do it again and not go as high now we're going to work on the other side and do the same thing. So actually, what we're gon na have to do, because it's a little thin right in there we're going to bring it up just a little bit higher. So we can match that spot because we don't want to look like there's a hole in his hairline. So now the clipper is halfway closed and now we're going to close it down all the way. So now, when we come back with the trimmer, I don't want to get anywhere near my taper with it with the trimmer. Then it's gon na wind up being too high. So, by stretching out the skin, it makes the hair stand up okay and then on the back. I'M keeping the clipper parallel to the floor and I'm shaving up, but you can see I'm stopping about an inch below where we left off with the previous clipper, because I don't want to get anywhere near that taper and mess it up. We have a nice taper there, so we're just cleaning up the neck. Here I'm doing the same thing I'm pulling down with my finger: it pops the the beard hair out or the neck hair out, so we can get it cut nice and close to prepare the hair to cut the top properly we're gon na use. Our zoning of New York firm, hold styling gel, it's very thick. It'S a 100 % alcohol free. It has aloe vera in it to keep the hair soft and the scalp soft, and there are absolutely no flakes when it's dry, it's 100 % flake-free. So what we want to do is we want to take a decent amount, not too much just enough, so that we can get the hair standing up and we're gon na dry it all into place. So it's all the hair is all standing in the same direction. So we got to get it right down to the right down to the roots right down to the base. Not everybody has that hair that just stands straight up on its own. So what I'm using is a powerful hair dryer on high heat and I'm using a nozzle here. What the nozzle does is it directs the heat? So I want that heat the brush and the hairdryer moving in the same direction. So I want to direct that heat right at the roots to stand the hair up. So I want to get this back all even across, but I'm not rounding it like. I did before now we're starting the square portion of the haircut okay. So now we're gon na spin them around and we're going to work our way forward. So just take your time and get a really good cut down the center. We want to get a nice even center guide, to follow very small sections when we're dealing with short hair. We want very small sections, otherwise we're going to see clipper mark sorre clipper lines. You know what I do was after I get the first cut. I turned my clipper off. I grabbed my brush and I brushed through the hair a few times and I checked my mirror. I want to make sure that first cut is nice and straight, and I want to get all the loose hanging hair out of his out of there. So it's not in the way. So once I do that I'll take us a second time I'll go down the center just to make sure it's nice and even then we'll touch it up and then we'll work on the sides introducing saurian of New York premium grooming products for the modern man designed By third-generation master, barber Gregg's Orion made in the USA and not tested on animals, each of our styling products is infused with natural ingredients and features light. Clean fragrances are two-in-one, shampoo and conditioner is sulfate and paraben free and color safe. Do you own a barbershop or salon rent, a chair or run a school, find out how we support our retailers with world-class barbering education and product knowledge, training, we're currently accepting applications for wholesale accounts and invite you to apply on our website zoria of new york? Okay? So that completes our first cut, which is our rough cut. Now I'm going to retell the hair and dry it back up and touch it up. We do the same thing on the top here. Just a little freehand work to get that corner just right and saved here on this core, okay. So now what I want to do is brush off his face and now we're going to do the final style with a really strong paste so to style our flattop. We'Re gon na use ours, Orion of New York shaping paste, and what this is is. This is a very thick paste and it's gon na rub. It'S gon na rub in our hands and emulsify in our hands like a cream, but then it's gon na harden up like a pace and it's gon na hold and it's gon na hold all day. It'S gon na hair won't move at all. So what you do is you want to multiply it in your hands and the beauty about this pace is there's no clumping or anything, and it doesn't clump in the hair when you put it in the hair, but as you can see once we put it in The hair, it stands the hair right up, even the most stubborn parts in the front, and then we get that right down to the roots and we're going to take our vent brush and we're going to brush it all straight back and we want to brush it Up in the corners because that's where it wants to lay down so as I'm brushing it up in the corners, I still have the product on my hand and I'm doing the same thing in the front and then the same thing. On the other side, hey and now we're going to spin them around and show you the view how the beer blends into the tapered outline now we're square across the top. We taper it out the tail in the back and then the fade again fits in into the beard on the other side. So for a quick review. The first thing that we did is that we use our firm hold as aurion of New York gel to style. It up in the air to give it a nice strong hold and we took we trimmed it down from there. And then we used ours or native New York, shaping paste, which has a which goes in real easy and it has a really strong hold as well. And it's going to hold the hair up all day. Long and even the toughest parts in the front. And in the back corners, it's going to stand it straight up. You

Comments
habesha2: He can pass for wolverine lol.... Good tutorial, keep em coming I'm learning a lot.
andrew cluer: This conventional-looking young man appears initially as an unlikely candidate for a Crew Cut, but the makeover is very successful.
zhivargo williams: I like how you done this cut on a difficult styled client for the cut. Most people do it on easy clients makes it look wsy to easy not like reality
jesus zarate: Old school cut not a lot people doing them anymore very good style And precise .
Hasan Ucar: Great video can you do a senior citizen haircut with natural parting.
Andrie putra: This is flattop haircut tutorial we waiting for..
Russell Bogrett: Flattops are making a big comeback. I find myself doing more every week.
Frankish Knight: Great work!
kobebeef415: barbers don't listen when he say you can't have patchy parts and need to cut it off, you will mess up a dude's lineup and make him have a big as forehead
Mike Navs: Great flattop
Philip Plowman: Well I tried going to the website and the link provided as you suggested and nowhere could I find a link to set up an account or ask for help or anything. All I showed was an existing account which I do not have
Joshua Ivery: His hair looks so thick
Jon-Nikki: Michael's Ph.D: Worst flattop I’ve ever seen
Damien Thomas: Is his hair really thick
Drew Williams: This is dope
michael slane: handsome man
Faaiz yalda: Mate that’s not even the sides needs more blinds too looks uneven mate
h1z1 king: Is that suppose to be a simon cowell hairstyle