How To Make Wig Lace Look Like Scalp The Best Highlight Blonde Wig Super Fine Hd Lace
- Posted on 07 February, 2023
- 360 Lace Wig
- By Anonymous
▬▬▬★ Valentine's Day Sale is going on ★▬▬▬
$50 OFF over $289, $30 OFF over $179 | Code: LOVE
▬▬▬★ OMGHerHair Coupon Code ★▬▬▬
$ $ | : ROSH30
▬▬▬★ Free Shipping & Buy Now, Pay Later ★▬▬▬
▶ ▶ : https://www.omgherhair.com/blonde-high...
Length: 20 inch
Density: 180%
Color: Blonde Highlight
Size: Medium
▬▬▬★ OMGHerHair Quality Glueless HD Wigs ★▬▬▬
√ Super Fitted Glueless Wig Cap
√ Real Invisible HD Lace
√ Clean Bleached Hairline
√ Deep Parting 13x6
√ Adjustable Straps & Elastic Band
▬▬▬★ MORE WIGS FOUND HERE ★▬▬▬
▶ OMGHerHair Official Website:
▶ Fitted Glueless HD Wigs:
https://www.omgherhair.com/fitted-glue...
▶ Beginner Friendly 360 Wigs:
https://www.omgherhair.com/360-lace-wi...
▶ Luxury 13x6 HD Wigs:
https://www.omgherhair.com/13x6-hd-lac...
#hdlace #hdlacewigs #13x6wigs #13x6hdlace #gluelesswigs
▬▬▬▬★ OMGHerHair Social Media ★▬▬▬▬
Instagram: https://www.instagram.com/omgherhair/
YouTube: https://www.youtube.com/c/OMGHerHairOf...
Facebook: https://www.facebook.com/omgherhair
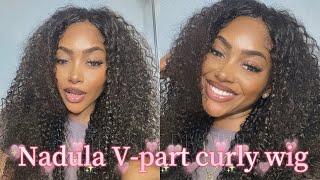
Foreign, hey guys it's Rachelle and welcome back to my channel. Let'S get into this wig, it's a highlight weight and honestly, this is probably one of the best highlight wigs I've ever worn. I love love, love, the tone of blonde Shades and The Roots is nice and dark usually sometimes highlight wigs. The roots are a little brassy, but this one I was here for the dark roads. So if you want to see how I installed this wig from start to finish, please continue to watch. Let'S get into this wake, so the wig that I'm using in today's video is from OMG her hair and this wig was sent to me. This is my first time using this hair company never used them before, but this is pretty much everything that comes in the Box. You get a brush elastic band to adjust the wig to fit your head size. Add your brush because I always need my Edge brush for when I'm applying my wigs. Now I got some wig caps, but it's a little too dark for my skin tones. I'M not here for it now. This is the wig fresh out the box. It is super silky guys like this is colored hair and when I say color I mean like it's bleach, hair and the hair texture felt so soft and silky. The knots are pretty bleach, as you can see, so the knots look pretty good and it has a comb in the back. I like the big comb because it's perfect for the nape I'm going to cut off that extra lace, because I don't need it. I'M not going to use it for anything and you guys know I like to cut the Combs off the side because, honestly, they literally just poke me in the side of my head, so I don't really use these. Do you guys use these? I never use them. I'M going to be doing my ball cap method and I'm using a stocking cap. I personally prefer to use stocking instead of the wig cap, because it's thinner, especially when you're doing a shoelace I like how thin the stocking is comparing to the wig cap. They do have very thin wig caps, but I like this one because it matches my skin tone better as well. I have a very detailed video on how I do my ball cap method. I will link that video down below, if you have not seen it as yet, but I do use the Bold hold Liquid Gold to apply. Then I'm going to go in with my scissors once it's all dry and cut away all that extra bit of wig cap. That I don't need I've actually gotten requests to do more hair videos without doing the ball cap method, and I mentioned to you before that. The reason why I do it it actually does protect my edges. I personally don't like just putting a wig cap because my edges are still out and then the glue can touch my edges and pull on them. So I do prefer to cover my edges with the by doing the ball cap method. So no hair is exposed at the side and there's no glue touching my actual hair. Now I'm going to go ahead and pop this wig on my head and I'm just making some adjustments at the back. So I add the comb into the back of my head. You guys see, I never show this step, so that's pretty much. What the back looks like someone was curious to know what the back of the wigs look like when you apply it asks and if it's you know lifted at the back, but that's what the comb is for to keep it in place. Now, as for this wig, it's about 20 inches in length and 150 density, I do think the wig is just a tad bit big for my head, but it's a good thing. It has the adjustment straps, so I'm gon na go ahead and adjust that, and I did that part off camera. So I'm just adjusting my wig once again just to see how it's looking and honey these edges on this wig looks great. I do not have to do any tweezing whatsoever, which is good so now I'm going to cut away all that extra lace, because we don't need it and you guys know I like to cut my lace in sections that way. It'S a lot easier for me to apply it. I'M loving the hairline on this wig. Now it does go down a bit lower than where my actual hairline starts. So I'm going to take out some of the hair at the front just to get an idea of how much a lace I'm gon na need to cut off just so it works for my forehead. So now I'm going to go ahead and apply some lace glue to my forehead and I'm using my very own lace glue that I will be launching very very soon. I know I've mentioned this so many times, but I promise you it is coming very soon. So I did two layers and I go in with my blow dryer on the cool setting to dry down that lace glue pretty quickly. Now I'm going to pull down that lace and honey it it's already looking good, but she's, not even melted yet, but it looks really good. So I'm going to go in with a blow dryer and I'm going to go ahead and cut away the extra lace. Now, as you can see, I'm cutting away a lot of the lace because, like I said, the hairline did go down a bit low on my forehead. If your hairline doesn't go, if your hairline goes on Lower, you don't need to do this, but because mine goes up a bit more. I need to do this so now I'm going to go ahead and add some more lace glue on the edges of the wig. Just to make sure it's nicely melted down and everything is secure. So again, I'm gon na do the same thing. On the side, I'm using my rat tail comb to apply the lace glue on the side as well, and I, like I said I like to do everything in small sections. Go in with my blow dryer on a cool setting, and I did about two layers of glue so now we're gon na go ahead and pull that lace down melted into the lace glue, and you guys, I'm so glad that I don't hi Tina. That'S my oldest! I'M so glad that I didn't have to actually tweeze this wig so now that the wig is on I'm not going to do the other side on camera because I'm literally going to be doing the same thing on the other side. So what I'm going to do now is I'm going to cut some little tiny baby hairs. You guys know how I feel about that and I'm going to cut away all that extra lace as well, and I'm using my eyebrow razor to cut away the extra lace. I, like it a little bit jaggedy, so no straight lines, because if you do a straight line, fine, the wig is just gon na look weird, so you want to kind of cut it jaggedy and I just added some glue right by the ear tab, because that's The part that usually lifts easy, so I added two layers of glue once again and go in with my blow dryer and melt it down for a nice and Flawless melt. I'M gon na go in with the Chia V melting spray and I apply to the edges of the wig and I'm going to go ahead and tie it down. Leave it on for about 10 minutes and voila. She is melted down to Perfection. She looks amazing. I didn't have to tweeze the hairline, but it looks really really good. I did my makeup off camera, so yeah guys look how silky this hair is like I'm here for it. Let me know what you guys think and this is it and I hope you guys enjoyed this video. I just went in with my flat iron just to straightened a bit, and I forgot to mention that I use my hot comb to flatten the wig. I don't know what happened to that clip like I lost it somehow, but yeah this is the completed. Look. I really hope you guys enjoy this very quick install. Let me know what you guys. Think of this video and I'll see you guys in another video very very soon. I love you guys and thank you for watching bye, foreign


Comments
Loved girl: Do not buy guys. I bought from this company this year and the wig was such a disappointment. Over plucked sidewalls to baldness and over processed hair with lots of split ends. Ended up turning the wig into a closure. Last time I will order any wigs from this or anyone other company. I will still to my quick weaves and sew-ins going forward