Detailed Flawless Wig Install From Start To Finish *Beginner Friendly* Ft Hairvivi | Arnell Armon
- Posted on 07 February, 2023
- 360 Lace Wig
- By Anonymous
hi guys :) really enjoyed filming this! hope you find this wig install tutorial super helpful and informative!
hair details below
Enjoy BIG DISCOUNT CODE: Arnell (Limited Time)
▬▬ ★☆ Free Return No Reason ☆★▬▬
▶ Mavie Wig in the Video: https://bit.ly/3DCMtbk
Hair details :
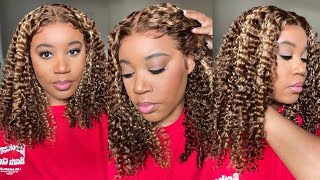
Wig Cap Construction: Free-parting 13x6 Clean Bleached Frontal Wig
Length: 20 inches
Cap Size: Medium
Lace color: Cappuccino
ALL To Make Your Wig Natural
√Pre-plucked Hairline
√Clean Bleached Frontal
√Real Invisible HD Lace
√Pre-Sewn Piano Keys Elastic Band
√Pre-made Fake Scalp
▶13x6 #HDLACEWIGS: https://bit.ly/3lavN4M
▶Best sellers #LaceFrontWigs: https://bit.ly/3WZX7jo
▶Hairvivi #GluelessWigs: https://bit.ly/3X2nODK
▶Same YT Gurus Wig Kit For Sale:https://bit.ly/3HQtHQd
Hairvivi Official Website: https://bit.ly/3JIquDT
Follow Hairvivi on Social Media:
Instagram: https://www.instagram.com/hairvivicom/...
YouTube: https://www.youtube.com/channel/UCWK7J...
Facebook: https://www.facebook.com/hairvivicom
Cassy
Influencer Manager
Hairvivi Website
Hairvivi Instagram
my amazon storefront https://www.amazon.com/shop/arnellarmo...
If the link looks like this * https://go.magik.ly/ml/wntu/ * its an affiliate link! Some are commission based depending on the brand and some are ones I can track just to see who is interested in what products :)
Brands interested in Collaborating please email
-----------------------------------------------------------------------------
Follow Me on my other socials!
Instagram https://www.instagram.com/arnell.armon...
Tiktok https://www.tiktok.com/@arnellarmon?la...
I don't have a snapchat or twitter
-----------------------------------------------------------------------------
--Frequently Asked Questions--
Camera I Use: Canon 5D Mark IV https://go.magik.ly/ml/171il/
& Canon EOSr https://go.magik.ly/ml/171im/
Camera I Use For Vlogging: https://go.magik.ly/ml/171io/
Editing Software I Use: Final Cut Pro X
Age: 27 years old
Location: Los Angeles, CA
Here we go: hey guys, welcome back to my channel. If you are new, my name is Arnell and in today's video I'm going to be doing a wig and stall. I'Ve been doing more wig installs lately, like dedicated wigging stalls like videos I used to make back when I first started YouTube and I kind of miss it. It makes me feel like I don't know it's just with YouTube these days. I know you guys or if you're, if you watch me, I know people love weekly Vlogs, they love to be in the business. The T, and just with all content you put out there, has to be some type of like I don't know like a reason behind it. I just missed the days where we could just sit down either. Do our makeup and hair and it'd just be that so I've been doing more of that lately. I know it probably doesn't engage as much as my typical videos, but I'm gon na keep doing it because I I like it like it's fun. So today's wig and stall - I'm really excited about it, because I'm working with one of my favorite companies and that is going to be hair VV, I love their wigs. They have some of the best wigs like out of all the companies I've worked with. They are a hundred percent top three. I know that their wigs are a little more pricier than other companies, but it's for a reason. I'M gon na show you why. So, when you open the box, you'll be greeted with this little. Who are you gon na Focus girl? This? Thank you for your purchase and has a few instructions on the wig itself. You know if you're a beginner, then after that you'll find this bag in this bag. They give you a few supplies. They give you this edge control brush that has a rat tail comb at the end and then the edge control brush with both the brush and the comb, although with their wigs, I don't really do baby hairs. Typically, I would use that for baby hairs, but with their wigs you don't need them. You'Ll see. You also get this band that I believe people put on to like make the wig not slip back, but I typically don't use these, I'm not a fan of them, but if you are, it comes with it and you I love their branding. I feel like they put a lot of effort just into their branding. You know they're, not just okay, throw it in the box and that's it no they're they're about their branding. You also get two clips and guess what their Clips have their brand on it. They'Re really good with their branding. If I were to come out with my own wig line, I would package the wig like this. It just feels very put together, so it also comes with this true scalp tape, which I've never used before, although I think it's nice, they put it in the package with your wigs, you don't need it and it comes with a few different shades. You pretty much put it on the lace and it gets ridden like the little squares like the grid. You see in the lace. However, I feel like their lace. Quality is so high that these are optional, they're, not necessary. Some wigs, you need stuff like this and guess what branding baby I just love how they put their name on everything with their wigs. You don't need it. It'S optional, it's there, but you don't need it. You then get a card says. Thank you for your purchase. It says when you purchase a wig, you post a video review and you share your happy experience on social media to unlock 30 cash back keyword happy. I don't think they're gon na get 30 to anyone who says anything bad, but I can guarantee you if you order their wigs before you know their wigs are good. You won't have anything bad to say you get a returning exchange registration in case you want to return the wig and then about us like their branding, is just so cute to me. You get another little card that lets. You know how to care for your wig and then you get the wig itself, so it's actually wrapped. I opened it because I want to see the color, but it's wrapped with this paper right here and then you have a silk bag. Guess what the logo is on the back and then the wig is in the bag, and then you have this stuffy to keep the wig in shape. I know. Typically, I don't like go into detail like that with, like my wig videos, but let me know if you guys like that I kind of feel like It's really informative, so here's the wig we're installing today She's a Beauty I have not. I'Ve never received a wig. This color, if I'm not mistaken, like this, really nice brown color now one thing I could say by the way this has highlights - I don't know who's in their lab like doing this, but I really you would think that these wigs are hand-dyed. I, like I just feel like their wig quality, is top tier. If I was going on a trip and I needed to order a wig first sight that will come to mind is the, and this is not to say that other rig companies don't make good wigs. You guys have seen the wigs I've worn they they look good, but I just I just love how they put it together. So let's get into the actual wig, so you flip it inside out. As you can see, it's pre-bleached. You don't have to bleach it like the wig comes ready to go, there's some companies that say pre-bleached and they're, not pre-bleached. This is not one of them. They'Re pre-bleached. You have two Combs on the side which I always end up cutting off, because I typically will glue my wigs down or even, if you're, using a glueless method. Typically, I don't even use the Combs, and so I just take them off because in my mind I feel like it makes the wiggly flatter. It also comes with an adjustable strap built inside the wig and guess what guess? What branded you already know, then in the back, this is like one of my favorite things. I love when companies use like the double comb I feel like it adds so much more security. Typically, on most wigs, the comb is like half this size, so I love that it's long, you have more more adjustable straps in the back. You have a tag on the wig. Yes in case you want to return it. This tag better stay on it, they're just like they're, so legit she's, just a very nice unit. So typically I glue my wigs on. I really prefer glue. However, this wig is promoted to be glueless, so I'm going I'm going to do without glue, which is very, I have not installed a wig without using glue, probably since I believe, 2020 yeah since 2020, when I was doing that hair series, I'm a glue girl, but We'Re gon na do it without glue, because I want to show you guys that it's glueless and it's effortless and it's super easy to do all right. Let'S get into this install starting with a stocking cap, I'm gon na do a ball cap only because I feel like you don't have to you really don't, especially if you're a patient, because it is a whole extra step. However, I feel like my wig installs personally. Come out better when I do it, so I do it so. First, I'm going to push back all my edges with some edge control. Yes, this is a pedicure brush, but I've never used it on my feet. I'Ll actually buy these brushes for this because I feel like they're they're, the perfect texture like they're, not too hard and not too soft, and some of my brushes are really harsh. So these work out, I want to say, they're, like a dollar I'm using this as controlled by this company called hair, so Chic I bought their bundles before, for my sew-in and their bundles are really nice, but they have edge control. Now I like it all right. She slipped back P.S. If you don't want to do a ball cap method, what I would advise, which I've done before I'll part, my hair in the same style, I plan to part the wig, and then you could put powder directly onto your hair. I'Ve done it! It'S really easy, or you don't use powder at all, but just at least part your hair, where you're gon na put the wig. I think when you're working with thicker lace not doing a ball cap is more forgiving when you're working with thinner lace. I don't know. I just think it makes a difference. So, oh, not you are you having a rip in you, you're gon na put your stocking cap on, and just I mean it's already got a hole in it. Let me actually move that to the side, because I want that to be right by my ear, so I'm going to cut a hole in this side, preferably look behind my ear. If you cut it like right in front of your ear, it makes the hole too big pull my Viggle ears through that all right cool before you spray, for whatever reason, when I put my stocking cap on some of my hair, will move, that's an easy fix. You just take a comb and go underneath and just like brush that back any hair that might have got out of place so to mold my stocking cap. I'M going to use this Wonder: lace, adhesive spray. I have the both uh this bottle and the red bottle. They both were really good to me, they're, better than got to be so you can either use your finger, which works is just. I hope my hands get dirty or use a comb and just spray it and push it back: foreign cool and so typically, when I do my ball cap method, uh, of course I'll make sure the spray is like a little bit before my hairline, but I like To put a little back here too, just to create more security, now here's something I've been doing as of lately, because the thing is this like it'll hold, but the side tabs they always lift. I haven't mastered keeping those down they're, just really annoying. Unless, like you really sit there forever, let it thoroughly dry, but even then you don't know so I put a little bit of glue. Oh and this one came right out. This is a new bottle. This is the Erica J, uh Sport and I'm so happy. She released it in just a regular bottle because it's so freaking good, like you, if you are familiar with like the original, then you could tell the difference like yo like this really holds it down. So I just put some glue over here by the ears just to ensure that they don't lift, because the most annoying thing of her is when you do a ball cap method in the size star, lifting and I've experienced that more than a few times. So I just put the glue right here. I went to a phase where I was using glue to just do the whole Bobcat method. However, I noticed that when I'll put the powder it just it, wouldn't it just wouldn't it just wasn't the same. Okay, you could watch like some of my old videos, my old wig videos, to see what I'm referring to so now. I just put it right here and that seems to work out for me and it dries pretty quick, and now we wait. This is not gon na take more than five minutes foreign all right. So I'm positive it's dry and I hope so because, like it's squeezing my forehead so now we're going to apply powder. My favorite powder to use for my ball cut method is either the studio fix powder or this Fenty Beauty powder, because it's like a thicker powder, so I just feel like it gets the job done quicker for shade reference. I am 350, but I have used 360. 370 and 345: it's all the same thing, so I'm gon na take this very old brush from Becca. Only because like I, I don't really use it like that. I just refuse to get rid of it because we don't sell it anymore. So I feel cool to have it, but because it's kind of big and wide it can get the job done quicker. This isn't working like I thought it would. I mean like it's working but like no, let me use my regular flat head brush that did the job better. Some of the spray back here is still wet and you could tell based on how the powder applies, but that's fine it'll dry as long as the front is dry, I'm using a different like stocking cap. I typically use the ones by Kiki hair care, but I'm using this one that came in another hair like package and theirs are smaller. So I'm like it's gon na hurt my head. I want to take it off. Yes depend on the wig I'll put powder on the lace too, but sometimes when you put powder both like, if you do the wig, the stock uh the ball cap and then you put powder in a lace too. I can't explain it, but the lace lays different. It'S almost like the powder's thick, it weighs heavy on the lace. So it's not a necessary step. You will get a forehead line. It'S okay, though it goes away. So all I'm doing right now is peeling. This back checking to make sure I don't peel it too far back it's easier when you cut it this way versus having to go back and tweak it, it's just annoying and I'm just gon na cut that take my time, because I have definitely cut my face. Multiple times, not just once not just twice, not just three times like probably like ten plus times is Russian. Let me go back and just oh, I remember during the summer of 2020 I had like found these like different, like these new scissors at Sally's, and when I tell you they were the sharpest scissors I've ever owned in my life, like they shouldn't, have even sold Me those without a license. You know like I know what I'm doing, but I'm not a licensed professional. When I tell you those scissors were so sharp, I cut my hand so bad and it was twice in one day. It was bleeding so bad to this day. I still have this scar like they were the sharpest scissors ever, but they work so good. I missed them, but I'm like scared of them. I was traumatized. I was like. I don't want to use it anymore because I kept cutting myself because they were like they were just hazardous. Okay, they were so freaking sharp. We look bald. Okay, so now I'm gon na go in and quickly cut these side clips. Like I said earlier, oh, I don't know what shampoo hair BB uses for their wigs, but they smell so good. I pay attention to that and let me cut the tag off because, obviously I'm not returning this I'm going to try it on this color. Oh, my gosh stop! Oh, I want to glue it on you guys because I don't want to take it off. Oh brother, I might have to glue her you guys because, okay, I'm going to like this race car theme party tomorrow, I'm gon na, take this off. I actually don't need it. I'M going to this race car theme party tomorrow and I was debating on which wig I wanted to wear. It was between this one, and this other highlight wig. I have, and oh my God like, what's gon na, be my vibe, but after putting this on and seeing the color, I'm like this could go on my vibe. So I'm like, I might have to keep you on for the night, because she's just really cute and look at the part. You know it's 13 by six. I love a good 13x6. I'M not knocking thirteen by four but in my personal opinion, the deeper the part. The more natural the wig looks, that's just what I think, although some girls are able to make their two by four look good, I mean I do it, but I always request 13x6. Oh, this is perfect. You guys, can I please glue it it's because the outfit I'm wearing tomorrow this would just this will really go well with it like really bad. So I'm like I'm gluing it I'm so sorry, I'm so just no just no look! Okay! Look! It look it just just for proof. This is glueless. Look it. The hairline is pre-plugged she's ready to go. Look at her. Look at her gets a little spray tie down blow dryer she's good to go, but I want her on. I got a glue her. This looks too good, I'm so sorry, I had other plans, but then I put that on and my plans changed. Oh okay, where's, my tweezers at I got ta make this a little even because this part is a little higher up, so I'm going to take them lightly. Peel that back! Oh, I'm, so excited now, because that looks so good! Oh, if you guys watch my weekly Vlogs, I don't know which video is going to go up first, but you'll see like why it's imperative that I installed this wig. I have to install this wig and like glue it and keep it on because my jacket so for the party I was like you know, I don't know if I want to do like a full on like race suit, but I'm like when am I ever gon Na wear a race suit again, I'm not so I got this jacket off Amazon that has like race, girl, Vibes. I'M like I'll wear this again, you know, like I just wasn't gon na waste. My money, you know I don't. I don't do that anymore. So the jacket is like brown, and just this will really just go so well, so it has to be done so I'm just taking some alcohol and ruining my makeup. No, I just trust me. There was one time in which I was in a rush and I was like: do you really got ta like clean up around your forehead for it to stick, and I learned my lesson: the glue didn't stick. I wasted my time and I kind of like messed everything up about to take off the ball cap redo, it put a whole new one on. It was a catastrophe all because I skipped this step. Don'T skip this step, get some alcohol, 70 90 alcohol whatever and clean clean it. Even if you don't have makeup on do it, I'm telling you it makes a difference because there's been times where I did all these steps, and I skipped that and the lace did not stick so now. I'M gon na use my Erica J glue and I'm gon na, like put it directly on that line of the ball cap. Oh, this one looks so freaking, pretty that's the thing about hair BB wigs for me, you guys they really just put me in a tough situation because I'll have like other hair companies, I'm working with and obviously you know the girls want their videos. But then, every time I put on, I won't even just say: hair Vivi, it's just their wigs are always good, but any good wig. I'M like oh. I want to keep this on. Did I get attached the last hair, BB wig? I had only had it, for I mean I've only had it for maybe like a month, and I installed that thing like four times. I got really attached to her and I just feel like that's what happened with this wig. I feel like this color like this brownish auburn color, has always looked really good on me too. This is going to be a perfect install mark my words, so I did this later, I'm gon na. Let it dry you want it to dry completely clear. I recommend popsicle sticks. You can use your finger, just clean your finger off with alcohol. If you don't have a popsicle stick or you can use the back of a comb. I just I feel like these are just the best I don't know and they're cheap too. You want to let it get completely clear if you don't, you can make it work. I'Ve done it before, but just just save yourself some time, let it just dry completely clear. So when you spread it out, you want to make it as even as possible, once the first layer dries clear, you're gon na go in with a second layer. If you want to keep the wig on for weeks, you're gon na go with a third layer. Maybe the fourth layer - I always stick with two two is always enough for me. So that's what I'm gon na stick with we're just gon na install it like that, so I'll be back after I do my second layer of glue and then we'll install the wig. Okay, we're back it doesn't look completely clear and honestly, I don't like these stocking caps. I'M used to these ones. Like I said earlier, these are good they're soft they're softer these. I can't explain it but there's a there's, a difference like they're, sheer they're, more sheer than the average stocking cap, but these are higher quality. I don't know how I don't know how it's kind of like, where you have some really cheap pantyhose, and then you have some that are better quality, they're still pantyhose but yeah. I I won't use these again because I feel like they rip they rip very easily and when they rip the glue it, I can't explain it just does not dry the way it should, but I'll show you guys how to get over that. Okay, because it's annoying, but it's fixable. So now it's time to install the wig, because the sides are completely clear and if I wait until this dries completely clear, which is not a guarantee that it's going to dry clear, because basically the glue is caught up in the stocking cap, then the sides won't Be tacky anymore, so let's just do this, so I'm going to pull it forward. Every wig is different. Okay, there's some wigs where you want to press the sides down. First, then, the middle there's, some wigs. We want to press the middle down first and the sides. It all depends, but you kind of want to like try to get it over that before you impress it down to just make sure it's like adjusted onto your head, the right way like this front part. I don't want it that far on my forehead, so I'm going to bring it back, but then the side part I want to bring it a little up, so I'm gon na actually start with this side and I'm going to press down on this side. I could tell I'm gon na have to cut this back because that doesn't really align with my hairline. So we're going to do that and then we're going to bring that forward just a little bit and then press down like that. Yeah I like, where that lays on my forehead. So I've had my handy dandy, hot comb plugged up for like the past 40 minutes, so she's, hot and ready, and so I'm just going to start to use that we push back so because I'm going to have to uh more than likely cut off more on This side I may or may not have to do some plucking all right, so we have to be cautious when cutting now you could use one of these, but if you're a newbie, I actually think scissors are easier. I'Ll explain with these. It'S all about Precision right, like it's cool, but sometimes you can cut too far back it's just just know, but with the scissors, if you want the same effect, lay it like this and like drag it like that. You just don't want to cut too much lace off like me, even as someone who's been doing wigs forever. I still do it so when I get to the side is when I'm going to start using these scissors, like the regular scissors, just cutting still dragging at the same time, it really depends on the lace you're working with, but with this lace, it's gon na look Good, regardless just watch so I'm just dragging it so as you can see, the scissors are kind of sticking, which means I kind of have a little bit too much glue just a little bit. But I'll show you how to fix that too. Sorry to cut the Restless lace off and now I'm going to cut this lace, that's covered my ear. We could tuck the hair behind so, as you can see, since I had to kind of cut off more than I needed to. It looks a little blunt, but it's okay, because we're going to twist that and make it look like this she's doing well, also also, depending on your hairline, like your natural hairline, you could leave it like this, but my natural hairline is more like on the thinner Side, so that's why I feel inclined to like pluck a little bit more, so it matches that because I'm not used to seeing my hairline be dense, but some people have denser hairline so to this to them. This may look normal, I'm definitely gon na. Add a look, but I like how that looks. I'M gon na cut a little more off, so it's even okay, cool now, I'm right-handed. So do my left side is easy. I don't like doing my right side. It'S really annoying, it's like my problem side, but we're gon na just do it fast and try to get out the way I have to do this side in sections like with this side. I could just slide you know, but with this side it's easier for me to do it in sections. That'S what I'm gon na do make it sure that looks even so for this side instead of going like back, I have to go from behind the ear and you could feel where their lace is press down. Again, here's what you do with extra glue. You can either take alcohol and rub it, but I feel like even when you feel like you got it all off it. Just it doesn't remove it. The way I wanted to so what I'm going to do is this works better when you have a mirror up close, so you don't pluck your skin I'm going to pick up the glue. That'S still, I can't poking out, and you want to pluck it as fast as you possibly can get a nice little grip on it. Trying to plug your skin. You want to pluck it as fast as you can, because the glue is sticking out from underneath the lace is still the same glue holding the lace down. So you don't want to peel it up because that just ruins the Integrity of like the install Okay. So, as you can see, I kind of semi tweak this side, while, while I was off camera, I'm actually tweaking a little more just a tad. I like how that looks, so I'm gon na do this side now so, depending on the color of the wig, you actually don't have to pluck too much. Lighter colors are way more forgiving like. If this was like a super dark color, the hairline will look dense or more dense than this looks like a jet black or even a 1V. But since this is a brown color, a lighter brown color at that. I really don't have to pluck too much at all, so I'm just gon na part a little away pluck a little bit, but not too much plucked so like it's really not dense. At all trust me, I've had dense wigs they're, a pain in my ass, like I, I hate them. In fact, I'll tell companies don't send me that, because, like girl, I don't want a man, you could spend like an hour just plucking alone, and I mean, while I can do it, I don't want to do it. So, as you can see, I don't know if you guys see that, but it looks a little dark right there right ignore this shiny white part. I also don't have Foundation there so ignore it because, as you can see from the front, looks fine, but you could see some of my hair. I'M gon na show you guys how I fixed that too, but first towards my little stick. I have these tiny little sticks too. It'S the it's for eyebrow waxing. I'M gon na put a little bit of glue on another stick or just a new Surface, but this is easier because I'm going to throw the stick away, you can put like a DOT of glue. You don't need that much and I'm going to take this stick and where I need to add a little bit more glue, I'm just going to like slightly lift that up and apply glue using that or you can use the the tail of a comb. I just have these so it's easier for me. Okay, so now I'm gon na take my Sephora micro smooth powder and I'm going to take a really tiny angled brush and where you could see my hair underneath a little bit. I'M just gon na put the powder there and then, in order to like blend that in I'm gon na get some spray and just brush it so now, in order to melt the lace, I'm gon na clip the hair up. First, I'm going to spray this spray from Erica Jade and I'm actually I'm pretty new to using it spray that take this elastic band and tie it, and while that melts I'm going to style the hair all right now. Okay, I think it's been on my hair. Long enough and my head's starting to hurt so it's been about, it's been about like 15 minutes, maybe oh okay, I'm actually gon na, take The Edge brush. They said I'm gon na take the comb part to just like oh pretty much like brush that out, because I feel like it looks too harsh. I want this side to fall into my face a little bit more, so I'm just going to hot comb. It a little bit to make it go that direction. Dang, maybe both sides. I kind of like how that looks. I like how that looks, I'm going to keep the wig long, but I do want to just lightly cut the front just so. It'S kind of like framing my face a little better. I'M not gon na take off any lint, though just in the front, so it lays a different way. Foreign that looks better to me. You see what a difference that just made now, I'm just like up close to my mirror doing little minor tweaks to the hairline. I want to make this look as natural looking as possible. I feel like if I just tweak a little bit, that I could have that. Look, I'm going for you guys know. I'M perfectionist that looks good. Do a little more quick spray, I'm gon na brush it out. Don'T worry foreign such a perfectionist. I can't stand it. I am content some rough curls because I'm honestly being lazy, but when I style this wig tomorrow, it's going to be so cute. I think I'm gon na do crimps for my look actually we'll see, but this looks so cute and I like the highlights they have in the front. I just feel like this really. Compliments me a lot. So I guess that concludes this video. If you plan to sleep with your wig, on which I plan to sleep with this wig on tonight, if you want your lace to look just like this, when you wake up, you can't just like wrap it or put a bonnet on. You have to sleep with this one now the cool thing is you don't have to do it as tight as I did it earlier to really Mount the lace. You just want this like just lightly. Just do it as lightly as you want to like, but tied enough to where it's not going to slip off. But if you want your lace to still look melted in the morning, honestly, even more melted because, like the longer it melts the better, you have to sleep with this on you have to so that's my last tip. So I'm gon na link everything down for you guys below, including the glue I used, including this elastic band, the spray. I used everything that you need in order to complete this install, and I hope you guys enjoyed it if you did be sure to. Let me know in the comments down below or by simply giving this video a thumbs up and I'll see you guys in my next one


Comments
arnellarmon: I’ve missed this style of videoooo!
Ellie Diaz: I don’t wear wigs at all, but if it’s Arnell I’m gonna watch. She just comforts me so much.
India Tuff: My birthday is next month. I definitely been thinking of buying a wig from them because of you. Thank you for the video. It’s flawless as alway ❤️❤️❤️
Juel Clyne: Arnell is the ultimate wig-whisperer. I can watch you install a wig all day every day. Your wig installation is perfection ❤❤
Jasmine B: Arnell you could install 700 wigs and make 700 separate videos and I would watch all of them lmao this is so satisfying to watch. It looks so good!!!
Asmaa vlog 아스마 브이로그: Honestly, the content provided by this person deserves support from those who agree with me?
Annika: Arnell!! You made me discover my love of wigs a few years ago. I must have seen the watch me recreate videos at least 3 times each and while I mostly have synthetic non lace fronts, I totally butchered one with lace recently and remember thinking “shit I should’ve gone to Arnell’s channel first” so you have no idea how much I needed this video to pop up! I have a gorgeous pastel lime green one that I haven’t touched because I don’t want to screw it up. Thank you for this. love you and congratulations on the baby. So excited for you, love❤ you look so gorgeous and I adore this color on you btw
BigDanii: Ever since your first HairVivi video, they became my favorite wig company. They are worth the price and they come styled soooo cute every time.
Dose of K: I promised myself this year imma learn to do wigs on myself and Arnel u always make me feel like I can, like dam girl u did that
Charmee Taylor: I just want to say how proud I am of your consistency! You’ve really been making your mark on YouTube!! So proud!
Ms. Casanova: I love these videos from you! This is what made me find your page originally beside the fact that you look flawless
H I V A: This color is stunning you’re making me wanna try this shade
Zaira: thank you for sharing!!! I’ve been looking into becoming a wig girl because I’ve never dyed my hair and I want to start styling it more but don’t want to damage it too much and I enjoy being a brunette so I don’t want anything too permanent. This step by step was so informative!!!! ❤
weakhotspot: i must say, the wig installs are definitely MY favorites!!!
Lavonne Pruitt: I would love to wear a wig for the winter and in the summer. Your step by step tutorial is very helpful. I am still not ready to install my own wig but after watching a number of your videos I know that I will be more confident.
Amber: Love this wig on you. This has me ready try one.
Joy: This video came in right on time! I’m looking a mess at work. We’re gonna do this install together.
Ameerah B: I love these kinds of videos where there is “no reason” and your just doing it because you like it. I enjoy these sit down videos….well all your content regardless but this is my favorite style
The HallWay: I tried with the wigs but just can’t get it right…. But I really love watching you perfect yours every time ❤❤❤
Colipopkola: I miss your wig videos definitely helpful and giving me more confidence to install. I actually ordered from hair vivi for the 1st time because of you last year. My package didn't come with all the extras that yours did. I don't even think I got card or anything lol. I did have the tissue paper wrapped around my hair which was in a silk bag. The box was black, super cute and sleek with a satin bow. But yeah just the wig and the tag lol. The quality was great and very pretty and 20 inches long I think I got a 1B. I was hoping it would come with some extras and help me out as a beginner but that's ok.
Aroy 212: never wore a wig but i still watch all your wig install videos because i just love watching all your videos lol
exclusiveop: That color is perfect on you! Next wig install imma really need to see you do it glue less babe lol (the girls want to know)…also can you let us know how the glue install holds up over a period of days with sweat, etc, like how you maintain and refresh each day?
Theresa Aubry: You're giving a whole Charlie-Angels meets Faith Evans vibe with this whole look... I love how the Auburn-Brown compliments you're sandelwood-beige complexion with you're amber-hazel eyes .... I'm currently experimenting with auburn hair as well only kinky-curly best investment I get compliments by people all the time... feel like a whole new person .... Any ways, what ever happened to your sister???.... I haven't seen her in a while....
Alea Saunders: Missing these vids! ❤ Can you do a HairViVi series?? I want to see more styles/colors from them!
Kathleen Moonga: Loved every minute of it!!! I have locs and you have me considering buying a wig, id like to see a glueless method with hair vivi wigs using the stuff they sent with the wig just to understand how to use them..
Chan R: Honestly I love your wig videos, I’m a wig wearer myself
Cynthia Echeverria: I don’t even wear wigs but I thoroughly enjoy these videos your energy is super calming also a Valentine date night video would be super cuteeeeeeee makeup - hair - fit wishing you well with the little bby
Alicia Jones: I love your wig install videos!
Susan Mejeh: I love Hairvivi wigs. I ordered three from them using your code. I just ordered one from IDN hair because of your recommendation
Susan Mejeh: The Ebin lace melt spray is EVERYTHING
Niffany4: I love your makeup and wigs videos. Don’t get me wrong your weekly vlogs are good but the wigs and makeup are top tier!!!!
Jorden Frinkle: Love the videos you have been posting. And pregnancy looks amazing on you. You are going to be such an amazing mom. Just wondering if we have an eta on the weekly vlog. No rush though. Love you though one of the best content creators out there. ❤❤
NishaD: You're the only person I watch to do a wig lmaoooo I just installed my first one and watched almost everyone one of your videos
Natasha S.: You should keep doing it we love it!!
Kay 16: Love this unit
sha'ava pacheco: I love love loveeee when you do hair videos ! This wig is that girl on you whew !!!!
Miiss Dee: That’s a great wig. And you always have the coolest music playing in the background.
Shalandrea Hillsion: Arnell..We need more GRWM…Hair..makeup..outfit..whole nine…Once again..Pregnancy agrees with you baby…You always were a stunning woman…but the pregnancy glow is real…
Paisley Durant: You're so beautiful I love hair vivi every wig comes ready to wear, My two wigs from Hairvivi all great quality.
Z. Dyme: I like seeing everything that comes in the box. I'm a newbie to wigs
Phionaa.: God knows how many times i checked for a video! so obsessed with you & your videos ❤!
Loyiso Mkhazi: Hey Arnell. I've noticed that you like lighter tones (and it looks perfect on you!) with your wigs but you always dye your natural hair black. What's the diff between your natural hair color and some of the brown-toned wigs you install and love? Im asking because these colours look stunning on you so I'm assuming your natural hair colour would too.
Jada Renee: This color is so Delicious on you ❤
Crystal “Cryssy K” King: Soooo pretty!!!
Samasia Robinson: At elks wig videos will get you all the way together probably the only influencer I’d trust with wig reviews
Hayley Moradel: We miss it too!! That’s where I found you at. I don’t even do wigs and I still loveddddd your wig videos.
Diamonique Durant: Yayyyyy i’ve been waiting for this install video!
Ms. Robbie’s 60’s & Beyond Beauty: Arnell,You get that. I love Hair Vivi too, but the consumer does not get those perks. They use to at least give the baby hair brush, I call them a year ago asked what I didn’t get the band, hair clips & brush, I was told since Covid they stopped including it smh!! But do I love them Yasss!!
CeCe Golden: Congratulations on your 900K subs @arnellarmon !!!
Phelo Fipaza: I don't even be wearing wigs lately but I'll watch each and every install video you post idc
Ivy Merritt: Congratulations on reaching 900K subscribers!!
tshepiso mokhema: I would still love to see a glueless wig from you
Msindisi Mtsotso: I peeped IG and I saw that jacket. It's a bomb combo!
REID: You have mad awesome skills
Khwezilomso Ntanga: Congratulations on 900k
dessy: yeah it looked too good!!
Abijah T: Congratulations on 900K OMG!!!!
Mamas: You make me wanna wear a wig and I don’t even like them
Cassandra Silva: brb while I check my bank account! That color is too good!
Lynn Uhler: Can you pluck while not on? Your beautiful ❤️
Amari: OOOH Arnell I miss these too! i’m so relaxed right now i miss you!!!
Gloriaaaa: Do I own even 1 frontal wig? No but am I going to watch the the whole of this video? Absolutely.
Jada Renee: You’re beautiful❤
Dishon King: The transition plug in! >>>
That Girl: Lady I love the wigs and coloring/cutting… videos bring out the mannequin head
Jackie Conway: Beautiful be blessed 0:)
Fresh Air TM: Ok but the short blonde illusion of a bald/cut is cuuuuute on you
Ashley Royster: Do what you enjoy. You have to keep yourself engaged too or you'll lose enjoyment.
ThePeanutGallery: Omg not you back paddling back to glue. I get it, tho that wig looks good.
huni: Arnell is actually really cute bald lol she has a great head shape
CARLS: hairvivi is theee best!! but yes, pricey
S A: Where do you get your stocking caps their so thin
lmz nour: Can you do a perfume video☺️
Robi Oceanna: Heyyyy beautiful
Megalook Wig: very looking forward to your nice video dear
Ebony Sanders: I knew you were gonna glue it lol
Andia dark: Liking now watching later
Ayanda Bob: OMG 900k
Jeannine Niles: Love
lookatlin: girl that bald cap was BALD
Stephanie Marcella: ✊
TNDRA V: I also only use HairVivi!!!!!
Judith Leavell Parker: Arnell, I was hoping that you had put the wallpaper up. Maybe you have. I didn't wait until the end of the video.
Lexi J.: The queen is back
CurlsQueenofficial: Hi arnell, if it is possible that give us some replies?
Alika Maisuradze:
TNDRA V: LOL this camera is CRISP
Pottattoo.chippss: Heyyy arneezyyy