Low Hairline Wig Install | Ft. Oulaer | Amazon Human Hair Wig
- Posted on 30 January, 2022
- Bob Wig
- By Anonymous
#Low #Hairline #Amazon #Wigs #Oulaer #Install #Scalp #StepByStep #HowTo #Glue #Glueless #Lace
INSTAGRAM: SamanthaAlyssaa_
https://www.instagram.com/samanthaalys...
BUSINESS INQUIRIES:
XOXOXOXOXOXOXOXOXOXOXOXOXOXOXOXOXOXOXOXOXOXOXOXO
HD Transparent Lace Front Wig Body Wave Human Hair Wig With Baby Hair For Black Women Pre Plucked Natural Hairline 150 Density Brazilian Virgin Glueless Body Wave Wig 24 Inch - https://www.amazon.com/dp/B081SHFQFS/r...
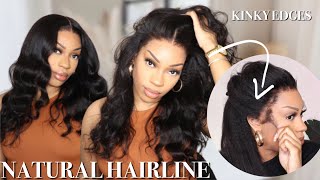
Hey guys welcome back to my youtube channel in today's video, i'm gon na be showing you how i did this really really nice install on my beautiful cousin diamond um. She has a low hairline, so i'm gon na show you how i work with that and yeah. Let'S go ahead and get right into this video, so this wig is from amazon and y'all. This was like the best wig that i've used it's so nice and um. The lace is really good quality, there's very minimal flyaways. It flat irons very well, and i just really really recommend this wig - it's not the most affordable wig, but it's worth the price. So the first thing that i did was bleach the knots you want to make sure that you're creating a thick paste. I say this in all my videos. I know you guys are sick and tired of me saying that, but you want to create a thick paste, so it doesn't seep through the lace, it's very, very important, um to make sure you're not bleaching those roots so yeah. So just go ahead and um bleach the knots first, so you can get that scalpy. Look. The lace is already really nice, but you want to bleach those knots to make it really look like your scalp. I typically leave the bleach on for about 20 minutes before washing it out. I washed the roots out with the shimmer lights shampoo, to get rid of any brassiness and, at the same time, i'm also going to shampoo the rest of the hair before dyeing it jet black, like she wants, i'm going to be dyeing this hair jet black, and This is another way to get your wig to look really really shiny and nice um just put a semi-permanent color on there, and it will help you know: vibrate make your wig look more vibrant if that makes sense, so i'm just going to pluck the hairline a Little bit before my cousin comes over because um i don't want to pluck too much, because i don't want to plug out too much hair and i want to match her hairline because she has a really low hairline. So i just want to pluck it a little bit and you want to pull the front section out first and pluck behind the initial front section and just keep on plucking um not staying in one place for too long until it starts to look more natural. My cousin had short hair, so i did not have to cornrow it, which is always great um, and i just licked it back with some gorilla snot. I think, and just blow dried and molded it so it would stay flat. I removed any oils from her hairline with a alcohol pad. I pulled this cap all the way over her head, making sure that it would be. You know super flat and i just cut out some holes for her eyes and her lashes. I'M using some got to be spray um to lay this cap down in the front, and i like the got to be spray better than the glue because it's easier to work with, and then you don't have to worry about. You know it dries super fast. Sometimes glue takes longer to dry. This dries super fast and it just creates a very flat and seamless cap ball cap i like to just sew down um the side of the cap, because that's often a place where it'll lift a lot and then you can also sew the back of the cap Too, to make sure that it's not going to lift or anything, i like to cut all the excess cap off and then start in the middle of the hairline and work my way on each side and the good thing about the got to be spray. Is that say you spray too much and the cap is really low. It'S easy to lift up parts of the sections you want to lift up. So that way, you know you can remove more of the cap and i'm just going to get as close to her hairline as i can to make this really look like her scalp here. You see me adding makeup to kind of blend that cap in and that's okay. If your cap tears just a little bit just put makeup on it, and you won't be able to see um where it has teared, and this is going to blend it in and match her scalp as much as possible, i'm also going to be adding some that Same foundation to the inside of the lace, as you can see, i cut the lace into three or four sections, and this is very much key when you want to um. Do an install on ladies with low hair lines, because it allows you to be able to work into sections and kind of manipulate the lace to lay how you want it to so. I'M going to be putting glue down one side at a time and i'm gon na evenly layer some glue and then um. You could take like your edge control, comb and kind of smooth it out. So it's not clumpy at all and then we're going to let this dry clear before adding on another layer. So once the second layer of glue has dried, i'm going to go ahead and start to lay down this lace and i'm going to try and match her hairline as much as possible. You can pluck some more later to kind of recreate the hairline more once you have a better idea of how the lace is laying, but for the meantime, just try and match the hairline as much as possible. That'S why it's good to work in sections and also um if a little bit of the cap is showing it's not the end of the world, because you can cover it up with some baby hairs and also once i got the wig on her head. I noticed that i'm gon na have to redo the middle part, so please ignore that it's not completely centered right now, i'm gon na fix it later. So that way, um it's completely centered, but for right now we're just worrying about matching up that hairline. So my camera cut off right, as i was putting the elastic band on so here, you're just going to see me um, taking it off, i'm going to remove the lace with a razor, and i'm just going to take my time with it guys. It looks a little bit boxy at first, but i had to do it like this in order to match her hairline as much as possible, so bear with me, but i'm just going to start cutting off the excess lace with the razor all the way around. The hairline so now i'm going to start combing out the baby hairs. This is the fun part and where it starts to look more natural, so here's the part where you can plug out some more hairs. If you see that it needs to be plucked, i did cut off the baby hairs with a razor and then i went in and used my small flat iron to curl them under and then i'm going to be using gorilla snot to lay down her baby hairs. I was trying to make sure because it's your birthday, like i don't know what it is so now, i'm just going to be doing some finishing touches, i'm just going to be putting some foundation on the part, and this is me adding some hair color spray. Just to make that part look a little smaller and more realistic, and that will bring us to the end of this video we are done. I hope you guys enjoyed this video, don't forget to like comment and subscribe, and i will see you guys in my next one bye. You


Comments
Inga Chapman: You did a very nice job! I have had stylists turn me away from a wig because of my low hairline. They need to watch your video and learn!
Shayla Akridge: I have the same problem with these wigs . My hairline is too close to my eyebrows . And I’m very scared to get glue on my edges. Thank you so much I will make sure I cut my lace so that I have 3 sections.
AmandaJane: What make up and what color did you use