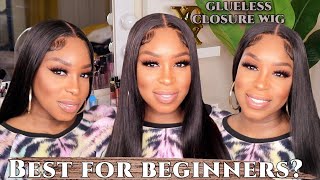
Balayage Hd Lace Frontal | Glueless Frontal Wig Install For Beginners | Ft Megalook Hair
- Posted on 17 March, 2023
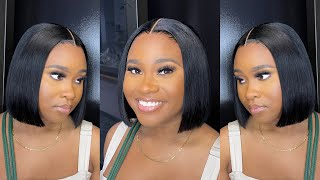
- Bob Wig
- By Anonymous
●▬▬▬▬▬▬▬▬▬✤#MegalookHair✤▬▬▬▬▬▬▬▬●
2023 Sale Up To $120 OFF
☞Get Extra 20% Off With Code: MYtb20(over $169)
♥Same Hair I’m Using in the video:➤ https://bit.ly/3YesXJB
Hair Info: 13X6 lace balayage body wave wig 26 inch 180% density
Official website ➤ https://bit.ly/3A9cKwL
Fire #balayage wigs:➤ https://bit.ly/3X0UVJA
25% Off New Pop Wigs:➤ https://bit.ly/3yBsLKK
New Trendy Color Wigs:➤ https://bit.ly/3EwXVpD
4C edge-hairline wigs :➤ https://bit.ly/3XOOWXw
Contact us:
YTB : https://bit.ly/3h7MRq7
INS: https://www.instagram.com/megalookhair...
TIKTOK: https://www.tiktok.com/@megalookhairof...
P R O D U C T S U S E D
C O N N E C T W I T H M E:
My Website
Hair Appointment Booking
https://wynnejean.com/pages/hairtour
Instagram @WynneJean
https://www.instagram.com/wynnejean/
Facebook @WynneJean
https://m.facebook.com/WynneJean/?ref...
Twitter @WynneJeann
https://twitter.com/WynneJeann?s=09
For business inquiries [email protected]
F A Q:
Ethnicity: African American
Height: 5'7
Age: 23
Measurements: Bust 36'' Waist 26'' Hip 38''
Shoe Size: 8
F A V C A M E R A G E A R:
Camera - https://amzn.to/2NJcPPs
Camera remote - https://amzn.to/2CDAsm2
SD card - https://amzn.to/2Qim76w
Umbrella lights - https://amzn.to/351lJxv
Soft Box Lights - https://amzn.to/2O9zzXF
Full size ring light - https://amzn.to/2XcmDo4
Traveling ring light - https://amzn.to/2XaDLdQ
Traveling Tabletop Ring Light - https://amzn.to/2NJbisG
Lighting & Backdrop Kit - https://amzn.to/2OgmTP4
Backdrop - https://amzn.to/2CHxA7W
Mic - https://amzn.to/2KlQrcJ
*This video may include affiliate links / paid promotional content & product placements. However, all opinions are my own*
Thank you, hey loves. Welcome to my channel. My name is Winnie Jean, if you're new here and if you're returning, then hey girl, how you doing if you are new here, you probably like this girl, it's crazy because well no, my ball! Cap is late. Getting to it, this is the best ball cap I've done in a while. Today'S video is gon na be a very layered vibey. Look. I want to go for the Gusto I'm having a lot of leave out lately and my hair is super long, so I can never start my layers where I want them to and I'm trying to give curtain, Bang realness. Okay, today's video is sponsored by Mega. Look. They sent me this wig for today's video. All the information will be down below in the description bar as well as any coupon codes. I have. Maybe, if I got them, you go have them and today we're giving highlights okay, we're giving Blondie blonde blonde. Okay, we're giving the Vibes they sent me some cute little goodies with my wig there's, an elastic band, some lashes, a edge brush a couple: wig caps, all the things and this cute little bag. I like to keep my wigs in after look. She cute. This game is so cute, but yeah I keep my wigs in these. They make it with glass so much longer than just having them swinging around, but without further Ado. Let'S go ahead and get into the looks sweetie. So this is your girl. I have not named her yet she's giving Yolanda Vibes. I don't know why it's just something about her. How pretty, how pretty let me get the details because y'all got ta know: y'all got ta know, so this is their 26 inch, 180 density, 13 by 6 Balayage wig. I went ahead and pre-bleached the knots and kind of pressed out the edges just a little bit blow dried the hair out and got it ready to install, let's go ahead and try her on the inside has Combs all along the back of the frontal one in The back and then an adjustable, strap here and then two on the sides. I'M gon na go ahead and trim this extra lace off and then I'll cut out these three cones up top just because I'll be applying it with a little bit of hairspray and ciao. We don't need them, I'm gon na go ahead and cut these out and I'm using my little razor comb. I just kind of slide it under and use it kind of like a seam ripper. If you have a seam, ripper that'd be awesome, but this razor works. Just as well, you just want to make sure you're, really gentle, so that you don't end up cutting the cap or the lace do not cut your lace, all right, we're ready! Okay, so it's laying pretty nicely. I just need to go ahead and trim a little bit off the ear tabs just a tiny bit, so it fits a little bit more comfortably but other than that they lay in pretty nice. I'M gon na go ahead and part out the ear tabs where I need them to be before I cut it just because this wig I cut the ear Tabs, are really important because the hair is a different color than mine, so I can't really finesse it. How I normally would so I got ta, take my sweet time and get it laid properly and after every cut, you want to try it on, because sometimes you cut too much off one side and then the other side fits perfectly all of a sudden. If you're familiar with my channel, you know the ear Tabs are not my bestie like we do not get along, but I'm really learning how to finesse them. It just takes a little bit of patience, so I'm trying my best to do just that and be patient because girl normally, I would have been halfway done with this installed by now. I am not trying to be here all day but, like I said when you wear a color wig, I feel like the install has to be on point or else it starts to look real tacky real quick, and we don't want that. That'S not what we want. So we have our ear tabs, given what we need them to give. I have a little bit of a low hairline, so I'm going to take some of this hair out of The Middle. That should be enough. I don't want to take too much because sometimes it starts looking real it. So I'm just gon na pull this hair out, it's easier for me that way, but you can actually cut the lace if you want the reason I leave. It is because I kind of use it as a handle, because, once I take off the front, Lace in the middle is normally the area that was pre-plucked, so I have to go in and actually pluck the middle now, so that it doesn't look so harsh in Comparison to the sides that were already pre-plexed so pretty much, we plucked out all of the pre-plucked part, and now we got to take the plucking back a little. I hope that makes sense. I start right along the outside, of where I want the wig to lay, and then I like to part back about a half inch at a time and just continue plucking all the way back, so it kind of builds like a gradient natural hair would be. This is way thinner than as it gets. You know, as it goes a bit further back and you just kind of want to replicate that this is going to take me about 20 minutes. So I'm about to go ahead and finish plucking and then I'll pop back in in a second to show you guys the finished look. Okay, so I tweezed it quite a bit. It'S looking really good, but I think I'm gon na leave it here for now and finish it after. We like get the install going because I don't want to over pluck. I have done that before and wasn't cute so now, because we're gon na do a glueless install I'm gon na go ahead and trim off the excess lace in like a squiggly pattern. You don't want it to be too straight and you kind of want to leave a little lace in front of the hairline like not a lot, but I used to cut it right up to the hairline and no ma'am. You want to leave it. Maybe like a millimeter or so right in front, if you can all right so as you can see, I trimmed it on this side, Lubin a little bit of a glaze trust me. It looks a little crazy right now but mark my words. Okay, it's gon na! It'S gon na help and I'm gon na do the same thing on this side before we go ahead and actually start the install process. Today'S video is more focused on The Styling if anything, but I kind of want to still show you guys from the beginning to the end, just in case anybody is new and this happens to be like you know, one of your first videos or if you guys Watch my videos, while you do your own hair comment down below, because I watch YouTube videos. While I do my hair and I would love to be that person for y'all kind of adorable, I'm honored, how are you wearing your hair right now? We in that weird, like screen time winter kind of vibe, depending on where you live, and I don't know if I want braids poor Bob like I'm just all over the place all right. So we have that trimmed. Well make sure it fits one more time and I'm also going to make sure that none of the hair is like under the lace, because that could get annoying. So I'm applying a little bit or my brush, I'm applying a little bit of hairspray and just kind of combing everything back to make sure it's no like flyaways and we can get our install as clean as possible because I want it to be perfect. Okay, perfect! All right so for this install I'm just going to go ahead and use my spray normally um. If I was going to wear for a little bit longer, I would use my bold whole Liquid Gold, but it's not giving that I'm probably gon na wear this wig for a couple of days. So I wanted to hold. But I don't want it to be like hard to get off if that makes sense, so I'm gon na go in with my even lace spray. This is the active one. The black one and I'm gon na just apply this from Temple to Temple and then I'm going to use my bold whole liquid gold on the ear tabs just because it gives a much better hold for the ear tabs. I'M going to pop my elastic band on really quick so that this middle section can melt and then we'll be back in like five minutes to finished, really like two or three minutes. I don't leave it on that long, while the edges kind of get settled before we do the ear tabs, I'm going to go ahead and start the actual cut for the hair, because that's half The Styling for this hairstyle the cuts so first things. First, I'm going to part the hair in half and brush it out, so we can get like the the length cut trimming. A half an inch to an inch off your wigs makes a world of a difference because it really gives it the effect of being really polished and really healthy. Just like you wouldn't want any scraggly ends or your natural hair. You do not want scragging ends on your wigs; it just looks ciao for the lack of better terms, maybe even cheap, so you really want to make sure that you trim the ends, especially with this cut, so I'm cutting off about two inches or so that the Ends, look nice and healthy now for the layers. This is the 13 by six closure, so I really have a lot of room to style and I'm excited now. This is not like how I would cut it on my natural hair. So it's not going to be perfect, but it's gon na give you the overall Vibe I've pulled the hair up and now all of this extra hair. On top of where this are I'm gon na just trim this straight across, and this is going to be our shortest layer all the way around the head, the layers in the front are going to be a lot shorter, but bear with me I'm gon na. Do this one step at a time so now that I have that guide cut, I'm going to part it down the middle. I may actually end up wearing a middle part, but I don't want to press it in there yet just in case I change my mind. So I'm gon na just give it a little light press. So it's not sticking up, but I'm not trying to like press it to Smithereens, or else that part will not be moving okay. So now we kind of got to part it down the middle and we're gon na part rows straight down and with my razor comb, I'm going to start where that layer we cut in is and follow that through the rest of the hair and we're gon na. Do that all the way around so pretty much using the top of your head like the center of a circle and part now triangles going from that Center, using the shortest part as a guide for the layers? So, as you can see, the layers start here, I'm gon na get my razor comb and follow that throughout the hair, and it just adds like volume and body all the way around your earlier. It'S in the front and in the back just be like hella flat. So I'm going to go ahead and finish this all the way around the head and I'll pop back when we actually do the layers in the front, because those are going to be a lot shorter. All right, so I cut basic layers all the way around and now I kind of want to go back to finishing the install first, because I want to press it out and see where I want the part before I start layering it too heavily, but I'm not Gon na lie y'all, it's getting middle part, it's given middle part energy, so the middle is melted, ignore this extra glue on my forehead, I'm going to clean that off, but in the meantime, in between time we meet the ladies ear tabs. So I'm going to use this bold hold Liquid Gold. This is Magic, It's Magic and it's black on so I'm here for it. I'M going to apply this to my ear tab area and you want to keep it really thin, maybe just like a little dot. Okay and I'm gon na just spread this around and then lay that ear tab down all right. So while we have The Sideburns melted, I kind of dragged down the elastic band so that we can get a good middle part and press it out. But first, let's finish the cuts so so far. This is what it's given it's some layers, but no ma'am, not enough. So, starting from the middle part, I'm gon na part towards my eyebrow to get like a triangle in the center, and this is where our shortest layer is going to be make sure you bring it all the way to the edges, because you don't have random long Hairs so yeah. This is where our shortest layer is going to be, and I want it about here, so I'm going to take my razor comb and cut that layer into it and we're going to use that same Technique. We used in the back to blend those layers in, but we're trying our best to keep these towards the front, because you don't want the layers all the way around your head to start the short had foreign, so the layers look amazing. I really love it. I think they're gon na come alive once we curl the hair. I am covered in hair. That is a part of the process and you just got ta trust it. You just got ta just got ta Vibe out, you know, let's see how the lace is, laying and let's go ahead and move on to the neck. Okay, I'll be cutting off my circulation with that thing, but it is for a good cause so to clean up the hairline a little bit. I'M gon na go in with a little bit of micellar water on one of these little reusable cotton rounds and just take a little bit. You don't want to do too much or you're going to end up lifting your lace, but I'm taking it right along the lace in front and just cleaning up any extra glue and then I'm following that up with just a damp cloth to wipe off any of The extra makeup remover just want to have a really clean canvas, because glueless products have a tendency to look really shiny when they dry and it just it doesn't give, and now I'm going to take a powder foundation. This is the Maybelline super stay in the color. It doesn't say: maybe it's the number it's j-e-w-91w is what it says. That'S got to be the color Okay, anywho, I'm taking this, and I'm gon na just apply it to the edges of the lace to blend it in with my complexion, because this is transparent lace. So it kind of takes on whatever color you put on it, but look at that. Instead, a little bit of residue but baby girl like it's given scalp, it's giving scalp get into it. Okay, we've got the cut down. We got the install done, let's go ahead and do the baby hair, I'm kind of trying to comb up these little sideburns because baby, I kind of glued them down on accidents. This happens all the time, but I'm just trying to comb it up because pretty much they are molded down. At this point, foreign, okay and now for my favorite part, I got the little baby hairs on the side laid down pretty cute they're, giving I'm really proud of myself for being able to do these ear tabs. I did not used to know how so now that we've got that out the way we can go ahead and start curling, the hair before we start curling, I'm going to spray my hair down with a little bit of hairspray. This is the Tresemme ultra fine hair spray 24 hour, frizz control and spraying it down a little bit and brushing it through. It'S just gon na add a little bit more hold to the curls. It'S already like some product in the hair. I'Ve been doing this a lot lately and it's been working, so if it's not broke do not fix it. I want this style to have a lot of volume, so I'm not pressing out the part. Yet I'm actually going to do it kind of like roller press Style with the curls. So I'm going to grab a piece of hair right here in the middle, the shortest layer and we're going to curl this first. So it has the most time to set, because this is the area that I want to have the most volume. So I'm taking my one and a half inch flat iron. I think it's like one and a half or one and a quarter and I'm just going to curl the hair and while it's still hot, I just kind of wrap it around my fingers and I'm using one of these little Clips to clip it at the base And then we're going to curl the rest of the hair kind of like normal and I'm curling the hair in opposite directions so that the hair doesn't all stick together and do that like unicurl thing, so I'm doing some curls towards my face some curls away. Um! Oh Roy, I kind of brushed the um curls out and now I just need to kind of press out the part I didn't apply any wax, I'm just using that leftover hairspray to kind of tame the flyaways a little bit and for the last step, I'm going To go in with a little bit of foundation powder and a thin brush and just kind of Define the part a little bit, I'm using that same Maybelline stay powder and I purposely didn't make the part like super bust down middle part. I kind of wanted to look like a blowout like a really soft blowout and blowouts never have perfect Parts. It'S not really about the part, however, because we have one, I need it to be like visible. Damn should I make it bust down, because now that I made it visible, it's like not given all right, y'all hold on one second hold on. We almost done yeah that one piece so wreaking havoc. I'M just gon na use a little bit of foaming lotion to lay it back in place the other direction, because y'all know I'm too scared to put that hot comb right here shout out to be scared, laughs all right Lips. This is the finished. Look lots of layers some nice volume, some nice swoopy swoops. Why have one swoop when you can have two? You know: that's the vibe. The color on this wig is impeccable, I'm literally obsessed with the color and that's it folks. I hope that you guys really enjoyed today's video and I will see you in the next one: bye, babes


Comments
James: So cute! Love the highlights in the wig and how it looks on you girl
AceNSpade Tv: I love this so much, beautiful & your amazing at explaining things
Shaniqua Natson: Beautiful ❤I love your longer videos because we get more of your personality and great tips Maybe we can get a "Do your hair with me" series?? I'm down for it
Nina Negedu: The highlights look so good on you
Satanette 85: It made me jump when u started yanking the hair out the front! I never saw tht before ❤