Step By Step Closure Wig Install For Beginners | Easy Tips & Hacks For A Perfect Install! Westkiss
- Posted on 27 July, 2022
- Bob Wig
- By Anonymous
Hi Jolieden's!
today I showed you all how I install my closure wigs. I hope you enjoy!
products used:
l’oréal developer - https://amzn.to/3cP2sIU
l’oréal blue bleach powder - https://amzn.to/3S8WAu0
ouai shampoo - https://go.magik.ly/ml/1k94d/
silkience conditioner - https://amzn.to/3vno5Gt
tweezer - https://go.magik.ly/ml/1k94f/
rat tail comb - https://amzn.to/3vno5Gt
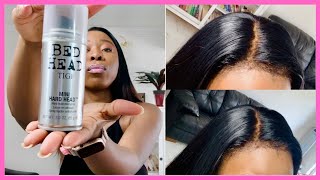
brush-able hair spray - https://go.magik.ly/ml/1k94l/
wooden brush - https://amzn.to/3OGO8iS
blow dryer - https://amzn.to/3J91IKK
hot comb - https://amzn.to/3Pzojm1
wax stick - https://amzn.to/3cB2Om6
ebin hair spray - https://amzn.to/3zAYDzW
flat iron - https://amzn.to/3b91eri
lace tint - https://amzn.to/3Bj1xKV
bold hold liquid gold - https://amzn.to/3BliDYw
ors hair gel - https://amzn.to/3zaJvrz
▬▬▬▬▬▬▬▬▬♛#westkiss♛▬▬▬▬▬▬▬▬
Hair details: 26'' body wave 5*5 HD lace closure wig, 200%density, small cap size
Video Hair Direct Link➤https://bit.ly/3c7IUPo
★westkiss official hair store➤https://bit.ly/3PvNkOG
Join Our VIP Coupon FB Group Now(!!!$135 Discount Package)➤ https://bit.ly/3obsYPb
Hot selling HD lace wigs➤https://bit.ly/3yJa4Un
Affordable 37% Off Curly lace wig➤ https://bit.ly/3Rxpxjb
Up to 43% off Lace Wigs➤https://bit.ly/3uTe43I
Hot curly lace wigs➤ https://bit.ly/3yKP2EX
#westkisshdlacewig #westkisswig #westkisslacewig
#WestKissHair Official Site Huge sale Big Discount
Follow West Kiss hair on social media :
Instagram @westkiss_hair_store: https://bit.ly/2OlKstu
YouTube @West Kiss Hair: https://bit.ly/2Ol5U1m
Wholesale WhatsApp: +86 13323741050
0:00-0:30 intro+wig specs
0:31-4:16 customizing the wig
4:18-8:35 parting + molding
8:37-11:06 styling
11:07-13:51 install
-----------------------------------------------------------------------------------
follow my socials
instagram - https://bit.ly/3iXZfVJ
twitter - https://bit.ly/2QLsIFM
-----------------------------------------------------------------------------------
for any business inquiries please contact: [email protected]
-----------------------------------------------------------------------------------
✨FTC - some of the links used above may be affiliate links. If you decide to purchase anything using these links I will be receiving a small commission. Using these links will not cost you extra money! As always, thank you for supporting my channel so I can continue to produce content ✨
Hi julian, so i'm back and with a hair tutorial, i'm going to be showing you guys how i customize and install this wig. This wig is by west coast here, and thank you to them for sponsoring today's video. I currently have in their 26 inch 5x5 hd lace closure, and this is in the 200 density and the cap size that i got was a size small. As you guys can see, the hairline is a bit dense, so we have to customize it push p yeah push your feet. Turn me up. Come here so to bleach my knots. I use the l'oreal technique. 20 volume developer, as well as the l'oreal quick blue bleach powder. I personally like to use blue bleach powders whenever i bleach my knot because i feel like it helps eliminates majority of the brassiness from bleaching you're, not since blue and orange on the opposite sides of the color wheel. They cancel each other out. So, that's why i personally like to use a blue bleach powder. I mix both the developer and the bleach powder in a bowl i like to have it at a very thick consistency. More so like pancake batter, and i like to use a plastic bowl. I just flip my wig inside out and pin it to my mannequin head just so i can bleach the knots easier um. I literally spread it on like it's butter, and i just take my time with this. To be honest, one mistake that i did make was applying too much at the front just because it did end up over bleaching the hairline, but that's a quick fix, but i just wanted to let you guys know that, because i'm human, i make mistake, and i'm Not a hair stylist, but i have been to my hair for a really long time, so i know some tips and tricks and i know how to make my hair look decent. I like to make sure that no knot is left untouched. So i make sure that the bleach is all over the closure, so i'm gon na, let that sit for 30 minutes and then i'm gon na wash it out. I didn't show you guys watching the wig, because it's washing a wig but my rule of thumb. Whenever i use shampoo and conditioner i just like to use products that i will probably use in my natural hair, so today i use the whey, medium hair, shampoo and for conditioner i use the silken's hair care pro formula for damage repair. I'Ve actually never used this. In my natural hair, but i had it laying around in the house, i just decided to use it and i've been using it for a lot of my wigs as a recently, and i like how my wigs feel after i use them. So definitely give it a try. So this is how the wig looks after i washed it out. So now it's time to tweeze that hairline, i'm using a tweezerman tweezer. I'Ve had this tweezer for, like five years, invest in a good tweezer and my rule of thumb. For plucking, just don't stay in one spot. I do not have no other rules, i don't have no other tips, just don't stay in the same spot, but go berserk with it. In my opinion, i like to go berserk with the plucking. I mean. Don'T get me wrong, make sure you're not overplopping your wig, but if you have a thick and dense hairline make sure to pluck that, even if it doesn't mimic your natural hairline make sure it mimics a natural hairline, it doesn't have to be your own, but make Sure it mimics at least a natural hair line. Whenever i pluck my wig, i do it in sections. I just don't want a thick looking wig like i don't mind my bundles being thick, but the closure needs to be on flat flat, and this helps that. So i do that until the middle of the closures, because i don't want it to be super duper thin. But i still want it to look very natural, so that's just what i do. I literally pluck in sections, and this is the result for me plucking. I do some more plucking when it's on my head, but for the most part majority of my plucking is on the mannequin head, because i can see what i'm doing, whereas when it's on my head, i cannot see what i'm doing. That'S why i do majority of my customizations and styling on the mannequin head, because i can see what i'm doing it allows me to know if i'm doing too much or if i need to do a bit more so outside when they pull up, they get me Loose yeah jump out boys. I want to put a middle part in my wig. I use a tape measure to make sure that it is in the middle. So this is a 5x5 closure, so the middle is 2.5 inches. The reason why i do this is because i don't want one side to have more hair than another, so i want to make sure that everything is equal and even this allows it to look as natural as possible. Um. If you aren't measuring out your parts, you definitely should now, because if you're ever wondering why one side looks more bumpy or not bumpy, but like more thicker than another. It'S probably because one side is just thicker because it has more hair and then i place a pin where the part supposed to be, and then i just part my hair with a rat tail comb. But now it's time to mow the hair. I'M going to be using the sebastian sharper brushable hairspray. I love this hairspray because it gives me the hold that i need without leaving my wig feeling stiff, which we don't want after i spray it. I go in with a wooden paddle brush you guys. This brush is a necessity if you want a flat looking install honestly. This is a holy grail product. Whenever i do my installs, it is a game changer. For me, it's literally from the dollar store. I pay like two dollars for it. I try to link a similar one down below. This is a hard bristle brush, which i prefer, but to have my wig looking flat. I love using this brush and now i'm going to blow dry it just so everything can start molding into shape. I'M blow drying the hair back just so the hairline can be seen and it'll give more of a frontal vibe. If that makes sense, and i went in with a tweezer again just to clean up my middle part. This is how much hair i actually plucked out throughout the whole closure. As you can see, it was a lot of hair going with the hot comb. This is by golden touch. I believe i got from the beauty supply store like five years ago and it still works perfectly fine, but i do want to try a new one. So if you guys have any hot comb recommendations, please leave them in the comments down below. I make sure it's a part, the closure, so every piece of hair can lay flat. I personally, like my installs, to look really really flat and sleek, not the whole head, but my closure in front will have to be very very flat and sleek, because that's just the look that i like, but the hair has that volume. Now i'm going to be using my tgi bed head wax thick. I'Ve used this wax since i first started wearing wigs, but one thing that i've done differently is that i no longer use a hot comb right after just because i realize whenever i use a wax. Stick any type of wax any brand. It makes the hair feel very, very heavy and sticky, and i do not like that. Then i brush the product in with my paddle brush, as you guys can see it's molding into place, and then after i like to go in with the ebbin wonderlace bronze hairspray, this hairspray is the goats like you can literally do it install with this hairspray alone. I love this hairspray. It has a very, very high hold. I do not spray a lot when i put it on hair, it will make the hair very very stiff, but i like to spray it just so my part can stay in place so, regardless of the weather, my hair will look the same. This literally just locks everything that i did prior and that's why i love using this hairspray. I use this hairspray like three times throughout the install process, so yeah, so now that we have our closure, how we want it it's time to style the hair. I'M in london i like to go and shop at the mall shop at the bottom when it comes to flat ironing my wigs. I have to do it in very, very small sections, because i want a sleek look. I don't want no wave pieces, nothing and i'm using my baby, bliss flat iron that i've had for years. I think, like 10 years now, and it's the only flat iron that i ever use whenever i fly in my hair, it leaves my hair super duper straight. I do this throughout my whole head, including the closure, make sure to flat iron, your closures as well. Just so everything can be nice and sleek. So i finished one side of the closure. Now i'm going to brush it down, sleek it back down with my paddle brush, and this is how both sides look finished and now i'm going to be doing this hack that i've been doing for years. I like to flat iron my closures and frontals, but before you flat iron, any frontal or closure make sure you do a test piece first to make sure that it is a real lace. A lot of companies sell thick lace and you will know that it's fake lace, because when you put heat to it it literally burns. This is a material, it's a fabric, but i like to flat iron, my closures and wigs because it minimizes the appearance of the holes in the lace and it makes your closure and frontal super sleek and flat, and it gives a natural vibe. Now i'm going to uh tint my lace, i like to use the evan tinted lace hairspray, and this is in the shade darkest brown super quick super efficient. You get it from the beauty supply store. I think i purchased this for like ten dollars and then i'm going to blow dry that dry and then go back in with the ebbin wonderlace bond just to seal. That in this is how the closure is looking right now, as you can see, my part is not as defined as i would like it to be, so i'm just going to go in with some mascara. Like i said earlier, i did over bleach my knots, so i'm just going to clean that up and define my middle part and then i'm going to brush the mascara in with that same paddle brush just so, it won't sit on top of the closure, and this Is how the wig looks after i'm finished styling it now it's time to install it. I have on my wig cap, i'm not doing the wig cap method because i'm wearing a closure wig and me personally. I feel like it's a waste of time, so i'm going to spray some of that lace, tint on my wig cap as well. Just so it can match my skin and now i'm going to go in with the boldhold liquid gold. I love love, love this freaking product. I don't like to use glue whenever i'm installing a wig just because i don't like to keep hair in my head for too long. This product literally holds so well. It holds just like glue, but it is so easy to remove you remove it with water and it's not messy, but it's still effective. So i now put the wig on my head. I did adjust the elastic bands on the wig to make it more fitted and rust. Kissed did supply me with an elastic band. I blow dry it at a medium heat to help melt the lace into place, and this is how it looked like after i took the elastic band off. It was looking real nice but y'all. My wig was too far back and i didn't realize that until after i cut it off - and i was like my forehead - looks - super duper big. Typically, i use an eyebrow razor, but i didn't have one on me, so i just use regular shears um just cut in a jagged edge but yeah. I moved that wig right back up because i did not like how far back it was it made my forehead. Look super duper big and my head was not this big. I honestly should have left it with no baby hairs and looking back at it, i kind of regret the fact that i did the baby hairs, but i'm just cutting some baby hairs into my wig. I'M still learning how to do baby hairs like i'm, not a pro at baby hairs at all whatsoever. So that's why i'm not even gon na go into detail. I use the rs hair gel to sleek down my baby hairs, and this is how one side looked, but i was just i was just over it. It took me so long to get that one soup looking right now, i'm just going to put some foundation powder on my lace just so it can blend into my skin a bit more and i'm going to put some on my part as well, and this is The final look like this is the hair. I love this hair so much it's so thick, so luxurious, so silky and it's super duper long for it to be 26 inches. It literally hits my hips and i'm five nine, so definitely to recommend west coast hair. Thank you once again west kiss for sponsoring today's video and this time my hair looked after my makeup. I hope you guys enjoyed this video. I love you julian. So much and i'll see you guys in my next one bye,
Comments
Simply Britty: You definitely taught me something new with flat ironing the actual lace I have to try it!!
Binty Dee: Sis thank you for this I need all the tips !
Jessie Patricia: Love it
Mssstephanie: sis don’t destroy your channel with hair videos I love your channel ♥️♥️
Jamaican BSN, RN: The prettiest face & you are wearing the hair sis!
tamara hill: I Love West Kiss’ wigs!!
Evesha: Stop! those shots at the end tho. MY GOD .LITERALLY SO GORGEOUS SIS!!!
Xbliss: Gorgeous
Turiya Hall: Gorgeous
Lovesoso12: You are sooooooooo PRETTY. Please mooooore vlogs. I am binge-watching your vlogs and i loooove your vibes.
Fatou Diop: Love your thumbnail
West Kiss Hair: Wow! Dear, you are so pretty with our wig.
It's Kamel: Flat ironing the lace is different come on here buss down middle part
Sanjay Reid: Very nice
Sassy: Hello Gorgeous!!!!
Na’fee Banks: it’s the thumbnail for me
Tau Amanii: I thought you were summer for a quick min❤️❤️❤️❤️❤️
Aïchatou Bella: Okay minor channel rebranddd. ♥️
tff ytre: Alles sehr schön. Aber zuerst zusammen die Nummern 10 und 1. Eine emprutt.ONLINE Brünette und eine anderej Blondine. Es wäre unfair, wenn ich 4 wählen würde