*Must Watch* Full Detailed Hair Tutorial!! Bleaching, Plucking, Install & Removal Ft. Vshow Hair
- Posted on 07 September, 2022
- Closure Wig
- By Anonymous
Direct hair link in the video ►https://bit.ly/3qioKGw
Hair Deets: 30”,13x6 Lace Frontal
Klarna x Zip x Vshow Hair. Buy Now, Pay Later!!!
Use my code “TAXE15” for 15% OFF!(No Limit)
#VSHOWHAIR official store ►https://vshowhair.com/
Glueless wear & go wig, easy install within 3 secs ►https://bit.ly/3PCqHZk
No Glue No Gel V Part Wigs ►https://bit.ly/3b3R4rL
#HDlace frontal & closure wigs ►https://bit.ly/2XwJWgI
Our hot selling #lacefrontwigs ►http://bit.ly/2YLaFlu
Trendy colored wigs ►https://bit.ly/2PByn3J
━━━━━━━━━━━━━━━━━━━━━━━━━━━━━━━━━━━━━━━━━━━━━━━━━━━━━━━━━━━━━━
Stalk with #VSHOW HAIR, get the newest promo info and free hair.
Instagram :@vshowhair7 http://bit.ly/ins_vshowhair
YouTube: VSHOW HAIR http://bit.ly/yg_vshowhair
Tiktok: @vshowhair ► https://www.tiktok.com/@vshowhair?lang...
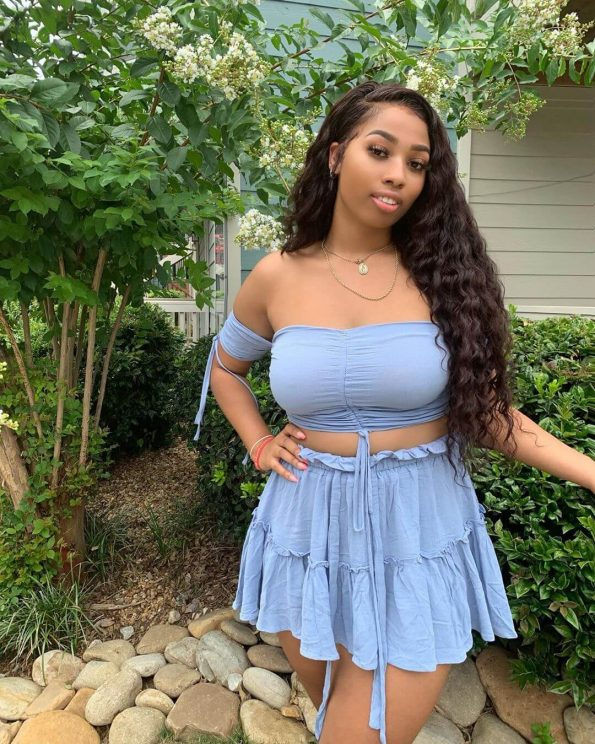
Foreign welcome back to my channel and welcome to one of those fun riveting videos. While I take you on the journey that is Jesus, my wigging stuff, so this is gon na be another one of those start to finish. Videos where I show you exactly everything I do take you along the journey and process of you know installing my wig from Straight Out of the Box. Today'S wig, I'm working in is working with is from show Hair Company very cute packaging. By the way, like y'all said that cute, I always wonder what these packaging it's like. Is it a PR box or does everybody get the cute box, but straight to the nitty-gritty? Okay, I've got some lashes to work out. All of that. But honestly, I don't really care about that. This is what we care about, so they sent me a 30 inch, wig 250 density and it's a straight away. There'S been itching for, like a nice, Sleek clean side, part, look like little C curve. Part. You know you know what I'm saying so. Hopefully this will be the link to give me that okay, she's thick she's, full here's a look. So I believe this is a 13 by six parting, I'm kind of like bummed, because I really wanted to be like 13 by six. All around you know like it's just six inch parting down in the middle section, which is cool but dang y'all. I want six inch parting all around, like you know, side to side. So first thing I'm definitely doing is bleaching the knots the knots are not pre-bleached. If you can see for my beginners newbies out there wondering what are not. You see those little black dots at the base right, those little black dots down there. Those are the knots and, if you're, trying to go for a scalp type of look, you can't have those black dots showing like that's, not giving scalp that's giving wig. So you want to bleach it with a hair bleach to make it light colored. So it looks like it's like you know, coming out of a scalp and, of course, we'll be plucking the hairline, because the hairline needs to be plucked for it to be more natural, but okay, okay, let's get into it so first thing: first, four star, I'm just Gon na spray back the hairline, it's already pretty pushed back, there's no like baby hairs in the front, but I just always do this and make sure I push back all of those hairs. Oh my God. Sorry guys, the camera that just fell, damn girl, you're, embarrassing me in front of my friends, anyways so yellow, saying hairline pushed back now, I'm just combing everything back. I'Ve heard people, so they use the hairspray too to kind of help create a barrier. So it doesn't like get any bleach onto the hair. I personally call BS on that because I don't think it helps kind of create a barrier in my opinion, maybe I'm just doing it wrong, I'm making so excited to try this out today. This is a new bleaching powder. I'Ve heard a lot about this, the blonde Brilliance I got this from Sally's I've been using the carols, the Carol's DW powder bleach, but I feel like my bleaching skills. I don't know the knots are not bleaching the way I want them to bleach, so I decided to kind of just invest because this is more expensive than the regular standard BW powder. But I've heard a lot of professionals use this. It claims to lift up to nine levels, which is more than the Carol B. One does, and it also is supposed to have some moisturizing and conditioning moisturizing and conditioning effects. So it's osteoples, I guess, like protect your hair, because bleaching is a process that can you know, damage your hair in the long term. So hopefully this was worth the money. This was what I believe: twenty dollars the instructions so that I should use 15 20 to 25 volume developer. Normally, I use 40, but I want to follow the instructions on this because instructions are there for a reason. So, let's see if this 20 volume will be as effective, I wish it came with a scoop like the carols one does, but that's cool, I'm just gon na. Do I guess two scoops? Hopefully that's enough. Let me add just a little bit more. That'S a lot! Damn okay and then go in it says on the things then go in it says on the thing to use. I want to one and a half ratio. I said I'm even over here measuring, but I just like to gradually add it and mix it till it gets to a certain consistency that I want. That was a big thing: okay, still a little bit cakey and chalky, it's a pretty good consistency for me. I like it to be nice and thick that way. It'S not like running off. You know so always make sure you like test it to make sure it's not running off nice and thick, but still spreadable and creamy all right, that's pretty good! For me, I feel, like absolutely it'll, be more just a little bit too, because it can be too thick where it's out here, not even just like touching the knots you can. I like to do my bleaching. You know having my wig face down as silk or whatever use my French I'm just trying to get the best positioning using a popsicle stick to apply the bleach. You can use anything that helps you. You can use plastic. My plastic spoon, um hair brush dye like this, but just don't, use anything metal because metal does affect the reaction, because this is a chemical reaction like apply enough pressure where you're covering the knots, but not too much as where you're starting to like push too much And it's starting to bleed. If you need to take breaks and flip the wig over to check yourself, then go ahead. You it's your wig, don't mess it up! Take your time, I'm gon na go ahead with some foil and place that under the wig just to help you know, speed up the processing time especially give this is 20 inch. 20 volume developer, but hopefully it works just as well as the regular ones. This part gives me stress, because I'm always scared that I'm gon na like push the bleach and start bleeding the hair just to really seal it all up cool all right. So it's been what a good 40-ish minutes as you can see. The knots yeah they're bleached for sure these are still black. That'S kind of push it deep enough, but like there's a lot of like yellow knots over here forming because since these knots up here are not covered with bleach, you know there's no chance of them processing the ones that are covered. I don't know if it's showing up on camera are definitely very yellow and very ready to be washed. Okay guys. So I have made the executive decision to go in and bleach the hair one more time like like. I feel like it's just it's good, but I just really want this install to eat, so I'm gon na bleach you one more time. I feel safe doing this because when I did use 20 volume developer, which is much gentler or less harsh, I guess than 40 - and this bleach that I bought is meant to be more conditioning and moisturizing blah blah. So I really just want these number yeah for the second bleaching. It'S mainly up here, where I'm going to be styling that I care the most about it's not going to worry too much about getting the bleach back down there. But this time I'm gon na put a little more pressure and really try to get those knots I'll start from here, all right cool. So you see how like the knots are really covered. Now, like it's really over them, that's what I'm looking for and we proceed now normally because I don't get perfectly bleached knots all the time I kind of just work with it and have to figure out finessing later, but since I'm really trying to work on my Technique these days, that's why I'm going back in to re-bleach it, so you don't have to if you're, not something perfect at first, nothing is perfect at first. Do you get lots of questions like do you have to do? You have to bleach knots for an install. You don't have to do anything when it comes to wig like you can really just put it on the way. It is and figure it out, but you know if you're really trying to go for that. Scalp look and if your wig is more like one of those cheaper wigs where they did literally nothing for you and you have to do all the work, it's just not going to give the same. Look, that's all I got ta say and then I'm just gon na put that foil on back on, oh God and yeah. Let her sit and process like before. Okay y'all can see, those knots are definitely bleached like black wear. This is after 30 minutes of re-bleaching. So I'm going to wash it again, which is why it's important for you to sometimes like you know, push that bleach a little bit to where you see it covering those knots. You can really get it. It'S a bit scary. I know, because I was scared too. You know when tic-tac-toe, who was scared. I was scared, but you see that yapiana baby I'm going to use a combination of the blue and orange to the lace. First, I'm going to use some of the blue because I do see some yellow and orangey tones in there, and I don't like to let this blue shampoo sit on my lace too long, because I've realized, depending on what kind of lace it is. It can give it a bit of a weird tint after so really I come back in about like five minutes because it works pretty fast and wash it out, but I do like to make sure I'm scrubbing it in okay, chaosi. Most of the knots are now a more Brown blonde. Some even have turned basically invisible because they took the tone very well and now it's looking more like it's coming out of your scalp, less coming out of a wicked lovely love that I've already gone ahead and washed the hair with some shampoo and conditioner. So now I'm just gon na let this hair air dry for the over the night I like to. I don't, like you, know, working with my hair when it's wet, so I'm gon na come back tomorrow and talk to you all about the plucking in our installation. Tomorrow, okay day, two we're back. The hair is fully air dried and it's time to pluck her, I'm just going in with some t-pins to help pull out the lace and pin it. I like to make sure I have the middle of the wig lined up to the little lines on my canvas head. If you don't have a canvas head and you're trying to become better at your wig making skills, then babe get you a canvas head. You need one and not just a wig head like the styrofoam ones, that you get for five dollars, an actual canvas head. I got this one from Amazon. I have a 23 inch one because I have a 23 inch. Circumference head get one. That'S your head size! They have different ones. It does what's supposed to do because most of the styling I'm about to do today is going to be on this canvas head all right start plucking, I like to always part the hair down the middle. This is just to help me one working sections and two to avoid plucking in the middle part, because, like I've said before, whenever I pluck in the middle part, it just never looks right, so I always avoid my best of plucking in the middle part. Unless I'm like trying to like you, know, make the part wider, what does part go back real far Charlotte knots, we did yesterday y'all see that yeah very proud of those knots. I'M gon na go in with my very very hot, hot comb and just press back the hairline and just literally helps me see everything and it's easier to pull the knots when they're. All like you know, pushed back like this, especially if the wig is dry. If your wig is wet, you can just like slick it back and do the same thing, but if you're plucking your wig dry, this is the way to go and you can plug your wig, wet or dry either way I used to like plucking my wigs wet Before but I feel like sometimes since the wig is wet, I can't tell how thick it's gon na be like the density of the hair. So I end up, like you know, under plucking a lot because I'm thinking yeah I really plucked that wig up and then once it's dry, I'm like dang. I did nothing at all, but plucking wet. The knots do come out easier because, like it just has more slip to it, but if you're gon na pluck dry, but I would honestly say, as a beginner pluck your wig dry, it's really easy to overplug as well, when your wig is wet okay. So I don't know if you can see right here the hairline's like slightly literally the littlest bit pre-plucked in the front. So what I do is I usually like to just pull out the front part of the hairline. Doesn'T matter if it's pre-plucked or not? I always like to start plucking behind the front that just helps me for over plucking, preventing bald spots, all that good stuff and to help me preserve my baby hairs, because sometimes I tend to over. Pluck that area push everything back to get out of the way. So I can see, what's going on the plucking going in with my bestie, my friend only tweeters, I use the Revlon slant tip tweezer slant tip I like to pluck with the tip pointing forward. You know this way and I pull and I plug in a dragging backwards motion not up and down, but a Back Drag. I always have my hand up here to help pull back the hair, really nice and tight. Have my tweezers, pointing you know, tip tip pointing that way and I don't start directly in the middle. I start a little bit off center and you're trying to pull the hair right out from the roots, and then you skip a line. It'S pluck a line and just keep working your way down the line but yeah I just go in like a pluck a line, skip a line, type of motion and I'm not plucking in the same area like if you think, like I looks like I'm plucking. The same area, I'm just going higher up when I'm done. I just go ahead and just push everything right back up, so I've gone ahead and just started plucking on my lap, because I need a new. I need a new wig stand and that wig stand was not stable and it was just affecting my plucking game, like I don't know so, I'm just gon na do it old school way and just pluck on my lap. So here's the middle right now. What I do with the front hairs is, I just start lightly, dragging my tweezer back right and doing the same thing. Plucking skipping plucking, skipping like pluck skip, pluck skip, you know, and I do it very minimally on the front. I don't like to plug too much or make two big gaps, and I just work my way down the hairline here, I'm not even plucking the front, I'm just creating more Escape spaces in the back, I'm just trying to like clean up the back of the hairline. Some more right here is still pretty dense in my opinion, so I'm gon na go in on this side and do some more plucking, but mainly in the back and on the front. If you feel like you, don't have that much control. You can also just like part out a lot more because sometimes I can't reach those back Knots just from plucking in the front I got like really pull the hair out foreign. Okay, that's pretty good to me. Put this back up! There pluck some more right here, because it's looking a little damp, I'm just going to create a little bit of gappage. The gaps in the front have to be very small, like you can't have big old two type of gaps in the front like make sure you're not making wide gaps in the front just a little. Some light back here, just a little bit dense. Well, let me stop. Let me stop because I don't want to start over plucking the hair actually yeah. I feel like it's a little bit thick back here, so I guess it doesn't matter, because I'm gon na be doing a side. Part you're not going to scale that I'm plucking your wig glass, just kind of helps preserve the longevity of it. You know so I'm pretty good, I'm pretty happy with this. Now I'm going to go ahead and do the other side, foreign, hello. It'S me hi guys. This is me doing a voiceover clearly and that's just because the audio in these next few Clips is just really messed up. So you couldn't hear what I was saying, but basically this time I decided to go ahead and style the wig on my mannequin head, given that I wanted to get a very nice and clean side part, I showed you guys. My inspiration photo whenever I am doing like side Parts like these, I'm still working on how to get them perfectly curved. I always just have a inspell photo that I'm staring at literally staring at and just trying to figure out my best to replicate that onto the mannequin head, it's easier on the wig head, because I can see everything from all the different angles and I can just Properly make sure I'm doing what I have to do. You know I went ahead and put some um. What'S it called mousse on it and the reason why I put mousse mousse just helps the hair like move easier. So I just use that to help me just get the hair to move and once I've figured out the part, the way that I liked it. I went ahead with my flat iron, I'm sorry, my hot comb and started to just press out the part. The only tip I can really give when it comes to creating that curved the side part is literally just get a photo and stare at it and keep doing it because I'm still trying to figure out exactly the science to getting the perfect curved part, and it Was kind of hard to finesse this, given that the wig wasn't a full 13x6 from side to side, so I had to like figure a way to curve it around where I still touched, the six inch parting space foreign once I carved out my part, I went Ahead and straightened the hair on the mannequin head as well, because I felt like it'll just be easier to reach the roots of the hair, while it's on the mannequin, I'm not really going to show Too Many clips of this, because straightening is pretty standard. In my opinion, but I did want to show a product I used to straighten - and this is the Eva, NYC main Magic 10 in one primer, this just kind of works as a Heat Protector. Also to help produce, I mean help reduce frizz, and it adds a little bit of shine, so I just sprayed that into the hair and I'm using my flat iron at 410 degrees and just working my way right through it. I try to do smaller sections. Kylie wanted this hair to be nice and silky. The main part Worth showing I feel like in my opinion, is this area. I went ahead for the parts of the hair that was on the lace. I went make sure that I went through Section by section and not just flat iron through the hair, but I also pressed a hot comb through each of these sections. This is going to really ensure that you get a very flat flat flat result with your wig and the smaller sections you use for this area, like the top of the wig, the better, because the wig will get really nice and flat like y'all, see how good This flat iron is it's pressing, my hair through but yeah. That was just really it for styling foreign. This took a bit straighten, but she's nice and straight it's so long, but I'm really excited to install this. Making the part on the mannequin head is just so much easier for me honestly, especially if it comes making a side part these days, because I can't see but yeah listen stuff all right. Currently, it's 11 34 p.m. Let'S see how long this install is going to take, I'm hoping it should be quite easy. Now, I'm giving myself an hour because it's really just installed because I've basically styled it on the head, but you never know. It'S me full of surprises. First, we're going to go ahead and tint our lace for it to match our skin color. Oh look at that deep curved part going to be tuned together with my Maybelline Fit Me Foundation, shade 356. Warm coconut. I believe - and I turn all of my wigs doesn't matter if it's an HD lace, transparent whatever eye tinted, but Pro tip. Let'S say like your lace is like darker than your skin tone. It'S better to use a little like a foundation. That'S like two shades lighter to tint, instead of your exact shade, because that way you can try to lighten up the foundation. I mean the lace, oh and another thing if you're like a dark skin or not even dark skin, but if you've got like a nice, like you know my skin tone and darker right now, a transparent lace probably won't be your best friend and you might have A hard time tinting it you're like gang. Why is it not melting yeah transplant lace can be a little bit difficult to melt. In my opinion, for deeper skin colors, I feel like transparent lights works best for, like you know, more of the fair tone babes like. Sometimes, if I can like manage to finesse transparent lace, but even then I'm still struggling the lace me look a little wonky, so HD lace is honestly best for every skin tone that matches the best. But if you're a fair tone definitely go with a transparent but real quick, I'm going to go in with some Edge boost edge control, as I call it yeah Edge booster and just use this to help push back my edges to get them out of the way. Because they can get in the way they can be really annoying, especially since these braids not fresh and then back in with the wig cap, and that's just so, you know help keep my braids from getting caught in the wig comp. That'S really the only purpose of why I wear it, so I always make sure I push it to the back like that. So it's not going to show you know under our Wicked I guess I've got some new scissors. I'Ve been recently investing in like more professional. Like hair product tools and I feel like they do kind of make a difference like in flat iron, better brushes, it's still all about your Technique, but, as you get better, you know it's okay to invest in getting more professional tools. It just makes. I guess it easier, you see. This is why I like styling, my wigs, my mannequin heads, sometimes because, like it just means like look at that like this is this is crisp. Those look real good, I'm so excited to start it. Oh, it smells like it's snowing. I just keep seeing myself I'm just like. Oh this and stuff about to be good. Okay, okay, let me be serious. I need some hair clips, like I see videos of people installing their wigs and stuff and they'll have like the lace, the hair falling in their face. I'M like how do you not lose your freaking mind, because maybe it's like the ADHD in me and I have too much going on around me. I can't I'm losing it, so things have to be pulled out of my face for me to have a same workspace. Other side, are you doing this just to make sure you have the the lace like fully fitted like Let It overlap? Like hang over your ear, that way, you know exactly where you need to cut. You feel me all right. Let'S get into this lace clearing, I feel, like I know better, but I'm still not gon na do better. I'Ve been playing around with this bed head spray, so I'm like this is my third time I'm gon na use it. This is what I use all the times for my lace, love, Evan, she's, great, it's a great glueless spray. It'S fast drying has longer hold. No, you can't wear it on your vacation to Cabo. Stop asking that y'all! It'S not waterproof! Water resistant! Okay, cancel me! You can't get it I mean like I can wear it for like two three days manage a couple showers with it. I'M, like you, know, maintaining my lace and not getting it wet, but it's not like a glue, that's what a glueless holds. You know, but I've been trying this, because I heard this was really good. I don't know how I feel about it. Like I said in a couple videos recently, I don't like it. No, I don't like it, but like it's not as good as this, but I'm gon na keep working with dick. You know. Sometimes some things don't work for you at first. You got to keep giving a chance and figuring out how to work with it. So maybe I just keep playing around with it I'll figure it out. I feel like this. Definitely it holds well, but it definitely can't do the whole pool thing like I was saying like once I get this wet one time in the shower, even with lace maintenance. It'S slipping and sliding, and I feel like the times I've used it. It kind of leaves like a weird cast of noise, but I'm gon na use it again today, just to see how I feel about it, one of the spring, mainly under my lace. This time I usually spray over, but I feel like spraying under oh, I feel, like spraying under kind of like helps. You helps reduce the amount of residue you get on top of your lace, so that weight like melts more all right now that I've sprayed that we're gon na go in with our blow dry on a warm setting and just start pushing down. All the lace will starts to stick. Thank you see, I feel like my side. Tabs sometimes don't want to stick it first, so I have to like cut the lace and then attempt to stick so because, like you see it's already lifted, I already knew that was gon na happen. I expected as such the side. Tab is just meaning a little extra reinforcement, so what I'm gon na do make sure. I'M spraying up here like back here, because yeah, I'm sorry guys. My energy sounds a bit low in this video. That'S because it's late, I'm tired, I'm hungry, you know, but I'm trying I'm gon na pull down some baby hairs right here and I like to just I always like going down my baby hairs, because it helps me pull the lace down even better. You know what yeah I'm gon na spray it over too because, like I said the side times when you need extra reinforcement and then we blow again foreign okay, that's one! Let'S get it next sections! You know what I lied. I'M gon na spray over sue me. I'M human, I can change my mind I feel like spraying under like I understand why, but I can't get it like as accurately, because the closer you are to the lace, I love doing these middle pieces because they're just so easy. I mean compared to the side. Tabs these little pieces be real, straightforward. You feel me. I think I will say that I've learned from wig installs you got ta, be really meticulous with getting that lace to lay like when I'm looking at my mirror right here, I'm staring at the lace in this little thing. I'M using this to really push down that lace that I see, sticking up, don't just be drinking anyhow like, oh, my God. No, like you, really got ta find the lace with your eyeball and push it down. While you got the blow dryer going and hold it like you pressing it, you know it's, I'm really just gon na say this for last, because I know it's about to be a struggle, but um. Oh my God, you got ta, be intentional with it like. I try my best to spray as closest to like the hair like down here, like I'm gon na try to spray up here. That'S why your legs get so crunchy and hard because you're spraying up here, no babies, you got ta spray down here. It'S close to the tip of the hairline as possible. Try foreign, oh, my God, I'm trying to like drag my scissors across while I'm cutting this like. It still has like a jagged cut, because I don't want to bluntly cut my legs. Let me cutting your lace. Ends up laying bluntly on your head, you know and that's what you want. You want to Jagged natural hair free type of way. Now I'm just getting a bit impatient, I'm just going rogue it's doing a bit of both under over whatever gets it there. I'M not gon na wait for this to stick down, because I know it's not so. Let'S just cut to chit chat see one thing I used to do before when I first started installing my wigs. That really does help a lot is. I would pull out the baby hairs all around the lace like what I'm doing right now on the sides and I'll just use that as an anchor all over. My only thing was that was that, like it was hard to push the hair back once like I've laid the lace because, like all that, pushing back of the hair would cause the legs to list lift all over. But that did really help me get my lace to lay like much easier spray smells hot, too good foreign look to the side whenever my installs are going really good. I just get so excited because it's like wow, I did that. Then I'm gon na cut it in a nice little diagonal angle and an angle you know short to Long, not too short, though not blunt cut like jacket like, so you see that okay, okay, now it's nice and hot, I'm gon na go ahead and curl it. I feel like curling it under works a lot better. In my opinion, it's what I've been testing out. It'S gon na give her a nice fat, curl, nice and tight the tighter the better. If you know what I mean, no I'm not same thing on the side. Diagonal chop, nice and Jagged and rough okay, we're gon na have to definitely get these down a little bit too low. Now, foreign foreign foreign foreign get up foreign roll out here right now. Yes, this is exactly what I wanted. What a big, dramatic swoops and I'm just gon na, go in and put my elastic band over everything just to let it all sit and set in the shape. I'M just gon na go back and re-straighten the hair, some more just to get it more flat and just to have something to do a few moments later, all right as fabulous and Luscious. This install is looking we're just gon na do a little extra tweaks just to really you know, get it to do what it needs to do. I don't know I'm just really feeling this like hair, like it's just so simple, but it's just that's just a bit of me. It'S just a bit of me. That'S what I'm going in just trying to like tweeze up a bit some places here and there. This is just me being actually doing too much, because sometimes I start doing these little tweaks and stuff, and that's when I ruin the style, I'm like damn mascara look. It'S called cover your grades. Basically, just black mascara, I'm just gon na use that to fill in some of the over bleached spots or any little gapping. I'Ve got going on 3 28 a.m. Okay, guys. We have made it to the end of this install it's three o'clock in the morning yay, but look guys I literally like went ahead and put on my pajamas, I'm like I'm ready for bed, but I was like wait. I didn't even film an outro for you, but here we go boom. I'M probably gon na insert a clip with my phone to show you just how long it is because I'm a little shorty and my camera can't go that low. But it's very very long as far as the quality of this hair, I would say it's super silky and soft. As you can see, it's really really thick, but my only thing I would say about it is that it does like it. It snags like I'm getting some snags here and there, so I can definitely say that it does get some tangling like nothing crazy where, like it's matted but then again, this is a brand new install, but it does like you know, catch in my hand when I Run my hands through it bro bro, it's giving like this is literally what I envisioned my product to be like. I'M feeling myself like whoop is giving I love this install so much like. I just love a simple side. Part like side parts are for me: I'm a side part girl, like you know, I was like bust down 40 inch middle part. I'M gon na bust down deep side. Part 30 40 inches like that's, that's gon na. Do it for me baby like okay. Yes, I love it. I love it so much! Okay, like you see that part, unfortunately, I'm so sad that I have to take this wig off like yes, I could just you know, put an elastic band and wrap it and go to sleep like that, but but I'm someone who doesn't like sleeping with a lot Of hair on their head, like I, I purposely like to wear glueless wigs, because I don't like sleeping with my wig on like my head gets hot, I feel like I have like a sensory thing. That'S why I can't do lashes either, like I don't like having things on my face and on my head, when I'm sleeping or I'm stressed like I'll rip it all out. You know so I'm gon na be taking this wig off, but I was like I'm gon na, take it off with y'all, because you did follow me on this journey to install it. So it's only fair if I take the wig off with y'all, so I'm going to show you guys how I take off my wigs so sad to see her go but yeah all. I do just get some water and spray on the lace because, like it comes off really easy with water, and I just kind of like Pat the water in and massage it, and I can feel it starting to loosen up. I know that just like that boom bam. Oh there you go edges safe, everything's, still good, and what I like about taking off my wigs at night is I reinstall it's going to be really easy. I literally just everything back in place and this way, if you know, when you're sleeping your wig, especially like a straight wig, it does get like little Crepes and Crooks in it unless you're gon na wrap it and really be wrapping their wigs, like that, you know, But all right with that said, I bid you guys do a good night and I thank you so much for watching this video following me along those lovely fine Journey. Yep, that's my story. I'M gon na go to bed now but yeah like I was saying. Thank you so much for watching. I hope you enjoyed this video. I hope you learned something but yeah. I don't really know how to end this. My brain is so confuzzled, I'm just tired, but I'll see you guys in another. One make sure you like comment and subscribe and remember you're, amazing, you're great, who, let me try to be a motivational speaker. Thank you, but no for real y'all are amazing and you're great, because you're you dumb the okay anyways bye, love. You guys good night peace out Girl Scouts goodbye


Comments
VSHOW HAIR: Direct hair link in the video ►https://bit.ly/3qioKGw