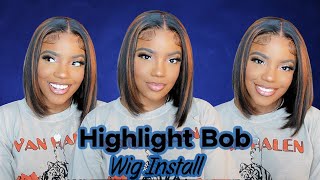
How To Make A Glueless Wig Without A Sewing Machine
- Posted on 04 January, 2023
- Closure Wig
- By Anonymous
Heyy beauties welcome back to my channel!
In today’s video I will be showing y’all how to make a Glueless wig without a sewing machine ✨
Products used:
Mesh dome cap
Needle & thread
T-pins
Wig Combs
Elastic band
Chalk
Canva block head
Hair
……………………………..
Need more help reaching success in your business?
Hair Game Playbook
https://jakiauniquedigitalpr.gumroad.c...
10 Keys To Business Success eBook
https://jakiauniquedigitalpr.gumroad.c...
……………………………..
Videos you should also check out:
How To Price Your Wigs
How To Find A Good Hair Vendor On Instagram | Start A Wig Business 101
Wig Supplies You’ll Need To Start A Wig Business
Dye Black Hair Red | Using Adore Crimson Hair Dye
…………………
Be sure to like comment and subscribe to my channel and turn on your notifications so that you can be alerted whenever I upload a video
Follow me on social media
Personal IG: www.instagram.com/jakiaunique
Wig Business IG: www.Instagram.com/wifeymaterialbeaute
Hair Care Business IG: www.Instagram.com/beautifulbrownstrand...
Twitter: twitter.com/bestfriendkia
For business inquiries:
Want to send me stuff?
23131 Michigan Ave Ste 1011
Dearborn, MI 48124
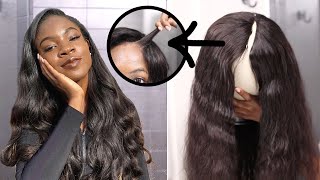
What'S up Beauty so we're just gon na hop right into this video here's, the wig cap that I'll be using. I, of course I use some chalk needle and thread you're gon na need that an elastic band, some scissors and, of course, the hair. So I'm just gon na go ahead and take this out the pack and go ahead and put it on my Dome head um. It doesn't really have too much stretch, but I'm not really worried about that, because that's what the elastic band will be for once you have put your cap on there. You want to go ahead and pin it down with your t-pains. You can get from your local beauty supply store or you can go on Amazon and get them. I will link everything that I will be using in this video in the description box below so be sure to check out that this will be a closure wig. This is just a regular 4x4, transparent lace, um closure that I will be using I'm going to go ahead and position it on my cap. You want to make sure that you bring it for just a little bit so that when you go to cut the inside of the cap, once you have sewn it down, you have room for the elastic band. You have room for it to actually fit on your head, so once you've got it to where you want it to be at, go ahead and pin it down with your t-pins foreign. You want to go ahead and get that hair on about the way, because once you begin to sew, it will find any and every way to be in your way. So you want to make sure that you pin that hair away from you. So you don't have to worry about it and I just put a little rubber band on it. This is what it should look like when you have pinned it down correctly. Everything should be falling in alignment. There should be no lumps blumps and crumps so right here. I'M just showing you guys how I sew. I start from the back and I work my way up from the front. I don't start in the front because I don't want the knot to show I'm just going to sew this all the way until I get to the front of the wig, and I will show you what I do once I get over there to the top foreign. Just as you would do, if you were sewing it on a sewing machine, you want to backspace your stitching, meaning once you get to the top. You want to stitch back two times before you actually cut and make your knot so that the initial knot is not directly in the front. You do not want your knot to be in the front foreign. With that side, I'm going to go ahead and do the same thing to the other side. If you are trying to start a hero, wig business - and you have no idea where to start, I will link down below my ebook that literally walks you step by step on how to start your business. It shows you different vendors, how to find vendors where to start how how to just go about the business side of starting a business and up into making your first sale. So, if that's something that you are interested in, I will link that down in the description box below so that you guys can check it out foreign the closure down. It is time to cut the inside of the lace out where the closure is. You don't want to cut where the thread is at because you will unloosen the stitching and your wig will fall apart. So you want to make sure that you are not cutting on the thread but cutting the lace inside of the closure just to make sure that there's no lace in the inside and two what this does is it frees up space and allows your wig to be More flexible and have more room when you put it on your your either your hair or your client's head. Okay! So now that we've cut the insides out, I'm going to go ahead and put it back on the wig so that we can go ahead and start drawing our lines so that we can start creating our wig. When you are drawing your lines, you want to make sure that you put two fingers at the bottom and then once you work your way up to the top, you want to switch to one finger because the closer you get to the top. You want your tracks to be as close as possible foreign once you're done drawing your lines. This is what it should look like. Do not worry about getting it perfect, sis ain't, nobody gon na, see them lines, but you this is just guidelines so that you can make sure you are learning your tracks right. The right way, if you know how to make a straight line without making the lines you can do it without it, but right here, I'm just aligning up my tracks just to make sure that I have the right sizing, I'm taking my t-pin and I'm placing the Hair in place so that I don't have to hold it the entire time that I am sewing, so that's just a little tip so that you know you don't have to hold the hair while you're sewing. You can just focus on sewing. When I begin to sew. I literally go through the weft and through the wig cap to make sure that it is intact. I then go ahead and make sure that I double knot it before I proceed so that way. When I'm going through the rest of the track, I don't have to go through the width. It'S sealed! You don't have to worry about the tracks coming apart and coming to place it's just when I'm starting and when I'm ending, I make sure I go through the width through the wig cap and I double knot. It foreign foreign, going to follow the same process. All the way up to the top of the head is no, you know different way that I'm doing it, I'm literally repeating the same process each and every time that I'm still on the track on I'm pinning the hair so that I don't have to have you Know hold it while I'm sewing, I make sure that I go through the weft through the wig cap, double knot it when I start it and when I'm ending it so that it won't come apart, and I don't have to worry about going through the weft throughout The track and it will not come apart and I literally follow this process all the way up to the top. So I'm not going to talk through the entire process of me, making the wig. I just want you guys to see exactly what I am doing and then I'll come back once I'm done foreign foreign, foreign, foreign, foreign, foreign, foreign foreign, your tracks, on your way, should look at something like this. You want to make sure you leave just a little bit of space between the actual closure and the track so that, just in case you need to replace your closure in the future. You can do so without cutting the wefts and loosening the entire wig. So this is the end, I'm going to go ahead and take it off so that I can show you guys how to actually make it glueless foreign on both sides of the closure, and I'm also going to add in this wig clip to the back so that You can clip it to the back and give you more security. So what I'm doing is I'm doing it in and out method I'm not going around, because I don't want it to appear to have much thread when your clients are wearing their waist. You want to make sure they look seamless as possible, so I'm going through the wig comb and through the wig cap and I'm going in and out instead of going looping it around foreign. What I'm showing you is the elastic band. Basically, the bottom half you want to make sure that you have that at the bottom. You don't want to cut that part, but you want to cut the top part and you're just going to cut it in half just so that you can have the elastic band on both sides. Make sure that you lay it in place. So you know exactly where you want it to place at and then you're just going to do the same in and out method that we did previously with the wig comb do not go through the actual closure. You want to make sure that you're going through the wig cap when you're sewing the elastic band on just like I said. If you want to replace the closure in the future, you can do so without having the hassle of the wig coming apart, because you sewed it on together. Once I've completed the first side, I'm just going to go ahead and do the same thing on this side. As well foreign, okay, so there you have it there. This is the completed wig we went on ahead. We constructed the wig, we made sure we apply the last event. You can literally wear this with glueless. You can with pie, glue it's totally up to you, but it does last longer when you do not apply glue to it. This is the final look. We made it this far and you have not subscribed sis. What are you waiting on be sure to hit that subscribe button and also turn your post notification Bell on until next time?


Comments
jj mac: Loving the thumbnail with a great background. #levelup
xxMoney100xxGamezing: i like it you need to got to 100 youtude