How To: Bleach Bath, Water Colour, Pluck, + Install | Ft 26 Inch Water Wave Wig From Curlyme Hair
- Posted on 29 January, 2023
- Closure Wig
- By Anonymous
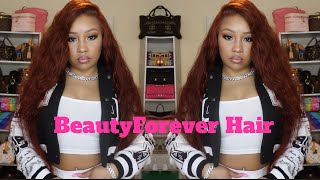
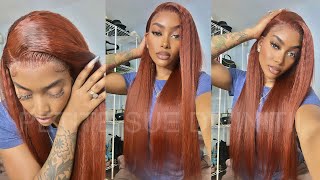
An easy beginner-friendly tutorial on how I achieved this gorgeous Auburn colour and flawless install.
___________________________________________________________________
Wig details:
26 inch 250 density 13x4 HD water wave:
https://curlyme.com/products/water-wav...
Products used:
- Blue powder bleach
- 30 volume developer
- Adore semi permanent hair colour: paprika, copper brown, & crimson
- Silicon mix
- Ghost bond glue
- Ebin black lace glue
- Rat tail comb
- Wig band
- Pink spritz
________________________________________________________
Let's connect on socials
bit.ly/3jeJNtA
Instagram: @rashidabena
Tiktok: @rashidabena
Business enquiries
________________________________________________________
#bleachbathsforwig #wiginstallforbeginners #auburnwigcolor #wiginstallandcolor #auburnwigtutorial #curlymehairreview #curlymehairwaterwave #curlymehairwig #wiginstalltutorial #wiginstallwithebinspray #wiginstallandstyle #waterwavewig26inch #wigpluckingforbeginners #wigpluckingtutorialforbeginners #wigpluckingtutorial
Hiya Darlings, thank you for clicking on my video today I'll be bleaching coloring and installing my 26 inch HD curly wig from curly me, hair and I'll, be taking you through the process of how I get my auburn color. How I pluck my wig, how I do my bleach baths and ultimately, how I install my wig so stay tuned and hopefully, by the end of this video you'll, be washing coloring and installing your wig, like a professional. So I always choose blue Powder and just to help with the brassiness. When you choose blue Powder over a plain powder, it does help with the brassy colors that I prefer to go with that I'll then go in with either a 30 or 40 volume developer um. I usually choose 30 over 40 because I don't want to damage the hair too much and when you bleach your hair, you are ultimately processing the hair and, as one of the units were curly, I didn't want the curls to be too damaged. So I started with a 30 volume developer. You just want to mix that in to get a nice toothpasty texture, you just mix it in preferably into a big bowl. You then want to go in with your boiling hot water. The trick with this is that you don't want it to be too watery, although in this I did make it a little bit too watery. So I do think next time I will be using more bleach products, but yeah. You just want to make sure it's not too watery with your hot water. Once that's mixed in and all of the clumps are gone. You then just want to dip your wigs in and then just make sure you saturate the product. Throughout with my Straight wig, I did use a brush and brush it through to just make sure that the bleach got through with the curly wig. I was a little bit scared that I didn't want to damage the curls, so I kind of just used my hands and just like made sure that all of the bleach was through. You also just want to get it on the lace on the knot. So you don't have to go back in and bleach the knots afterwards. You just want to really make sure it's saturated. In hindsight, I probably will do two wigs separately, because I felt trying to do two in one was a bit of a reach, but I did end up doing it. So if you are going to be doing multiple wigs like me, you do probably want to do it separately to make sure you can do it properly and it gets saturated throughout. I then cover it with foil and you want to leave it for around 20 to 30 minutes and once it hits that 20 minute Mark. I just go back every couple of minutes to check that it gets to the color that I want, because obviously I don't want to over process it, because I wanted it to be like a bright, auburn color. I wanted it to get this nice honey golden blonde. Color, so this was roughly after 30 minutes, then you just want to go in and wash it out. I wash it out with a cool water and I just feel like using hot water on processed hair. It'S probably bad news, so I always try to use cool to cold water. I just wash it out with some shampoo at this point. I won't conditioner it because I'm about to process it again with the watercolor, so in the meantime I'll just wash it out, I will hand dry it with a towel and just leave that sitting on the side before you dip your hair in the watercolor. You do want to protect the lace with layers of hairspray, so I'm here using my black ebbing lace spray and I just spray around four to five layers: cooling, it off with a cool hair dryer in between to make sure that the layers get tacky. And then I just go ahead and mix my color into hot water. So, as I said before, I want an urban color, so these are the three colors I'm using today, foreign. You just want to dip your wigs in until it's fully saturated with the color, and I know I have the four to five layers of hairspray on it, but I'm just still a little bit paranoid. So I will usually try try to just leave the lace. Flipped upwards, so it's not just laying in the water. There were times where my lace did go into the water and it didn't stain, but I'm just paranoid - and I just think I've spent too much on these wigs for it to go wrong now, foreign. So this is the final color result after I took it out of the water bath. I just washed it with some shampoo and conditioner. I used a bit of silicone mix to let the curls come back, and I just let it air dry for a bit. I'M now going to go in with my plucking, so what I do is I do it section by section um, so I will pop one section start about one quarter of an inch backwards and just piece by piece just pluck slowly with my plucking. I don't really have a technique. I know some people like to do the pluck skip method, but I don't really like those results. It doesn't really work for me, so I just kind of pluck in a pulling back motion just making sure I don't stay in the same place when I'm plucking and it's very sporadic. I like using a hot comb to flatten it. So I can see it better and every so often I'll just take a step back to look at what it looks like and once I'm happy with the result, I'll just part another piece off in front of that. Until till I reach the beginning of the scalp. So this is what the front of it looks like once I finished please ignore this mannequin. It is a hot ass mess and that hole is actually in my stocking cap and not the lace I am going for a scalp look. I don't really like baby hairs. So I like it to look like it's growing out of my scalp, so this is the final results. When it's been plucked and colored, I'm now going to go in with my installation method using the Bold cap method and some go spawn glue and some black Evan spray glue, because I don't leave my wig on for days. At a time, I usually just use two layers of black spray glue to secure my bold cap. I always dry on the cool setting, because the cool setting make sure it actually goes hard, we're going to use the heating setting it just basically melts it and you're. Just kind of going around in a circle it doesn't really secure the lace or the bald cap at all, and once the cap is fully secured, you just want to cut off the excess and put a bit of foundation on, and then this is me just securing The little end bit with some more spray, I'm just flattening it with my rat tooth comb. So whenever I initially install a wig, I always find it easier to do it section by section I'll start with the middle bit to make sure that it's actually Central on my head, I just put a few dots of ghost Bond glue out, spread it out with My rat tooth comb, you just want it to be a really thin nice layer, and then you want to go in with your hair dryer on cool setting and dry it until it is clear and tacky. Depending on how long you want to keep your wig on. Will determine how many layers you use so for a normal night out. I will only use two layers of ghost Bond glue and a layer of black ebbing spray. If I do want it to last a good couple of days, I will just go in and use four or five layers. I lay this right at the front of my bold cap, so it's not on any of my edges. It'S not touching any of my hair. It'S only touching my forehead and the Bold cap, and you want to make sure that the layer is really really thin. If your glue is still showing up as white, then you have either used too much or it's not fully dried. So all you want to do is get your hair dryer and just keep it on that cool setting for a little bit longer until it dries fully tacky and transparent. Once that's done, we can then proceed with putting the hairline forward and putting it on to secure it, brushing the wig backwards, whilst I'm trying to secure it. It always just makes it that little bit more secure to me. It just makes sure that the lace really gets into that glue and then afterwards, I like to go in with the end of my wrap tooth comb and just kind of push it down to secure it a little bit more once I've done that all across the Head this is the fun part. I then cut this off with a razor blade. I'M trying to go in a zigzagging motion because zigzag emotion on HD lace Blends way better than if you were to do it in a straight line. It'S a lot harder for eyes to pick up. You can see I've just cut myself. Oh my God. It'S a lot harder for eyes to pick up zigzag lines versus a straight line, so I try to do it in a zigzag once that's all secured I'll then go in with my spray, my Spritz spray to melt the lace onto my scalp, I'm literally just spraying. It onto the hairline and rubbing it in and letting that lace really disappear and when I've completely done my whole hairline I'll go in with my band to let it melt and at this point I'll, usually sleep with it overnight or if I'm doing this before I Go out I'll, try give it a good half an hour to just let it really melt into my hairline and yeah. Now that all the difficult part is finished, it's time for the fun part, I just use my continuous misting spray. I'Ve mixed a little bit of water and conditioner in it. I just spray it all around my head, get it really saturated and water and conditioner. I will brush my wig through with a denim brush, starting at the bottom of my hair, to make sure I detangle it foreign and then I'll just go in with some mousse mousse out my hair scrunch, my hair. Whilst it's drying and then I get these beautiful curls that form and yeah, this is basically the whole process from start to finish. It did take about two days for me to do, but I was kind of doing this off and on. I had other things to do and things um that kind of required my attention, if I didn't this, would probably take me a full day just because of how long stuff like bleaching and plucking takes, and if this was a straight wig. It'D. Probably take me a little bit longer because I would have to style it as well, but yeah. This is the final result. I absolutely love this hair. I love this color, it's absolutely gorgeous. It took color well and I will be going back to this company. I was a little bit worried because I thought only influences um got some nice wigs, but, as you can see, this wig is lovely and I paid my hard-earned cash for it, but yeah, hopefully um you were able to take something away from this video. Thank you. So much for watching and if you have more hair queries, I have more videos on my YouTube page with tips and tricks for your hair.


Comments
Katjé: Love the colour!
Nicss: Loveee