Detailed Step By Step 13X6 26Inch Amazon Wig Install | Bleaching, Plucking, Dying & Install *Melted*
- Posted on 02 February, 2023
- Closure Wig
- By Anonymous
Watch me slay this $180.00 Amazon wig! Im never paying over 200 again. Amazon me please!
WIG : https://amzn.to/3YjNZam
Purple shampoo : https://amzn.to/40pAS9j l
Bleach powder : https://amzn.to/3Rx1PE2
Jet black dye : https://amzn.to/3HxUy29
Mixing bowl : https://amzn.to/3HA8SHD
Shampoo : https://amzn.to/3X4kyb0
Garnier sleek and shine : https://amzn.to/40oKYr0
Garnier anti frizz : https://amzn.to/31OgQJ
These are afiliate links ( you click i get paid )
Follow me on ♡Instagram ♡
https://www.instagram.com/__AlisaDanie...
My amazon store front: https://www.amazon.com/shop/alisadanie...
Contact me : [email protected]
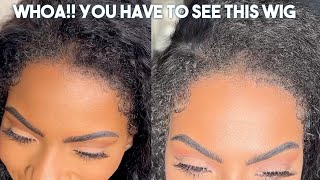
Foreign, hey y'all, welcome back or welcome if you're new to my channel hi, my name is Danielle and today we're going to be installing this wig from icrylery's hair um. First things. First, I'm going to show you everything they gave me. They gave some lashes. They gave me a brush. They also gave me a wig cap and y'all. This wig is so good for the price it is. I got a 13 by 6 26 inch 180, which was given more like 160.. I find the only thing that wasn't like correcting it: HD lace, which wasn't really given that much HD, but it was pretty close, pre-plucked wig body, wave, wig y'all. This wig is doing the same thing, so we're gon na install it. I like the fact that they came with five Combs and it did fit my head perfectly, because I always have issues with wigs that just never fit my head. So, firstly, first I'm gon na do is I'm going to dye this hair jet black, because I am a jet black girl. Now I cannot have the 1B or the brown hair anymore. It'S just not for me! So let's dye this hair foreign foreign. So now we are going to bleach these knots. I had to bleach my knots after I died just because I was using black dye, so I was like you just want to be better safe than sorry, I'm going to use the rest of my 40 volume developer. That'S why I have both 40 and 30, because I had a little bit left of 40 and I'm gon na use blue bleach powder. I, like blue bleach powder because I feel like it really gets that brassy a look and then, when you tone the knots it just looks a lot better. I like to use blue some people use white, I feel like blue just looks better, so I'm gon na be using my. I guess this is like a dipole, a Dye, mixer bowl or a bleach mixer Bowl. I really don't know, but I got this from Amazon. I had the brush with it as well. I'M trying to make sure I get all of that 40 round developer out of there because y'all when you need this and you ain't got no more and I always for some reason have to always go to the beauty supply store to get this, because I never Even have it so I'm like okay, I'm so happy that I bought more than enough this time. So I'm gon na put the entire pack of the um blue powder in there. I didn't need the whole thing. I don't know why. I put the whole thing in there, but I just wanted to be safe just in case, if I needed to go back and bleach my knots again, because sometimes I don't believe in the bleach on there for that long. I'Ll be scared that it's gon na like seep through and dye the hair, so I just made more than what I needed and I ended up, throwing it away and wasting it, I'm so upset, but it's all right. So, let's bleach these knots foreign. Thank you, foreign. Okay, so now that I let the we let the hair sit for 20 minutes um, I really wanted to make sure that my knots were bleached, because I always tend to just be scary and take it off too fast. So I was really checking up on it and making sure like the bleach, wasn't like seeping through the knots and dying the hair, which it wasn't it actually bleached perfectly. I was so happy the way that my my knots bleached. I was just like okay thank freaking. God finally, my first wig, where I did not up my hair or over bleed so y'all, see them Notch. I couldn't really see it because my freaking camera wouldn't be blurry, but it looked really really good. Like look at them knots y'all. I did my damn thing for the first time. Finally, I did my damn thing. Okay, so now we are going to tone these knots, I'm using this blonde purple shampoo. I completely forgot the brand I'm moving too fast, but I'm gon na have everything in the description box. So y'all can know exactly what I was using, but this purple shampoo is top tier. Like I love this purple shampoo like this really has like saved my lace. Fronts, life, but it came down to like toning, the knots and getting the brassiness out of it y'all this purple shampoo is that girl. So I'm gon na make sure that I really get the knots both on the inside and the outside to make sure that there is no brassiness in it at all. And then, after I'm done applying the purple shampoo I'm gon na. Let it sit for like five minutes just so it can like marinate, if that makes sense, and then we're going to shampoo the hair after foreign foreign foreign part y'all. This is the part that is like gon na make or break your wig. The bleaching part is scary, but this part cannot be fixed. You cannot add hair back into the lace unless you know how to do it, but me I don't most of us don't so this is the scariest part for me. So the easiest way that I do this is I get a hot comb and I um flat all the hairs and push all the hairs back and I also get a white towel. You can do like a white dish towel or white rag whatever. As long as it's white and you put that underneath your wig and you put your wig on your knee like so like how I'm doing here - and you have comb in your hair back first, okay! So now, after you hot combed, all your hair back you're gon na grab a. I don't know why my like Focus stories just acting dumb but just grab a tweezers. I like to use the angled tweezer just because I feel like the angled one, just snatched. The hair better - I don't know this is this - is the one I have and I always just go for the angled one. I'Ve always used it. So then how I learned the best way. I'Ve learned to save myself from messing up my lace and pluck it the best way without having to plug so much here is I take out the part. That'S already looked thin and already look plump. As you can see, this wig was already pre-plucked a little bit. So I didn't have to do that much plucking, but I still want it to look way more thinner than what it looked, because it's still a little bit full for me. So I learned the skip pluck method so like it's literally like maybe a half of an inch apart from each other, and you skip a piece pluck skip a piece pluck skip a piece Puck, I would definitely Tick Tock and then you never pluck in the same Place you plucked already, if you need to plug there again you plug behind that hair. So I would just part again and then I will pluck again so with skip. Pluck you find the thinnest areas, areas the thinnest area and that's where you will pluck because since it's already thinning, it just makes sense to pluck there. So it's a skip, pluck method or plug skip method, so pluck skip a piece of hair and then plug again. All right, foreign, okay, so after I'm done plugging that back part, then I put the rest of the hair. I put the entire hair back, I push it all back and then I do the same method on the front of the hairline. So, as y'all can see, there's a little Gap there, so it's a pluck skip method. So y'all can see me doing it here. You see the pattern forming like I'm skipping apart, then I'm plucking and then I'm skipping another part and I'm plucking. You want to do this all around the entire hairline and then, if you need to go back, you part the areas you already plucked. You part that out and you pluck again, while you plug in a part that you have it plugged. So that's what I'm doing now, so I parted all the areas that I've already plucked the first part and then the front, and then I'm gon na pluck again and the third part, if that makes sense so like unplugging, where I haven't plugged already so skip, pluck Plug skip method so pluck then skip plug the skin foreign foreign, foreign, foreign, okay. So now I'm going to use this concoction that I got off of, I think it was Tick Tock a while ago. So basically you take a rubbing alcohol and you take your foundation. Shade you put it in a spray, bottle, Shake it up, make sure that the foundation is like completely dissolved, and you spray that, on your lace, what I tell y'all lace is gon na be melted. Lace is gon na, be no longer there that that right there. It was giving me trouble because I had not much left in it, but that right there y'all, you cannot miss that step. You cannot miss that step like it's cool to just put your foundation shade on there, but I feel, like Foundation, has oil in it and like it just it's something about putting an alcohol on it and like letting it dry out and, like you know like make It more permanent - I don't know, but when you mix your foundation shade with your alcohol and you spray that on your lace, it's a game, changer game, changer. Okay, now on to installing this wig um, I was doing a tick tock and also filming this video on my camera for YouTube, and my dumbass forgot to put press record on my camera. So I kind of like missed a step when it like skipped a step, but basically all I did was cut off the access lace and then I cut out the extra lace that was in the front because the my head is kind of like shaped weird. So like sometimes it might be too much lace in the front, so I just cut up that extra lace that was in the front of the wig, so it can fit my head and then now we are applying my got to be glue the now. I'M about to be glue, my um bolto glue, I'm using both hold active. I like that one better than I like the regular bold hold, because I feel like this one just doesn't it takes a longer time to like loosen up like I feel, like my wigs last longer, with this specific glue foreign, the parts that I plucked um basically Got cut off so I needed to pluck my wig again as I can see, this wig looks like I didn't, even plug it at all, so yeah that part really got me upset, because I was just like damn like this way doesn't fit. My head, like it's too big for my head and don't get me wrong. This is me with every wig, even when I have like the most expensive wigs. It'S always like this. This is just my head. There was nothing wrong with this wig specifically, this is just my shape of my head, so I went back and I plucked the front of the hairline and remember the pluck skip method. Everything. Thank you. Thank you. So now I am going to make my part. I decided I want to do a middle part for this wig, just because I don't know a classic bust down middle part. It'S just I don't know. I feel like that's just the part that you have to do when you like, get a fresh new lace front. Like you've got to do a middle part, I feel like style Parts come like after that's just me like side Parts come in like after maybe like two weeks of wearing a wig, then you switch it to a side part, but middle parts. They just do it for me every time. Thank you! So now I'm gon na grab my black Sharpie. I would prefer for you, if you're, like a new way of doing your wigs, do not use a black Sharpie, because black Sharpies, they do seep through the lace and they do get on your legs. So I would prefer to get the L'Oreal root spray and, like jet black, whatever color your wig is that would work best, I'm just using a black Sharpie just because I don't have the L'Oreal spray. So I just took my changes with the black Sharpie. I'M pretty sure that the Sharpie did seep through my lace. But honestly I don't really care because I'm probably just going to keep it in the middle part anyways, so yeah, okay. So after I sharpened my hairline, I am going to grab my concealer shade and I'm gon na like draw that on my on the hairline just to like even it out and make sure that you know it just looks good. This is what we do do. Y'All already know this step like you got ta, you got ta put the casino on on that part: okay, oh foreign. So now it is time to do the baby hairs and y'all. I'Ve mastered my baby hairs when it came down to, like my shape of my head and like my forehead and where my eyebrows are so. I like to have my baby ears, start a little bit closer towards the middle, so maybe about three to four inches away from my middle part or maybe like three three or four I don't know y'all see, I'm probably gon na bring it up a little bit Higher than what I did right here, so I would say, like three inches after your part on your hairline and then um, you want to part it in like a diagonal way, and you want to also your sideburns. You want to part it in a diagonal way and then your baby hair part. You want to part that in like a diagonal way too so like kinda, have it more thin towards the front and then bring a little bit more hair in towards the middle and then kind of like a triangle. If that makes sense, I don't let you know how to explain it y'all just kind of see what I'm doing in a way. It'S just like a kind of like a round half circle part going on and then I'm gon na grab my hot comb and I'm gon na flatten those hairs out. I did burn myself and I was so freaking mad, so mad, but hopefully I don't catch it. There I think I caught it here. I don't know, but I burned myself and I was very, very mad okay. So when cutting your baby hairs, you want to cut it in a diagonal way, as y'all can see and kind of like graze the scissors or the blade along the hair, because you don't want it to be like a butcher cut. But you want it to be kind of like a razor cut in a way, and you want to cut it in a downward diagonal way, because you don't want the back the bottom of the baby hairs to be shorter than the front. You want the front to be shorter than the back to give it that I don't know how to explain it, but y'all know what I'm talking about. I know what I'm talking about same with the Sideburn. You want to cut it in a downward diagonal way and then I'm gon na grab my baby list um. I think it's a one inch um flat iron and we're gon na bump those baby hairs, so people some people bump it like backwards. I like about months forward because I just feel like I don't know backwards, just seems funny to me and weird and like when you like, try to shape it out. The curls are like flipped up in a way, and I just don't like that. Look so I like to bump mines forward and make sure you get a really good curl, because the curl matters, foreign foreign, thank you, foreign foreign foreign foreign, to where I um grabbed my hot comb, and I ran through the top of my hair again to make Sure it was extremely flat, be careful when using a hot comb, don't really point the Combs down towards your lace, because it might burn a hole through your lace. Make sure you keep it kind of going up and like using the back of the hot comb to like flatten the hair out, if that makes sense, but yeah I lost the clip, I'm sorry y'all, but then I grabbed my Garnier hair oil and y'all. That is like crack for your lace fronts as y'all can see. My wig looks really really really really really good. It does not leave your hair oily. So for those who might think that my hair looks super super oily, it doesn't leave it oily. It just gives it a shine and like when it comes down to like when your lace front starts to get a little dry and dull. That will revive your lace front, your hair, and we arrive it so well, just put that through your hair and then run a flyer through it girl, your hair gon na be right back to how it was when you first put the wig on okay. So yes um, I hope y'all enjoyed this video um. It really took. It took me seven hours to put this wig on y'all seven hours. My makeup is not coming out right. I was just so annoyed and then, on top of that, I was also filming this video and a tick tock, so yeah, I really hope y'all enjoy this install. I actually love the way this install came out like for the first time I actually was just like girl. You need to start doing hair again, because I really surprised surprised myself with this wig, like I really really did like. I love it and it's probably one of the best wigs I've ever installed and for it to be an Amazon, wig yeah, let's, let's clap, let's give it up for Amazon because y'all their wigs is a wigging, so I hope y'all enjoyed this video, don't forget to Like comment and subscribe and as I always say - I love y'all, so so so so so so much and I'm gon na see y'all in my next video bye, y'all


Comments
👉 BUY YOUTUBE VIEWS 👉 Link in Bio: showed my friends this and now they are obsessed with it