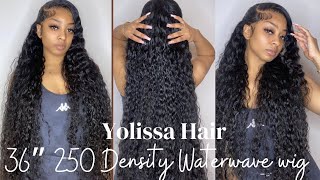
Deep Water Wave Wig Install (For Beginners) | Ariluvsfrenchfries |
- Posted on 05 March, 2023
- Closure Wig
- By Anonymous
#amazonwigreview #amazonlacewig #darkskinmakeup #blackgirlmakeupvideos #blackhair #protectivestyles #darkskinmakeuptutorial #wiginstall #waterwavewig #deepsidepart #sideparthairstyle #deepwavewig #deepwavebundles
thank you so much for watching my video !!!
DONT FORGET TO SUBSCRIBE AND SHARE!
Click to see more:)
LINK TO HAIR : https://a.co/d/2YHnXEf
LINK TO MINI FLAT IRON: https://a.co/d/c67t1o5
LINK TO BLOW DRYER: https://a.co/d/02AAH9A
MUSIC USED : https://youtu.be/QLKUuy7uCuY
Email:
TY FOR WATCHING ILY ALL SM!
FOLLOW ME ON TIK TOK!
ariluvsfrenchfries
FOLLOW ME ON INSTA!
@ariluvsfrenchfries
FAQ:
* age: 17:
grade: 11th
" editing software: capcut
* subscriber count: 602
"subscriber goal: 1000!
*current subscriber goal: 700
water wave hair water wave wig natural curly lace how to blend lace dark-skin lace amazon lace wig amazon 13 by 4 wig install lace wig install hd lace transparent lace wig install,water wave,transparent lace,how to melt a lace frontal,how to melt a lace frontal wig,how to make a lace look like skin,water wave transparent lace wig,hd transparent lace wig,hd transparent water wave lace wig,hd transparent lace wigs,realistic transparent lace wigs,how to install a frontal wig,how to customize wig,beginner friendly wig install4c hair,amazon wig,amazon wig installation,dark skin lace frontal,dark skin lace tint,darkskin lace,darkskin lace melting,darkskin makeup,deep,deep side part tutorial,deep side part wig tutorial,how to melt lace,how to melt lace darkskin,lace front tutorial,lace front tutorial with glue,lace front tutorial without glue,wig for black women,black girl wig,black girl wig install,auburn wig install,brown wig install
Cause most cities, hello, you guys and welcome back to my YouTube channel. My name is Ari if you're new, if you're, not new, welcome back to my YouTube channel today's video, I'm going to be showing you guys how I got this deep water wave side, part wig and stall everything I use will be in the description below. If you want to purchase it, so I hope you guys enjoyed this video and stay tuned for the next one, okay guys. So, as always, I'm starting off this wig cap already on and I'm just gon na, take my God to be spray and I'm just gon na spray, one layer all around the wig cap, also using my fingers just to spread it out afterwards. I'M just gon na go on my blow dryer on the little cool setting and just make sure that that layer of got to be spray is all dried. Next, I'm going to cut ear tabs, but when I cut I'm going to make sure I cut behind my ears so that the wig cap can look completely flat. As you can see here and then I'm gon na go in with a little bit. More of that got to be spraying, just bring it around the ears and then securing it with my blow dryer. Next, I'm going to begin cutting my wig cap first, just making in a small hole and then I'm going to cut alongside that hole because cutting alongside that hole gives you a band. So the back of your wig cap is secured. As you can see here. I have that band and now I'm just going to cut off the excess wig cap right around my ears. You wanted, I see now, I'm just going to start peeling my wig cap back I'm doing this because when I cut it, I want the wig cap to be as close to my skin as possible. So I'm just going to peel it back just a little bit. Not a whole lot and then I'm just going to go back in my scissors and cut it making sure I cut it as close to my skin as possible. Now I'm going in with my Foundation. This is a Born This Way foundation in the shade ganache and I'm just using this morphe brush just to blend in that Foundation, all over my wig cap and, of course, making sure to focus mostly on the edges, where my lace is going to be laid next. I'M just going to tint my lace as well again using that ganache foundation in that same morphe brush just to blend it all out. Now, I'm just going to put the wig on and y'all get into like this lace. Mash like it's already melted like this honestly. Could have been the glue this wig, but now I'm just going to brush it all back, just to get all the hair out the way. Next up, I'm just going to start by applying my first layer of the ghost Bond glue, as always making sure to spread it in a thin layer. Y'All recommend me some glues down in the comments below, because I have not found one that will stay on for like more than a week, so recommend me some glutes next, of course, I'm gon na blow dry again on cool air and y'all, I'm using cool air Because if you use warm air, you'll start sweating and all the oils from your scalp won't make the glue stick. So, whenever you're doing your wig installs just always make sure to use cool air. Now, I'm just going in my second layer of glue. Nothing really new. Again, just making that thin layer all around the perimeter of the wig cap and, of course, I'm just going to take my blow dryer on cool air and blow dry the glue until it's clear and y'all. I meant to say this earlier in the video, but thank you guys so much for 500 subscribers. I know I haven't been active recently, but it just means so much like you guys. Support just means so much to me. Actually, at the time of me, recording this voice over, I just hit 600 subscribers. So thank you guys so much like it means so much to me. I put so much time and effort into these videos and I'm really excited, and I'm really happy that you guys enjoy these videos because I really love making them for you guys. So thank you guys so much honestly. So now you guys I'm just gon na put on the wig, I'm always starting off by placing the middle lace down first - and I always do this, because if you put the middle down first and you find that on the sides there's excess leaves, you can always Cut it so always make sure to put the middle down leaves first now, I'm just gon na haul comb, all the hair back. So I can have the lace fully accessible to me to further melt it and I'm just gon na make sure the hot comb all around using the flat part of the hot comb, not so much to teeth, just to get it flat. Next, I'm going to take my Spritz and I'm just going to spray a few pumps on my finger and then apply it on my lathe. Then I'm just going to go on my blow dryer on cool air as always, and just make sure that any like parts that were lifted are just fully melted just for a better amount. I'M just going to go in with some tweezers and just press down a little bit more on the lace while blow drying, just to make sure that it's fully melted and secured gon na take the slightest bit of foundation and apply a little bit more on the Lace, so it looks like complete scalp and then I'm going to go in with some more Spritz and just add another layer onto the lace. Now I'm just going to be pulling out my edges and then using my Hawk comb just to flatten it out. So it lays better onto my head next, I'm just going to put my waistband on and then get ready to start parting. My hair, like I said, I'm going for like a deep side part. So I'm just gon na pop my hair y'all know I have a hard time parting, my hair, but honestly y'all. I think I finished like this is probably one of the best parts I've ever done in a video like look at that yeah. Now I'm just gon na take some of the edge booster wax thick and I'm just going to apply it onto the sides of my hair and then I'm just going to hot comb in no particular way. I'M just trying to get it as flat as possible around where the part is now I'm just going to be curling. My edges upward, with this mini flat iron that I got from Amazon this flat iron. It works wonders like it heats up so fast like go. Get one y'all go, get one right now like right now, once my edges are all curled, I'm just gon na take some got to be sprayed, I'm just going to apply it on my edges, I'm not using Edge booster this time because I find sometimes it makes My edges really hard, rather than got to be, which keeps my edges pretty soft and fluffy. So I'm just going to use a got to be spray and smooth my edges. As you can see, it was pretty easy. Now I'm just gon na put my band back on and then I'm going to section off one half of my hair to get ready for a hot combing. I'M just gon na take the edge or wax stick. I'M just gon na apply a little bit and then I'm going to take my hot comb and as always, I'm going to use the flat part. I don't ever want to use the teeth because that rips out your hair. In addition, I'm not hot coming all the way down, because this is a curly unit and I don't want to ruin those curls. So again, I'm just going to add some more wax stick make sure to hot comb using the flat side of the hot comb. Not really the teeth and really just make sure that it's all flat onto your head take our time - and this is what my hair looks like after I've Hawk home through all those sections, it's very flat. Y'All I'm telling y'all I'm putting y'all on this is what it looks like after I take off the band. As you can see, everything is pretty melted. So now I'm just going to take the small little eyebrow brush and just add some concealer lines around my edges and around the parts to give it a more natural look. And then I'm gon na go with my Denman brush, I'm just going to brush through all of the hair, taking out any Tangles or any knots that might still be in the hair, and this is what it looks like after it was all brushed out. Honestly, I was kind of feeling this look. I'M not gon na lie afterwards. I'M just gon na go in with this spray bottle that has oil, water and conditioner in it, and I'm just going to spray all over the hair in no particular way just making sure that the hair is just fully saturated. Honestly, I don't know what I thought. I was doing with the smaller water bottle. It took me forever to do this, like it was barely spraying water for rails. This is what my hair looks like after it's fully been saturated. So next, I'm just gon na go in with the red Eco argan oil. Gel and I'm just gon na like rub it through my hair, I'm not really gon na like Clump it together, I'm just gon na run it through my fingers just to make sure that all the strands are fully coated with the gel, and this is what it Looks like after I've applied all the gel next up, I'm just going to take my blow dryer with this little diffuser headpiece and I'm just going to diffuse my hair. As I said, all this will be in the link in the bio I'm just going to diffuse this on cool air, because I do not want my hair to puff up. I kind of want it to stay very wet and Sleek, so I'm just going to blow dry it with the diffuser All Around My Head and let's see the final result, you guys I really like how this turned out. This was honestly my go-to hairstyle. I love this so much. Let me know what you guys think down in the comments below and I will see you guys next time. Bye, ain't, nothing new! Now,

Comments
A Bespoke Living: ❤❤❤
Brilliant Christina Nation:
Taii: yesss