New! True Scalp Tape | Multi-Color Hd Lace Wig Detailed Install | Hairvivi
- Posted on 21 November, 2022
- Color Lace Wig
- By Anonymous
#lacewig #hairvivi #install
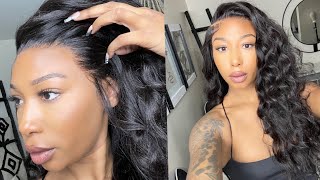
THE MOST REALISTIC WIG INSTALL! I decided to try some color and this was a hit! We all deserve wigs that look like scalp. Hairvivi has done it again. Here are my tips and trick to install your hd lace units without using glue while introducing the new "True-Scalp" Tape. I love it!
▬▬ ★☆ #HAIRVIVI BLACK FRIDAY SALE ☆★▬▬
Discount - Save Money Directly
$40 OFF PER WIG:Cryssy40 (1 Week Limit)
$25 OFF DISCOUNT: Cryssy (No Time Limit)
Activity - Sephora Gift Card
Place the order during black friday! Get a $100 Sephora Gift Card!
2 Winners will be announced on the December 1st
▬▬▬ WIG DETAILS ▬▬▬
Wig in video: https://bit.ly/3fQiJ2c
Hair Length: 18 inch
Hair Density: 180%
HD Lace & True-scalp Color: Cappuccino
Capsize: Medium
▬▬ NEW WIG ERA▬▬
-True-scalp Tape & Fake scalp Method
-Multi-color & Invisible HD Lace
-Anti-slip Elastic Band
-Clean bleached knots
-Pre-plucked Hairline
▬▬▬ MORE WIGS FOUND HERE ▬▬▬
▶ Best Seller LaceFrontWigs: https://bit.ly/3BMuHR2
▶ Hairvivi 13x6 HDLaceWigs: https://bit.ly/3wwVwGg
▶ Hairvivi Official Website: https://bit.ly/3sLvGNT
▬▬▬▬ Hairvivi Social Media ▬▬▬▬
Instagram: https://www.instagram.com/hairvivicom/...
YouTube: https://www.youtube.com/channel/UCWK7J...
TIKTOK: https://www.tiktok.com/@hairvivi.com?l...
Facebook: https://www.facebook.com/hairvivicom
Pinterest: https://www.pinterest.com/hairvivi/_cr...
▬▬▬▬ ForeverCryssy's Social Media ▬▬▬▬
@ForeverCryssy
INSTAGRAM: https://www.instagram.com/forevercryss...
TWITTER: https://twitter.com/forevercryssy?lang...
TIKTOK: https://www.tiktok.com/@forevercryssy?...
TRILLER: https://triller.co/@forevercryssy
▬▬▬▬ Shop HERE ▬▬▬▬
♥ Business Inquires: [email protected]
♥Website: https://www.forevercryssy.com
♥Amazon Store: https://www.amazon.com/shop/forevercry...
▬▬▬▬ MUST WATCH ▬▬▬▬
1. PLUCK LIKE A PRO: https://youtu.be/ouFJOAfWqWE
2. BLEACH KNOTS: https://youtu.be/nHxDaQWG9Tk
3. DETAILED INSTALL: https://youtu.be/583UXwGE4Hs
4. WAVY BOB: https://youtu.be/NRrgdRvpXTQ
5. SIDE PART BOB: https://youtu.be/XI_ZDURLc5o
▬▬▬▬ PROTECTIVE STYLES ▬▬▬▬
MY FAVS:
1. PASSION TWIST: https://youtu.be/7wMA_Qv2zjg
2. CURLY FRO: https://youtu.be/j8xHgc3ibys
3. NATURAL SIDE PART QUICKWEAVE: https://youtu.be/DIVAPv5YFX0
4. V PART + LAYERS : https://youtu.be/RYjHnb7-CBo
5. VERSATILE WEAVE: https://youtu.be/sRG_dfskG_4
6. KNOTLESS BOX BRAIDS NO BABY HAIR: https://youtu.be/vD14SlCCEuQ
7. BANTU KNOTS: https://youtu.be/JAbafgqWAUs
FAQS:
Location: Atlanta, Ga
Height: 5'2
Main Camera: Canon T7I
Vlog Camera: Canon g7x Mark III
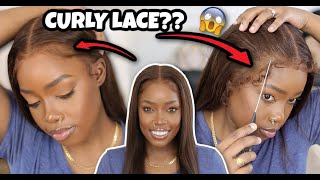
Foreign, hey babes, welcome back to my channel. If you are new here, welcome, you already know now's a good time to go ahead and subscribe and, as you can see from the title, today's video is in collaboration with hair Vivi. You guys know I've been working with them for quite some time. I am a stickler of packaging and they never seem to disappoint. So, of course they do have a ton of details on the inside. So I highly recommend that before I actually um cutting off the lace and really kind of getting into the unit definitely make sure to check out everything that they have included. Of course they do have some giveaway uh opportunities for you, sorry y'all, I'm cooking. They also have a couple of uh discount codes. They want you to have the chance to be able to like share your unit with them on Instagram Facebook. All that good stuff so definitely make sure to do that and then, of course, they actually provide these cards. So that you are aware of what um, lace or true scalp tape color, you will actually be, and you see how the cappuccino color just melts into my skin and then of course, the mocha color is a little bit darker, but it probably would be perfect once I'M actually like tan, because y'all know always out of town, so they did a lovely favor and sent me quite a bit of the true scalp tape, which is almost a replacement for the wig cap. I don't even want to say almost because it definitely is, if you're one of those people that know you're going to be wearing like that middle part, permanently, that bust down that got us in the Chokehold, okay or a side part like myself, then this is gon Na definitely come in handy and they do actually give you instructions on how to properly install it. So I'm going to be showing you that in detail today, so I make it a habit to try to show you these units fresh out of the box. So you can see exactly what it is that I'm receiving in hopes that you get the exact same products now. Obviously uh once it's time for you actually to place the order. Please make sure that you are following my description box. I want to make sure that you are not only getting the correct unit, but you are also choosing the correct cap size, the density, the length all that good stuff, because I'm hearing that some of these units that you're receiving are a little bit thinner than what You'Re expecting so we want to make sure that you have that density. Put up pretty high, you guys can see the inside of the cap as well, and the knots did complete bleached. I actually have my hair, like in cornrows. It'S probably been about two weeks at this point: um. So first things: first, you guys I'm just going to go ahead and try on the unit, because I want to make sure that I'm happy with it before cutting off that lace and also cutting off the tag. So you guys can see right along the ear. Everything is lining up properly. The knots are pre-bleached pre-plucked, I'm gon na go ahead and cut off any of the ear flaps um that are just kind of like in the way so that I can easily install this. Now that you guys can clearly see The Parting typically, I will wear my part on the opposite side, but I wanted to just do this for the purpose of the video I'm going to go ahead and show you how to install the true scalp tape. So first things first go ahead and kind of like measure this onto your wig cap. I have done this on a mannequin head before and also just completely off of my head, but just for the purposes of the video I wanted to do this on my ahead. In case you don't have those other resources, and so you guys can see you don't have to actually cut this in like a circular motion, but in comparison from when I've done it before I'm instantly able to see that this was a much better application. Hair VV also suggests that you go ahead and kind of cut the true scalp tape in that round shape as well just so that it's less detectable underneath the wig, of course, and you guys can see how sticky it is. If you mess up, don't worry, you'll get the chance to be able to re-stick. Stick it again: re-stick sticking, okay, and so the color of this tape would essentially match the exact color of a wig cap that I would have potentially used now. Obviously, you don't have to worry about the extra fabric in the back of the cap, but you definitely want to make sure that you place it in the exact spot that you want to part your hair and I would actually suggest uh laying the true scalp tape. Probably about a half inch to an inch behind the hairline simply in case you want to further pluck this and to also just kind of make it a little bit more more undetectable same as you would with the normal wig cap now. For me, I definitely wanted to just make sure that everything was going to be fitting properly. I did actually go ahead and remove the cap that I was wearing underneath this um just because I simply did not need it y'all, and so you guys will see here. I'M just taking a little bit of the pump it up. If you don't no, now you do. That has come to replace the got. Ta be glue spray. So if you're looking for a glueless install where you can take it off, put it on, don't have to worry too much about it, but having something that will still kind of keep the wig in place. I highly suggest using that product and then, of course, y'all can see just how transparent the lace is. I mean whoa, okay, but this is just kind of like a normal when it comes to hair VV. I always expect to have a really really nice lace. Typically, the color - I don't have too many issues with in this case. This is probably my first time in a long time getting hair from them that came pre-bleached that did kind of have that ombre Balayage situation going, and I don't know if you can tell already - but I was super happy Bronner Brothers Shout out to you. Okay and um just to go ahead and make sure everything is intact. I am going to go ahead and just take one of my elastic bands, just to kind of like hold everything down, not that we even need it by the time I got to this portion of the video. The front of the hair had already kind of got. Tacky and was in place, but I do want to make sure to get the unit length flat as possible. Y'All know we don't want those big bulky. Wigs so definitely make sure if you have not already check out my Amazon store so that you have access to not only some of the products that I'm using, but also the uh hot comb. If you don't want to go, there, definitely just check out your local beauty supply store, Walmart Target, all that I'm sure they have one and then I'm going to go ahead and take some camera wax. Is this the camera? No, this is actually the caracara wax stick. Y'All I have had this for so long. I feel like this is like probably as old as high school, given very much 2012 Vibes. That'S embarrassing, but, as you can see, it's still doing the job, and so I'm just taking a little bit hitting the very roots. And then, of course, it helps to lay everything down and if you need a little bit more assistance go ahead and take the camera flat iron spray. That is my go-to holding it's like a workable holding spray that does not leave your hair looking cakey and stiff, and you know how I can kind of get flaky. You don't have to worry about that here and you guys can see just how nice of a job they did when it comes to coloring. Everything is like Blended perfectly. The hair was super soft, of course, when it comes to shedding. I can never really tell um, you know just at first glance right. Obviously, I'm installing the hair, I didn't have a bunch of like matted up, hair or just hair shedding all over the floor, but it would be best practice to give it a couple days. Just to really kind of know for sure what the hair is going to do, but with my experience with hair VV for the most part, I don't really have too many issues as long as you're maintaining the wig with like the normal washes. I would maybe wash this unit after wearing it about five days straight, I'm more than likely would just take. Take it off, give it a good refresh just because of the products we're using right same as your hair. It can start to just kind of look way down and oily, but you guys can see it's given what it needs to give already. Okay, and so these are the curls that actually came with the unit. I didn't have to do too too much um, and so I am going to take some of my bio silk just to add a little bit of Sheen, not even that the hair needed it. But when it comes to color, I always want to make sure that it is a little bit more hydrated. So this is giving, I don't know it's kind of like a honey blonde Honey brown situation, but I did kind of want to add some layers. So you'll see in a little bit where I go ahead and just kind of shape it not too too crazy, but just around the face, because I know eventually I'll be wearing this in a middle part or a side part just on the opposite side of my Head, and so this is a quick look at what the curls look like and for me, I like to start my layers at about the corners of my mouth, just so that when I curl it it's still kind of framing my face, you can carry it up Higher, if you need to maybe towards the cheek area, but just to stay on the safe side, I wanted to start a little bit lower and you guys can see it helps just kind of shape. Everything especially once you've already had those curls in it makes it a lot easier now, if you wanted to, you could obviously get this unit pre-colored, and if you wanted to take it up a notch, you totally could so I know sometimes you guys are asking me, Like Chrissy is the hair able to be bleached dyed, here's a great example of a great job that they did and I'm just going to go ahead and do the same thing. On the other side, I'm just going to carry that layer all the way down, and if you are new here and don't know, I have a ton of wig videos that show you how to install with glue without glue with hairspray without the hairspray. Like I mean it's a lot, okay, if you need to know how to properly layer your hair, I have a very detailed tutorial as well, so definitely make sure to check that out. If you haven't already and yeah, this is pretty much it. I like to pretty much just brush the hair, all back, see what it is that I'm working with, and I think it was okay, but I did kind of realize. I was like this long little layer in the front. It'S, I don't know it's okay, but I just wasn't a fan. I felt like I needed a little bit more of like I don't know, you'll see, so I did go ahead and just lightly go through with the razor comb um later on. Just to kind of add a little bit more shape, but this was really pretty for this to be straight out of the gate I mean y'all saw, it starts to finish, and all that I'm doing is taking a little bit of the uh just a few pieces. In the front, nothing crazy, we aren't going to do like a whole baby hair situation, but just to kind of help with it. Looking a little bit more realistic, I am going to add just a few little wispy hair. So literally, all I did was just take the back of the razor comb and trimmed off. Maybe four to five hairs, add a little bit of mousse to keep it soft, and that is the look. Okay, like I told you guys before this is straight out of the box. So of course, when you get your unit, sometimes they do come like a little smushed and smashed. So you do have to add just a little bit more Voom to it and if you find yourself doing that and you're going to be wearing curls, I highly suggest layering it just so that it's not all one length. If that's your style, hey baby go for it, but in this case I wanted to go ahead and just add small layers, and then, of course you guys will kind of see here at the end, how the hair, just naturally flowed and everything kind of went into Place and so here I'm just going to go ahead and finish kind of like adding a few curls of I'm just gon na go ahead and brush everything back and kind of keep it nice and smooth, and you guys look at the hairline already. I was so impressed such a great job. So definitely let me know what you guys think about this. I absolutely love doing the start to finish videos, especially when I know it's coming from a company that I already love. I hope you guys enjoyed this video. I love you guys so much stay pretty and I will see you next time: bye, babies, foreign


Comments
Asonti: You did that sis! That color looks amazing on you
Debbie Brinkley:
jazzie cat: It looks very nice that would be a good gift.