Easy No Bleach Highlights Wig Install | *Amazon Wig Under $100* | Ft. Oytoy Store
- Posted on 13 March, 2022
- Color Lace Wig
- By Anonymous
#Amazon #Wigs #Closure #Frontal #Highlights #blonde #613 #color #install #stepbystep #Tutorial #Easy #Beginner #NoBleach #scalp
Wig used in this video - https://www.amazon.com/dp/B09QKNFN66/r...
INSTAGRAM: SamanthaAlyssaa_
https://www.instagram.com/samanthaalys...
BUSINESS INQUIRIES:
XOXOXOXOXOXOXOXOXOXOXOXOXOXOXOXOXOXOXOXOXOXOXOXO
Music by Ryan Little - New World - https://thmatc.co/?l=5DE2EE77
Tape in hair extensions for highlights - https://www.amazon.com/dp/B09KFXBPWX/r...
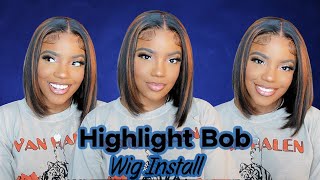
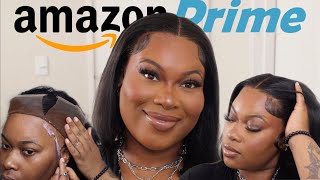
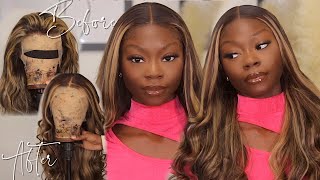
Hey guys welcome back to my youtube channel. I hope you guys are doing well in today's video i'm going to be reviewing this wig and also show you guys how i get my 30 minute highlights. Yes, quick and easy and you'll save so much time and energy. All right, so this video is sponsored by oi toy store. It'S a hair company that sells lace front wigs on amazon when they did send me this wig, i looked online and it was about ninety dollars with the coupon and right now. What i'm looking on here is ninety eight dollars, so that is a wig for less than a hundred dollars. Maybe it'll be a hundred dollars with taxes, but it is the perfect like beginner wig like if y'all just want to practice on wigs and stuff, and you don't want to invest your money too much, definitely check out this wig and y'all. I was able to get it to look really really nice like this, so the lace and everything matched my complexion really well so definitely check out this wig. If you want to practice on your hair, your beginner or you just need something: quick and easy. Um and you're on a tight budget. I think the hair is very good quality for the price that you're paying so very, very happy. I did add these blonde highlights to the wig and i'm going to show you how i do that later on in this video. So i will have this hair company linked down below in case. You want to purchase this hair and let's go ahead and get right into this. Video here is the wig fresh out of the package. Um, it wasn't thin, it didn't have a smell and they finally accompany sent me a wig cap that actually matches my head. Sometimes it's too dark um, but to get the closure to bleach the knots. You know we're going to be mixing some bleach in developer and you want to make a thick consistency so that way, it's not seeping through the lace, um and yeah. I just mixed this dirty developer with the bleach powder and i left it on for about honestly. I left it on for about 40 minutes because i was doing something else and that got it perfectly bleached, so yeah it took a little bit longer than normally. I would leave it on, but yeah. I washed the bleach out with purple shampoo and now i'm going to start doing like a soft pluck. That'S what i call it on the wig, because i don't like to pluck too much until it's on my head, because sometimes, if you do that, you can over pluck in areas that you may not have wanted to. So i just go ahead and take out the front portion like a little small section of the front baby hairs of the wig, and then i'm just going to start plucking behind it, and my method is to just keep plucking um. Don'T pluck too much in one area, keep moving the tweezers and spraying your water bottle, making sure that the wig stays nice and wet while you're doing this. So this is the next day and i'm getting ready to install the wig. I am just applying some of my medicated oil that i use because i get really really dry scalp sometimes so i put this on underneath my wig and then i'm gon na push my baby hairs back next, i'm going to be using some of the erica j's Hold me down like protective spray. This is supposed to protect you, your skin, from the glue say you break out very easily from the glue and stuff. I just spray a little bit um, where i'm going to place the glue at and let it dry. Then i'm going to be taking my wig cap and i'm going to spray some godzilli spray, where i want the wig cap to um. Stick to my skin and the good thing about the god to be spray. Is that after you spray it, it's still pliable so say you spray too low. You can always lift up the cap and cut off any excess that you don't need. I just sew on where the closure of the wig is going to lay so that way. Um the cap can stay in place. Then i'm going to cut off the excess cap and then once i get to the front of my hairline, i'm going to test the wig out to see how much cap i need left on my head, because you don't want the cap to be farther than where You want the lace to stop if that makes sense. Once i get the cap, how i want it, i'm going to apply some foundation to start blending in the cap with my skin color. At this point, i'm also going to apply foundation to the inside of the lace on the wig okay. So i did hot comb the wig on my mannequin head, because i like to use the hot comb on my head, the least amount that i need to so and now i'm gon na start applying the erika, j's watermelon glue, um right after the cap. So you kind of want to put a little bit on the ends of the cap, actually um, and i just put some on there and then spread it out evenly. Let that dry clear and then apply another coat before laying down the wig. I also like to take my comb and kind of comb, the lace down onto the glue, and then i apply a elastic headband around it and let that sit for about. I say about 20 minutes. Okay, so it's been about 20 minutes and i'm going to take off the elastic headband and i'm just going to comb the hairs and see what i'm working with i'm going to take my scissors and cut straight down the middle and then i'm going to proceed with Taking a razor to cut off the excess lace. Next, i'm going to go ahead and part out my baby hairs. You just want to take some of the hair from the front of the wig and pull it forward, and now i'm going to pluck some to make it look more. I don't know more scalp like and less less bulky right there, so i'm just going to um. Take my hot comb to make sure that everything is flat and staying out of the way, and i'm just going to pluck until i see that um, it's more scalp like and less like bulky, so you'll see me plucking. How i told you to pluck earlier, and also i'm i'm gon na, be combing out some of the hairs to get behind the next layer of hair. If that makes sense - and until i achieve the you know, look that i want so i got these tape and extensions off amazon and um. I got them in the color 613. Just to add some highlights to the hair. I had to try a few pieces before showing you guys, because i didn't know exactly how they worked, but um i'm going to show you how i put them in so you actually take one of the strips and cut them in half and you take half of The strip and stick it underneath the piece of hair and the other half you stick on top of the piece of hair and you um like push them together. But what you're going to need to do is actually take a flat iron and kind of um. Put some heat to the glue, so it could stick better because that was my issue. If i didn't take the flat iron to kind of melt the glue a little bit, it wasn't lasting. So that's how i put these in they're super simple, and they only take about took me about 30 minutes to find out where i wanted to place all the pieces, and it just gives a more custom look than just gluing a whole blonde track. Um on your wig, so i really like this method. Next, i'm going to be doing my baby hair. So i'm going to take my razor and cut off um the pieces of hair that i had in the front and i'm going to take a small flat iron and curl them under and what i learned from. I can't remember her name, but it's someone on youtube. Um i watch her video and she sprays the got to be spray on the edge control brush first and then uses that to brush out the edges once she has curled them under, and i thought like that's so smart, because if you just spray the gossipy spray Right onto the edges, it kind of makes them too wet and you lose the curl shape in my opinion, so i tried this method and i really really like it. So the tape and extensions were a little bit longer than the wig, so i just took the clippers and made them all the same length, and this is the final product i actually like it better straight than when i curled it, but i did curl it just To make sure that you know every that the hair could curl up, and you know how long the curls lasted and stuff. So i really really like this um, quick and easy highlights, and i hope you guys enjoyed this video. Thank you guys so much for watching this video. I hope that you enjoyed it. Please remember to give this video a thumbs up. Leave me a comment down below letting me know of other videos. You would like to see from me. I have gotten a couple comments and a couple: instagram dms telling me some video ideas. I really really appreciate and thank you guys for giving me that feedback and sending me um. You know stuff that i should do on this youtube channel, so i really appreciate it and don't forget to subscribe hit that bell notification button so that way, you'll be notified every time that i post a new video. Thank you guys so much for watching and i'll see you guys in my next video you
Comments
nessa elisson: I love how you show us the process from beginning to end girl also you are so beautiful… You definitely earned a new subscriber, and I’m excited to watch because we make similar content and i’ll be very interested xo
Linna_XO: Smart. Thank you!
ldpage1: Yesss love it